Replaces


Recommended for your 2003 Toyota Camry
Part Details
About TRQ:
TRQ is a trusted brand dedicated to making every repair a success story by combining premium parts with easy installation. Each TRQ part is engineered by a team of automotive experts to meet or exceed OEM standards, delivering enhanced performance and maximum longevity. With rigorous in-house testing, the brand ensures superior fit and function across every product line. TRQ also provides customers with best-in-class, step-by-step installation videos—so you can complete repairs with confidence, whether you're a first-time DIYer or an industry professional.
Product Features
Returns: Parts with electrical components cannot be returned once installed.
Attention California Customers:
 WARNING: This product can expose you to chemicals including Lead and Lead Compounds, which are known to the State of California to cause cancer, and birth defects or other reproductive harm. For more information, go to www.P65Warnings.ca.gov.
Lifetime Warranty
This item is backed by our limited lifetime warranty. In the event that this item should fail due to manufacturing defects during intended use, we will replace the part free of charge. This warranty covers the cost of the part only.
Returns: Parts with electrical components cannot be returned once installed.
FREE Shipping is standard on orders shipped to the lower 48 States (Contiguous United States). Standard shipping charges apply to Hawaii and Alaska.
Shipping is not available to a P.O. Box, APO/FPO/DPO addresses, US Territories, or Canada for this item.
Expedited is available on checkout to the United States, excluding Alaska, Hawaii.
Final shipping costs are available at checkout.

Created on:
Tools used
To remove this carpeted shield on the inside of the trunk lid, there are 13 push clips, all over here. I already removed these. I’m going to continue to remove these here, using the trim clip tool. Just kind of work them under there and pull them right out. I'm just going to put them in the trunk, so I don't lose them. Off with the last clip. This carpet is now loose. I'll slide it off. Slide the emergency handle through it. I'm going to just put it in the trunk, so it doesn't get damaged.
Disconnect the electrical connector at the trunk latch release. There is a control cable that goes to it, or control rod. When you pull this, actually, when you stick the key in the lock cylinder in the trunk, and turn it, that's what pops the trunk. So, we need to remove that. Then just pop the clip off here. Just pull it down, and pop it off. Actually, it fell right out. It sits in here in the grommet, just like that, and then locks. So, I popped it out, and it came right out.
I'm going to remove these. There's two 10 millimeter bolts up here. Get that one loose. Get this one loose. So, hold on to this piece while I remove it. Put the other bolt aside. Slide this out of the deck lid. Let's get this control rod, it has to come all the way out. The turn lock assembly is removed.
Here's the original trunk lock assembly from my vehicle. Here's a brand new one from 1AAuto.com. It is identical. It comes with this rod here, that goes to your lock assembly. It has the emergency handle on it. This is going to fit perfectly in the car. It'll work great for you.
To feed this rod back through the opening. It's going to go up and over here. Take our original bolts, slide them up. I can just see them go up through into the hole. Get this one threaded in. It goes to my ratchet, and get it tight. I'm going to stop. Reconnect the electrical connector.
Go back over here for the control rod. It's going to push into this yellow grommet, and flip it over, and lock it. Close it. I'm going to go pop it. It opened right up.
Reinstall the carpeted cover. Goes on the bottom of the ... the inside of the rear trunk lid. Push it up and over, like that. Just kind of hold it in place. It's pretty light. You can hold it with one hand. I'm going to get one of these push clips caught. Get another one caught, over here, and get one of the bottom ones caught. This middle one's good.
Thanks for watching. Visit us at 1AAuto.com for quality auto parts, fast and free shipping, and the best customer service in the industry.
Tools used
Hi. I'm Mike from 1AAuto. We've been selling auto parts for over 30 years!
Disconnect the negative battery terminal. This is a 10 millimeter nut.
Remove the intake air duct from the radiator support. These are 10 millimeter bolts. These removed, the duct should lift right out. Place that aside.
Before we can unbolt the starter from the transmission, we have to disconnect the electrical connector here, and the electrical, the main power cable here. I’m just going to put that back, push in on the lock. Sometimes you push it in first and then work it out. You might need to use two fingers. Put that plug aside.
Just take this nut off of the starter to remove the power cable. It's a 12 millimeter. Slide the cable right off. With the cables removed, I can sneak a 14 millimeter socket and extension in behind the starter. We'll reach this rear-most bolt. There's two bolts, this will be the rear one. Steady it with one hand and break it free with this one. I've got the rear one loose, so now I'm going to loosen this front one. It's loose enough that I'm just going to pull it out with my fingers. Take the socket and my extension, reach in here. I'll just turn it loose with my fingertips. Snake the bolt out here. With the bolts removed, the starter should pull from the transmission. Pull it right out of the engine bay.
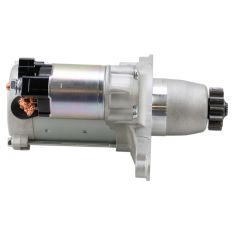
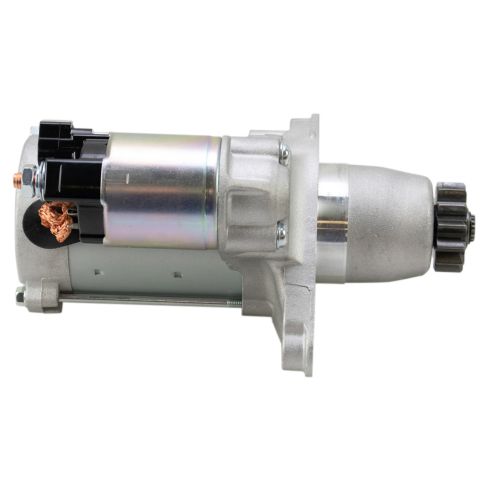
Here's our old starter from our vehicle, and our brand new one from 1AAuto.com. It's no core on this. It is brand new. See they're identical in design. It has the electrical connector here and the same size stud and nut here for the main power cable. So this should fit and get your car started again.
Feed our new starter into the engine compartment back into the transmission. Go under the shift cable, push a little bit farther back. Get this front bolt caught. This one's pretty easy to thread in, so I'm just going to thread it by hand all the way down. The rear bolt's a little trickier to get to, so I'm going to put it in the end of the socket with the extension and then just sort of carefully feed it down in here. Get it over this without dropping it. Get it in place. Just use my fingers to thread it in.
Torque the starter bolts 28 foot-pounds. I’ve got the extension and socket already in there. Just sliding in the torque wrench.
To reinstall the main power cable, the nut is on here from the factory, so we have to take off this nut and washer. Place the cable back over so those little metal tabs kind of lock in place over the square part. Push this rubber cap out of the way. 12 millimeter socket, tighten this nut up. Don't over-tighten it, because you can break the stud off here. So just bring it down. Feel like it tight. Reinstall that rubber cap. That prevents that cable that gets direct battery power from grounding out. Reinstall the electrical connector.
Reinstall your intake tube, sliding it back on to the air box, lining up the holes on the radiator support. Reinstalling the bolts. these are just bolts holding plastic into the sheet metal of the radiator support, so once you feel them get tight, just stop.
Reconnect the negative terminal. Starter installation's complete.
Thanks for watching. Visit us at 1AAuto.com for quality auto parts, fast and free shipping, and the best customer service in the industry.

STA03075