WARNING: This product can expose you to chemicals including Lead and Lead Compounds, which are known to the State of California to cause cancer, and birth defects or other reproductive harm. For more information, go to www.P65Warnings.ca.gov.
Lifetime Warranty
This item is backed by our limited lifetime warranty. In the event that this item should fail due to manufacturing defects during intended use, we will replace the part free of charge. This warranty covers the cost of the part only.
FREE Shipping is standard on Orders shipped to the lower 48 States (Contiguous United States). Standard shipping charges apply to Hawaii, Alaska and US Territories. Shipping is not available to Canada.
Expedited is available on checkout to the United States, excluding Alaska, Hawaii and US Territories as well as P.O. Boxes and APO/FPO/DPO addresses. Final shipping costs are available at checkout.
How to Replace Camshaft Position Sensor 2010-13 Toyota Prius
Created on:
Tools used
10mm Socket
Ratchet
1. Removing the Camshaft Position Sensor
Disconnect the wiring harness
Remove the 10mm bolt from the camshaft position sensor
Remove the camshaft position sensor
2. Installing the Camshaft Position Sensor
Insert the camshaft position sensor into place
Tighten the 10mm bolt to the sensor
Connect the wiring harness
Hi, I’m Mike from 1A Auto. We’ve been selling auto parts for over 30 years!
Remove the plastic cover. Cam position sensor is located on the top of the valve cover, underneath the plastic cover. You can do it with the cowl panel installed. We just have it off for other things. It also makes it easier for you to see what you're doing. I'm going to spray the connector with some water displacement oil because it is pretty dirty. It'll help me get it off.
The lock is here on this side. Sometimes you have to push the connector in and then squeeze on the lock tab. Just got to work it back and forth. Try not to pull on the wires. There it is. Put that aside. Going to remove the 10 millimeter bolt holding it in. Use a 10 millimeter socket extension ratchet. Going to wipe up some oil I sprayed in there. Need to remove this. It does have an O ring sealing it, so I got to push it kind of back and forth this way. Break it free, and then kind of wiggle it out of the opening. There it is.
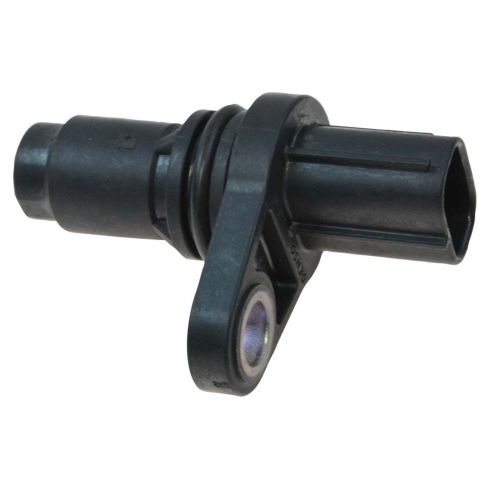
Here's our original camshaft position sensor we took out of our vehicle. And here's our brand new one from 1AAuto.com. Same exact style connector. Same design as the camshaft position sensor. This will fit great and work great for us.
Put the new one back in the same opening as the original one. O-ring might be a little tighter. Push it into place. Reinstall the bolt by hand. Use the steel bolt and aluminum valve cover. You don't want to cross thread it. It should fit in nice and easy. Just gently tighten it. Feel it get tight just stop. You don't want to crack the valve cover.
Reinstall the electrical connector. It's keyed only going on one way. It'll click when it locks in place. Put your plastic engine cover back on. These three rubber mounts just push on over these three ball studs. Apply up on the oil cap hole, and that's it.
Thanks for watching. Visit us at 1AAuto.com for quality auto parts, fast and free shipping, and the best customer service in the industry.
ESA94799
In Stock
Product Reviews
Loading reviews
Customer Q&A
No questions have been asked about this item.
Customer service
877-844-3393
Monday - Friday 8:00am - 9:30pm ET Saturday - Sunday 8:00am - 4:30pm ET
Toyota is a registered trademark of Toyota Motor Corporation. 1A Auto is not affiliated with or sponsored by Toyota or Toyota Motor Corporation.See all trademarks.
Enter Vehicle Year Make Model
Specify your vehicle's year, make and model to guarantee fit.
Year
Make
Model
Options
Drivetrain
This part doesn’t fit a . Select from parts that fit.