Replaces


Frequently bought together
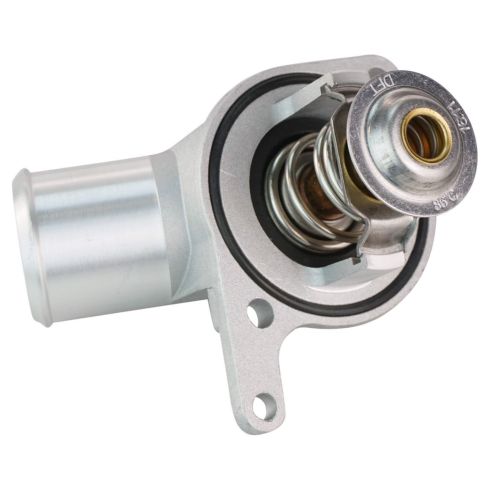
Part Details
Specifications
About TRQ:
TRQ is a trusted brand dedicated to making every repair a success story by combining premium parts with easy installation. Each TRQ part is engineered by a team of automotive experts to meet or exceed OEM standards, delivering enhanced performance and maximum longevity. With rigorous in-house testing, the brand ensures superior fit and function across every product line. TRQ also provides customers with best-in-class, step-by-step installation videos—so you can complete repairs with confidence, whether you're a first-time DIYer or an industry professional.
Attention California Customers:
 WARNING: This product can expose you to chemicals including Lead and Lead Compounds, which are known to the State of California to cause cancer, and birth defects or other reproductive harm. For more information, go to www.P65Warnings.ca.gov.
Lifetime Warranty
This item is backed by our limited lifetime warranty. In the event that this item should fail due to manufacturing defects during intended use, we will replace the part free of charge. This warranty covers the cost of the part only.
FREE Shipping is standard on Orders shipped to the lower 48 States (Contiguous United States). Standard shipping charges apply to Hawaii, Alaska and US Territories. Shipping is not available to Canada.
Expedited is available on checkout to the United States, excluding Alaska, Hawaii and US Territories as well as P.O. Boxes and APO/FPO/DPO addresses. Final shipping costs are available at checkout.

Created on:
Tools used
Brought to you by 1AAuto.com, your source for quality replacement parts and the best service on the Internet.
Hi, I'm Don from 1A Auto. I hope this how-to video helps you out, and next time you need parts for your vehicle, think of 1AAuto.com. Thanks.
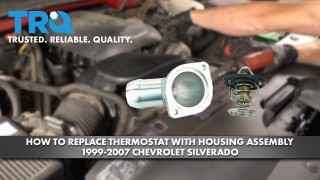
In this video we're going to show you how to replace the thermostat on this 2002 Chevy Suburban with the 5.3 liter V8 engine. It's the same part and similar process on these
Suburbans from 2000 and 2005. The items you'll need for this are a new thermostat from 1AAuto.com, flat blade screw driver, 10 millimeter socket and ratchet, drip pan, pliers, a pry bar, sandpaper, and coolant.
Start off by removing your coolant overflow bottle cap. By the driver side front wheel, go underneath in front of that, and at the bottom corner of your radiator, there is a thumb screw that goes to your radiator drain. Remove that and obviously have a drip pan underneath.
Now, loosen up this hose clamp, and this hose clamp using a flat blade screwdriver. Pull both ends of the intake hose out. Then lift it up and out. Now, using pliers, just push the two teeth together on this hose clamp. Then slide the clamp up the hose. Using a pry bar, just pry that hose free. You want to just pry back on it and pull on the hose at the same time. Now, remove this 10 millimeter bolt and the one on the bottom. We'll just fast forward as Don does that. Now, pull out on the thermostat, making sure you have a drip pan underneath. Then just pull the thermostat out the rest of the way. Use some fine sandpaper to make sure that you clean off any corrosion on the housing and then make sure that you clean up any debris really well.
On the right, is the old thermostat and housing. On the left, is the new one from 1A Auto. You can see they're identical, and they'll fit exactly the same. Take your new thermostat and feed it down into place. Then replace those two 10 millimeter bolts. We'll just fast forward as Don tightens those up. You'll want to tighten those to about 15 to 17 foot pounds. Now, push the hose back into place and then slide the hose clamp back up. If it clasped, unclasp it. If it didn't just use the pliers to slide it back up.
Then, take your intake hose, feed it back down into place and push both ends back to where they need to be. This hose needs to go underneath that radiator hose. Then, once they're both in place, just push this hose back up in. It will slip on to the side there. Then tighten up those two hose clamps with your flat blade screwdriver.
Now replace the coolant to the max fill line. Then you want to start the vehicle. Let it run for a little bit and heat up and let the coolant circle through. Then check where it's at and fill it back to the max fill line if necessary
We hope this video helps you out. Brought to you by www.1AAuto.com, your source for quality replacement parts and the best service on the Internet. Please feel free to call us toll-free, 888-844-3393. We're the company that's here for you on the Internet and in person.
Tools used
Hi, I'm Mike from 1AAuto. We've been selling auto parts for over 30 years! We're dedicated to delivering quality auto parts, expert customer service, and fast and free shipping, all backed by our 100% satisfaction guarantee. So visit us at 1AAuto.com, your trusted source for quality auto parts.
In this video, we're going to be working with our 2002 Chevy Suburban. We're going to show you how to remove and replace the thermostat on your 5.3L V8.
If you like this video, please click subscribe. We have a ton more information on this and many other vehicles. If you need this part for your car, you can follow the link down in the description over to 1AAuto.com.
Here are the items you'll need for this repair: drain pan, jack, jack stands, coolant, flat blade screwdriver, 15mm wrench, 15mm socket, ratchet, socket extension, torque wrench
Remove the coolant cap before draining your coolant or lowering the level, as with the cap off air can flow through and let the coolant drain faster.
Raise and support your vehicle. We're using a lift to make it easier to show you guys what's going on at home, but this job can easily be done in the driveway or your garage with a jack and jack stands. Place a drain bucket under the front driver side of your radiator. There's actually a little drain hose tucked up here nice and neat. We're going to flip that down and hold it over our drain bucket while we loosen the petcock, and allow the radiator to drain.
Loosen the hose clamp just after the mass air flow sensor. This is going to be the second one back from your air box. We'll do this using a flat blade screwdriver. Wiggle and twist the boot to release it from the mass air flow sensor. You may need to use your screwdriver to help peel it back here. These tend to get stuck on pretty good. We'll also remove the one at the throttle body. We'll need to disconnect the hoses from their clamps here. You can either try prying it out there, or there's also a little clamp at the bottom here that you should be able to compress, pop loose with a flat blade, and remove the intake runner from the vehicle.
Now, it's not 100% necessary to remove the upper fan shroud when doing this. You can get in there and do it without. However, it's going to make it a lot easier on us, and it only takes a moment. Plus, it will make it easier to show you guys what's going on. Should you remove it, we'll pop this hose clamp out with a flat-blade screwdriver. Remove the hose. Remove the two 10mm screws at the top of the fan shroud with a 10mm socket and ratchet. We're going to use our trim tool from 1A Auto to pop these up. You can also do it with a flat-blade screwdriver or a pair of side cutters. You don't have to remove the center pin fully. Just pop it up, and wiggle the rest of the pin out. There's one at the back on each side, like you saw there. Then, another one here up by the radiator. That one also has a twin on the opposite side. Pull back and lift out the upper radiator shroud.
Before removing your serpentine belt, make sure your vehicle has a belt path diagram under the hood somewhere. If this is missing or faded, you can just draw another one onto the plastic with something like a paint marker. Using a 15mm wrench on the tensioner, rotate the nut clockwise to slack the belt. Pop the belt off of whatever pulley is easiest for you to reach. Let the tension off the pulley and remove your serpentine belt.
Using a pair of pliers, and we do have a drain bucket set up underneath our vehicle here, release the clamp on the lower radiator hose at the thermostat housing and move it back. I like to wiggle the hoses, twist them, to try and get them to release. We'll just tuck that hose up and out of the way. Remove the two 10mm bolts on the thermostat housing. Do this with the 10mm socket and ratchet. We're just going to allow that to hang and drain out in a more controlled fashion. Remove the thermostat and housing from the vehicle.
Here we have our old thermostat that we removed from our vehicle and our new part from 1AAuto.com. As you can see, these parts are exactly the same. We have the same two bolt mounting location. It comes with a nice new O-ring. The thermostat is actually a part of the housing assembly here. The tops look exactly the same and have the same fitting for the bottom radiator hose. Now, the thermostat can fail and be an item that you replace on its own. Also, any time you lower the cooling level in the vehicle, because you're making a repair, we recommend that you replace these. Their inexpensive, easy to change, and it's cheap insurance. If you've overheated your vehicle to replace this while replacing the root cause of the problem, because a wax pellet in here is actually what allows it to expand and compress during temperature changes. If that pellet melts, your thermostat doesn't function and your vehicle's going to overheat again. If you're in there, it's likely this has failed. Their inexpensive, easy to change, and it will make sure that you can do the repair right the first time. This new part from 1A Auto will go in direct fit, just like our original equipment and fix you up right.
Install your new thermostat and housing assembly along with the two 10mm bolts. Torque these bolts to 11 foot-pounds. Reinstall the lower radiator hose and slide the clamp back into place.
Install the belt over the front grooves of the harmonic balancer or crank pulley. Bringing the right side over top of the pulley. We'll then go over top of the water pump and loop under the power steering pump, over the alternator, under the idler pulley. I'll keep this piece in my hand. Make sure that everything is seated because this one's kind of tight and you're going to want the room. Using my 15mm wrench, we'll take the tension off of the tensioner pulley, slide the belt over, double-check that our path is right, all of the belt is properly seated, and then let the tension back on.
Lift up on the upper radiator hose and reinstall the upper fan shroud. There are two little pins, one on each side, that'll help you align everything. Then, we'll reinstall our four plastic clips by popping the base in, and then locking the center pin down. Reinstall the two 10mm screws at the top. Tighten them down with a 10mm socket and ratchet. Reinstall the hoses back into their clips.
Reinstall the intake tubing. It's easiest to set it onto the throttle body. Reengage the hoses into their clips. Then, get the boot over the air box. Then, tighten down both clamps with a flat-blade screwdriver.
Refill your coolant. This vehicle uses the orange coolant Dex-Cool. Make sure that it is either pre-diluted or if you buy concentrated full strength that you mix it 50/50 with distilled water. We'll fill it up as much as it'll take, and then back our vehicle outside to finish bleeding the system while it's running. Don't be afraid to overfill it, because once our vehicle runs and gets up to temperature the thermostat will open and that fluid will all go into the engine block.
Set your vehicle with the fan on the lowest speed, set to hot in the vents so you can feel the warm air coming out of the vehicle. This will also open any bypass valves that prevent coolant from entering the heater core when shut off. This is another place that air pockets can build up. Now we'll let our vehicle run up to temp, and keep the coolant topped off in the process.
Now we just had to add just about a gallon of coolant to the vehicle once it got up to temp. Now we'll keep an eye on it, wait for it to finish bubbling, our heat to get hot, and the level to stabilize before we'll finally top off our fluid and take our vehicle for a test drive. Once your fluid is finished bleeding, and it's topped off reinstall your cap and test drive your vehicle.
Thanks for watching. Visit us at 1AAuto.com for quality auto parts, fast and free shipping, and the best customer service in the industry.

ECA92438