Returns: Parts with electrical components cannot be returned once installed.
Attention California Customers:
WARNING: This product can expose you to chemicals including Lead and Lead Compounds, which are known to the State of California to cause cancer, and birth defects or other reproductive harm. For more information, go to www.P65Warnings.ca.gov.
Lifetime Warranty
This item is backed by our limited lifetime warranty. In the event that this item should fail due to manufacturing defects during intended use, we will replace the part free of charge. This warranty covers the cost of the part only.
Returns: Parts with electrical components cannot be returned once installed.
FREE Shipping is standard on Orders shipped to the lower 48 States (Contiguous United States). Standard shipping charges apply to Hawaii, Alaska and US Territories. Shipping is not available to Canada.
Expedited is available on checkout to the United States, excluding Alaska, Hawaii and US Territories as well as P.O. Boxes and APO/FPO/DPO addresses. Final shipping costs are available at checkout.
How to Replace Automatic Transmission Output Revolution Speed Sensor 2002-06 Nissan Altima
Created on:
Tools used
21mm Socket
Socket Extensions
Flat Blade Screwdriver
Torque Wrench
Jack Stands
10mm Socket
Ratchet
Floor Jack
1. Removing the Wheel
Loosen the 21mm lug nuts with the vehicle on the ground
Raise the vehicle with a floor jack
Secure the vehicle on jack stands
Remove the lug nuts
Pull off the wheel
2. Removing the Revolution Sensor
Pry off the clips from the wheel well panel
Disconnect the sensor wiring harness
Remove the 10mm bolt from the revolution sensor
Pry the sensor up with a flat blade screwdriver
3. Installing the Revolution Sensor
Insert the sensor into place
Tighten the 10mm bolt to the revolution sensor
Connect the electrical connector
Press the wheel well panel in and press in the clips
4. Reattaching the Wheel
Slide the wheel into place
Start the lug nuts by hand
Tighten the lug nuts preliminarily
Lower the vehicle to the ground
Tighten the lug nuts to 73-86 foot-pounds in a crossing or star pattern
Hi, I’m Mike from 1A Auto. We’ve been selling auto parts for over 30 years!
Before you lift and support the vehicle, loosen the lug nuts with the wheel on the ground. Use a 21-millimeter socket and a breaker bar. Lift and support the vehicle. With the lug nuts loose, you can use the 21-millimeter socket with just your hand to finish removing the lug nuts. Remove the wheel and place it aside.
You don't have to remove this clip to get this shield out of here, but what we're going to work on is behind so we'll just make it easier for you to see. Take a flat screwdriver or a trim tool, pop this clip out, pull this aside. Replace the revolution sensor, also known as the vehicle speed output sensor on the transmission. Note it's right here. Turbine sensor is located further in, but we're going to work on the output sensor here. So let's start by pushing in the electrical, the tab on the electrical connector. Remove the electrical connector. This is a 10-millimeter bolt, remove that. Put this screw aside, so don't lose it. Grab the sensor with two hands and it should just wiggle out of the transmission. There's the sensor.
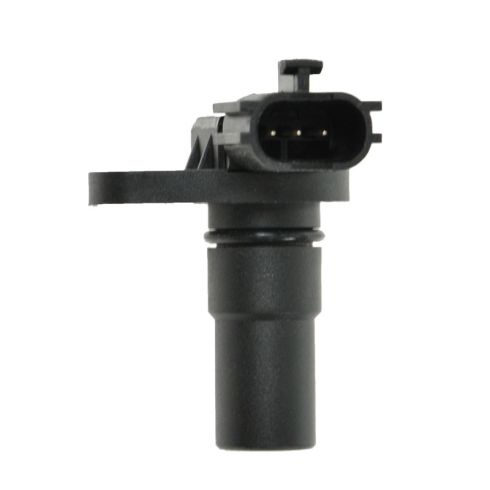
Here's our old transmission output speed sensor from our vehicle, and our new one from 1AAuto.com. You can see the same style connectors. Single mounting bolts, sealing O-ring. Same style sensor. This should slide right into the transmission and work great.
Install the new sensor straight into the transmission. That little rubber O-ring is going to give some resistance, but push it down to seat it. 10-millimeter bolt, we'll reinstall it. Get it threaded in by hand. This is just a very small bolt going into aluminum, so I'm just going to tighten it just 'til I feel it get tight, and then I'm going to stop because I don't want to break it.
Reconnect the electrical connection. Make sure you, if you're replacing these sensors, do one at a time so you don't cross the connectors. That sensor is replaced. Push our plastics back into place. Reinstall the clip.
And we install our wheel, and we'll torque the lug nuts. Just going to use the socket to get these lug nuts as tight as you can by hand, and torque the wheel afterwards once it's on the ground. Torque on the lug nuts is 73 to 86, I torque these to 80 in a cross pattern. Job is complete.
Thanks for watching. Visit us at 1AAuto.com for quality auto parts, fast and free shipping, and the best customer service in the industry.
VSA92873
In Stock
Product Reviews
Loading reviews
Customer Q&A
No questions have been asked about this item.
Customer service
877-844-3393
Monday - Friday 8:00am - 9:30pm ET Saturday - Sunday 8:00am - 4:30pm ET
Nissan is a registered trademark of Nissan Motor Co., Ltd. 1A Auto is not affiliated with or sponsored by Nissan or Nissan Motor Co., Ltd.See all trademarks.
Enter Vehicle Year Make Model
Specify your vehicle's year, make and model to guarantee fit.
Year
Make
Model
Options
Drivetrain
This part doesn’t fit a . Select from parts that fit.