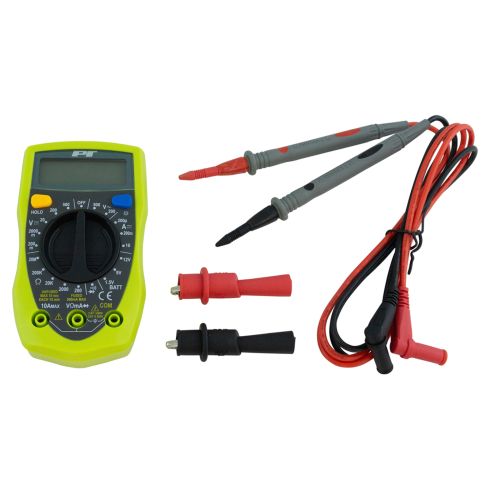
In this video, we're gonna be going over some of the functions and how to use a multimeter. The reason you might need a meter is so that you can test and diagnose electrical components in your car. There is many different meters that you could have. You could have a more expensive one or a more affordable one. Now, this more affordable one looks pretty busy. There's a lot going on on the dial. While looking at the more expensive one, it looks less busy. There's less things going on as far as the dial go. For the most part, these meters do the same thing. There is a little bit more options with a more expensive, more professional one. For the home option, this one will be fine.
There is 19 different settings on this meter. Let's break this down to three different sections. The first thing we wanna talk about is voltage. We have AC voltage over on this side which we're not gonna talk too much about that. That's just the voltage in your house and outlets and stuff, but we want automotive voltage, which is DC voltage. So what you wanna do is move the dial over to the 20 right there and it's gonna get your decimal in that place. Now, the only true difference between these different ranges just moves the decimal point. So that's just gonna give you your range. So if you stick with 20, you should be good. Depending on what you're testing, you may have to move that. You're gonna want your black lead in the common right here. Every meter is a little bit different. And then your red lead, you need to check down below where the voltage is gonna go. So that one's gonna go right there.
So this is how we're gonna test for voltage. Make sure those are in. So we'll take our black lead which is gonna be our negative lead, put it on the negative battery terminal, take a red lead, stick it on the positive, and we can check the voltage of the battery right now. That test we just did was not necessarily testing the battery. We just wanted to make sure the meter was working and the test leads were working. What I can do is a no load voltage test on the battery which is gonna test the charge of the battery.
The first thing we wanna do is turn the headlights on for one minute. That's gonna take the surface charge off the battery so that we can test it at its normal state. So now, let's just check this and we're at 12.8, 12.8687, which is good. That's the charge of the battery. Now, that doesn't mean the battery is good or bad. It just means what the charge is right now. To actually do an accurate test, you would need a battery load test tool which actually puts a load on the battery and sees how it reacts to that. But if you were testing the battery with this and you saw less than 12 volts, you're gonna wanna charge your battery.
So testing the battery is not gonna be the only reason you use this tool. You're gonna test other circuits with it. When you're testing other circuits, you take the black lead or the negative lead, put it on the negative battery terminal, and then whatever other circuit you're gonna be testing, you're gonna use the red lead and put it on the other end and you'll get a reading somewhere between 12 volts and 5 volts depending on the circuit type. Now we're gonna go over the resistance and continuity tests.
The first thing you do, put your meter on this symbol right here. And this is also a diode test. That's something different. Now, just take the two test leads, put them together just to check the meter, make sure it's working. And as you can see, you get an audible beep and then the meter will go as close to zero as possible, which is nice. So if you were gonna test the circuit, you wanna check a wire. You can have one end go right here. And we're just checking the continuity to make sure that voltage can flow through the wire. It's just gonna send a little bit of voltage through there. Now, something important when you're doing this test, you don't wanna have any power on this. So take away the battery, disconnect the battery if you're not sure, and then test the circuit. And that means that the power is able to flow through this wire. So the circuit would be good. Now, we're gonna check the resistance. Now, if you go to the 20K, that's kind of the middle point. Like I said before, when you move these, it's just gonna move the decimal point. So start at 20K. You can check the resistance of this wire, very close to zero, it's 0.01. If you check the wires themselves, the leads, test leads are 0.01, so that's pretty good.
All right. Let's say you wanted to check the resistance of a specific automotive part and you knew what the specs were, whether it's gonna be less than 1000 ohms or 1 ohm or 10 ohms, take the negative on one side, positive on the other side, and look at the meter. And this item is actually shorted so this is closed circuit. It's very close to a closed circuit, which it shouldn't be. Certain things, you can test this way, certain things, it's gonna be hard even to find a spec. What you could do is take a new one and test the new one and then test the old one and see what you come up with.
So as you can see, if I move the range, I get a different reading. Like I said, it just moves the decimal point. And this is very close to being shorted out. Now, if I was testing this, and when I went and put the leads on the terminals and the reading was like this, just like that, that's gonna be an open circuit. So that's the difference between an almost closed circuit and an open circuit.
So last, we're gonna talk about the amp setting or checking for amperage. What you wanna do is set the scale. You can move this around. Again, it's gonna move the decimal point. Depending on what you wanna do, if we were gonna do a parasitic draw, probably stick it on 10 amps. And then we're gonna move this test lead over to here. Now, you gotta be careful with this because the max you can check is 10 amps and then the meter is gonna shut down or it could even break the meter. Let's say you wanted to test this fan and the fan is below 10 amps, you know that it's below and you have a spec for it or you have a new one to compare it to. I know there's gonna be switches and relays and resistors in between this but for purpose of testing it, we're just setting it up like this. So the way you would set the meter up is, you're gonna have to break that wire right there or disconnect something, put the meter in between it. So one lead is gonna go right here, the other lead is gonna go right here, and you're gonna see how much current the fan is actually drawing. The voltage, well, on the ground side, the ground would go through here and it would come up with a reading. So when you're testing this, you could have an old fan that you're testing and it only pulls four amps where the brand new one is gonna pull two amps. The new one is a little more efficient which is good and that's a good way to compare it.
So that's one test that you can do if you needed to check the amperage of something. You could also do a parasitic draw test on this where you hook this between your car's negative battery cable and the battery and with the vehicle off, see if the vehicle is pulling too many amps and it's causing your battery to die.
So I hope this video simplifies using a multimeter for you. If you enjoyed this video, please subscribe to our channel, make sure you ring that bell, turn on all notifications so you don't miss any of our videos.
Thanks for watching. Visit 1aauto.com for quality auto parts shipped to your door, the place for DIY auto repair. And if you enjoyed this video, please click the subscribe button.