Hey friends, it's Len here at 1A Auto. Today we're going to be working on our 1996 Dodge Ram 1500, and we're going to be doing something super simple, replacing the steering shaft. As always, if you need this or any other part, check us at 1aauto.com, thanks. All right friends, we're inside the vehicle and I wanted to talk to you about something super important. Behind your steering wheel right behind here, you have yourself a clock spring. The clock spring just basically connects an electrical connector, but also makes it so you can still turn your wheel without putting your wires into a twist.
They're very delicate and they're pretty costly to replace, so I like to try to prevent damaging those. The reason why I'm worried about that is just because if you took your steering shaft off of one side or the other down there, the steering wheel isn't going to have anything holding it still and so if you were to turn this and it just spun, and spun, and spun, you could break your clock spring behind there. So, I just went with something like this, a nice little bungee cord.
They sell a special tool that you can buy if you wanted to get that as well. You do you booboo. I'm going to go with this because it's something that almost everybody has laying around, whether it's in your shed, in your truck, in your garage. Just put it around here. Then I'm going to bring these hook ends down underneath the seat and I'm just going to find a bar that's under there. You could feel around and I'm sure you could find something that you can connect those to. Put them on there real quick. Cool, all right.
That just makes it so the steering wheel can still, technically it can still move around quite a bit, but it's not going to be able to spin around. There's no way that this is going to be able to go ahead and do a 360 degree turn and potentially damage the clock spring. Let's move along. You might notice that this arm is off of the steering box. That's not part of doing the steering shaft. It's just for another video we're doing, so don't worry about taking that off. Just worry about getting this off right here.
Now we're going to take out the pinch bolt that holds the steering shaft to the steering box. It's a 13 millimeter pinch bolt. There it is. We'll set this aside so we don't lose it and we can continue. What I'm going to do here as you can see where there's this little split, that's where we're going to create a gap and it's going to help the shaft come off. Awesome. That shaft's moving around quite a bit. You can see right along here, it's starting to want to separate and it's starting to come off.
When we're trying to remove the shaft, we're giving it a couple bonks here and we're trying to get this to go up. The reason why ours isn't going up, is because the new shaft can do this. The old shaft that's been in here since 1996, it's been around a while. We're in 2019 right now, so it's not moving anymore. So as I bonk, this is not contracting like it's supposed to.
The shaft itself is definitely moving around on the box, that's ready to come off. The problem is, it's still not contracting like I was showing you before. What you could do is, you could cut the shaft if you have a cutoff tool or some torches and you weren't worried about burning anything. You could just cut the shaft and then that way you can get off the two separate pieces. You can continue trying to pry. You could unbolt the steering box from the frame itself and just try to move the steering box a little bit and at that point, hopefully you'd be able to get this loose and off of there.
Something to consider though is if you're going to keep bonking, like we've already given this quite a few bonks at this point. Every time we bonk and that shaft isn't compressing, it's sending the vibrations up into the passenger compartment to where the steering wheel and the airbag and everything else is up there. So, you could continue to cause damage further up the line by giving this those loving bonks like what we're doing here. That's something to think about.
What we could do is, we're just going to try to take out these bolts for the steering box and just see if we can move it around enough. Of course like I said, this right here may or may not be on there. If it's on, it might make it a little bit harder to try to lift it up and get it over there, but I'm sure you can finagle it around. So, let's try taking out these bolts real quick and move along.
If you are going to be taking down or moving the box around and you found that this arm was in your way, it would be much easier to just take off this cotter pin and this nut right here and break the tie rod free down here than it would be to try to take this off right here. Because once you get that nut off of there with your 34 millimeter, you'll take off the lock washer. Of course, that'll pretty much just fall off. But, then you'll have to try to separate this arm from here and that can be quite the task sometimes unless you have a Pitman arm puller.
Use our 21, I'm going to use the swivel with my half inch air gun. Anytime you're using an air gun or a swivel, make sure you're wearing your safety glasses. Put this up on here. Oh, we've got a bolt here, a bolt there, and a bolt there. All three of those go straight through the frame and then into the steering box. There's one of our bolts. That one I'm sure it looks exactly the same. I'm just going to leave these started in here for now. That's just so when I take out this last one, I'll have plenty of control over that box and it can't fall out of the vehicle. Yup, It's about the same size as that one. I can remember it.
I'll put this one aside. I'm just going to loosen these back up. I'm holding onto the box at this point. We just have that one last bolt holding it in. Aside from that, we're going to have our power steering lines. The power steering lines connect into the top of the box, so you need to remember that. I know we're taking this out right now and we're trying to get the shaft off though, but we can't let this box come dropping down because then we're going to rip out our power steering lines.
There it is. I'm just going to try to get that shaft off of there. There we are. We've got our shaft off of there. I'm just going to take this. I'm going to put this bottom bolt back in real quick. You can see it coming through the frame. I'm just going to start it into the box. There we are, awesome. All right, let me get this on here. We're using our 13 millimeter with a swivel. I'm just going to take out that jam bolt, get that out of the way. Here it is.
Okay, now we just need to get our lower steering shaft down off of the upper steering shaft. I'm just going to use a hammer. Let's see if I can help it along. Here it comes. There we go, let's bring it right up through here, and this is our problem child. Yeah, that is not doing what it's supposed to do. Time to go. I don't know if you can see right in between these two joints right there. You have your little U-joint. If your joint can do this, it is no good. This one over here feels fairly tight. You replace this as a whole unit of course.
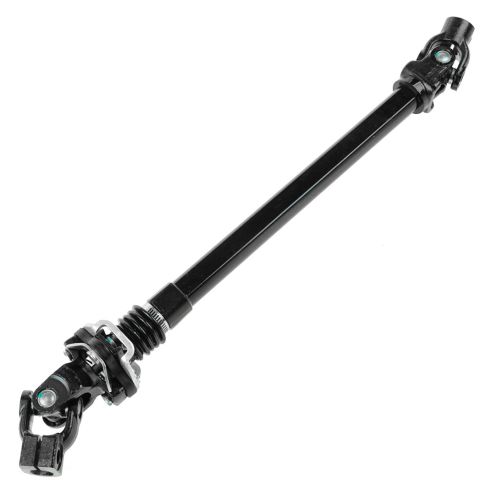
And lastly, this portion right here, it should want to go in and out. Now, either I didn't have my Wheaties today or this thing is extremely rotted and just doesn't want to move. So, here we are friends. A quick product comparison for you. Right here we have our steering shaft out of our 1996 Dodge Ram 1500. As you can tell, it's in very poor condition. Over here we have our brand new quality 1A Auto part.
Both parts when held up next to each other as you could tell, they're about the same length. If they're not, well, that's not that big of a deal because the length changes, or at least on the new one. Not so much on the old one as you saw. But anyway, to continue, you have the end that goes up to the upper steering shaft. You've got your little rubber damper here. That's great because it's going to keep the vibration down up at the steering wheel area. You've got this area right here, which just goes in and out of this area.
They made this one opposite of the original. I assume because well, the original didn't really work out very well in the long run. I don't know, it must've just held a lot of water in there and just turned to garbage quick and 1A Auto wanted to go ahead and juice it up a little bit for us and make it a little better. We have our universal joint down on this end, it's brand new. And then of course, the universal end up at this end, which is also brand new. This is a very nice part. Looks to be a quality part, and I don't see any reason why I wouldn't want to install it into the vehicle. So well, I'm going to go ahead and do it. As always, if you need this or any other part, you can check us out at 1aauto.com, thanks.
You'll notice on your ends that you have kind of like a flattened area. You've got all the little narrowed areas that go all the way around and you got the area where the bolt goes through, but then you also have a flattened out area that has no narrows. You want to pay special attention to that, because that's going to line up with the shaft that's inside the vehicle. And, you'll notice that it's the same way on the other side. Maybe it doesn't have as many narrows in there, it's kind of smooth, but there is a flat area. You're just going to line up your flat area with a flat area in the vehicle, and you should be all set. So, here we go.
It's down here. I'm just going to go right down through that. Let it down, pull this up here, there we go, okay. I can feel on the truck itself the shaft that comes out from inside the cabin. Right where the bolt's going to go through, there's kind of like a dimple. We're going to line that dimple up with the bolt holes in the new 1A Auto shaft, and then it slides right up on. It's super easy. I'm going to grab my bolt.
It's your prerogative if you want to use a little bit of threadlocker. I would say that it's a good idea. Blue would be the color of choice. If you don't have access to blue, a tiny dab of red, but definitely not a lot of red. I strongly recommend using a little bit of threadlocker, but stuff like that is always just dealer's choice like, you do you booboo. I'm just going to snug this up. Okay, torque it down.
We're going to torque this down to 36 foot pounds. There we are. I'm just going to hit one more time just for good measure. That's great, and we'll do the same to the lower one. I'm just going to give us a little blast with my Never-Seez. There we ar. Maybe a little bit extra, but the truck's not complaining. I don't hear anything. We're going to grab our steering shaft.
You'll notice that there's a flat spot on the box and there's a flat spot on the shaft. You can generally tell just by wiggling the shaft around. You should be able to feel where it lines up, and then it's going to slide right on. You might have to use a little bit of force. I'm just using my little mini hammer here and giving us a couple loving bonks. That should be pretty great. We'll grab our jam bolt for down there and we'll torque it down.
All right, what we're going to do here, we're just going to get this off. There we are. Now our steering wheel can move around. We're going to raise up the vehicle, or get underneath the vehicle and we'll get that last jam bolt in all the way. We're just going to snug this up until it bottoms out, and then we'll torque it down. We're just going to torque this down to manufacturer's specification, 36 foot pounds. I'll just check it one more time. That's tight, on to the next step.
All right, now it's time to bottom out these bolts, and then we'll torque them down to manufacturer's specifications. Let's get our 21 millimeter socket and our torque wrench, and torque these to 140 foot pounds. Here we go, let's torque these down, 140 foot pounds. All right, just double check them real quick just for good measure.
Thanks for watching. Visit 1aauto.com for quality auto parts shipped to your door, the place for DIY auto repair. And if you enjoyed this video, please click the subscribe button.