Replaces


Part Details
About TRQ:
TRQ is a trusted brand dedicated to making every repair a success story by combining premium parts with easy installation. Each TRQ part is engineered by a team of automotive experts to meet or exceed OEM standards, delivering enhanced performance and maximum longevity. With rigorous in-house testing, the brand ensures superior fit and function across every product line. TRQ also provides customers with best-in-class, step-by-step installation videos—so you can complete repairs with confidence, whether you're a first-time DIYer or an industry professional.
Product Features
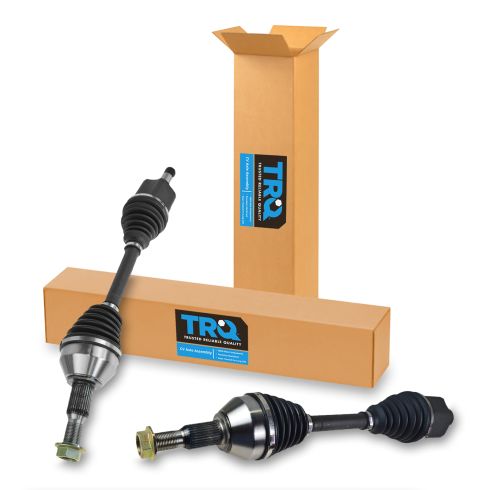
TRQ CV (constant velocity) drive axles are manufactured using premium raw materials designed to restore original performance. TRQ CV drive axles are new, so there is no core charge with your TRQ purchase. TRQ-designed drive axles utilize neoprene boots, moly grease, stainless steel clamps, and heat-treated ball tracks to ensure extended service life. Each TRQ axle is application-specific so each spline and thread will mate properly for a seamless fit. All products are fit and road-tested in our Massachusetts R&D facility to ensure we deliver on our promise of Trusted Reliable Quality.
CV axles are designed to transmit the power from your vehicle's drivetrain to the wheels while being able to flex and pivot to the demands of the steering and suspension systems. If your vehicle is making clicking noises at lower speeds or when making turns, it may be time to replace your CV axles with our 100% brand new assemblies.
Attention California Customers:
 WARNING: This product can expose you to chemicals including Lead and Lead Compounds, which are known to the State of California to cause cancer, and birth defects or other reproductive harm. For more information, go to www.P65Warnings.ca.gov.
Lifetime Warranty
This item is backed by our limited lifetime warranty. In the event that this item should fail due to manufacturing defects during intended use, we will replace the part free of charge. This warranty covers the cost of the part only.
FREE Shipping is standard on orders shipped to the lower 48 States (Contiguous United States). Standard shipping charges apply to Hawaii and Alaska.
Shipping is not available to a P.O. Box, APO/FPO/DPO addresses, US Territories, or Canada for this item.
Expedited is available on checkout to the United States, excluding Alaska, Hawaii.
Final shipping costs are available at checkout.
Created on:
Tools used
Hi, I’m Mike from 1A Auto. We’ve been selling auto parts for over 30 years!
With the vehicle on the ground, you can use a breaker bar and a 22 millimeter socket to loosen the lug nuts. Raise and support your vehicle with a jack and jack stands. We're using our two post lift. Use the socket and finish removing the lug nuts. It's seized to the hub. Take a couple lug nuts, just thread them on lightly, use your dead blow or a rubber mallet, hit on the tire, and it'll knock it free. Lug nuts will keep the wheel from falling off. Now that it's loose can you can finish taking the lug nuts off. Support it so it doesn't fall.
To remove this axle nut, there's no cotter pin but it is on there with a lot of torque, so what I like to do because when you go to try to remove it with the wheel off and the vehicle in the air, it's just going to spin on this brake router. If you have a second person hold the brake for you while you try to break it loose, sometimes the vehicle can be unstable on the jack stands if you're really wrenching on it with a long breaker bar. I like to take the wheel, we'll pop the center cap out with the wheel off. So it just pops out from behind just like that. And then we'll reinstall the wheel.
I'll have access to the nut. I can lower the vehicle on the ground with the vehicle's weight on the wheel and tire and loosen the axle nut. I'm not driving the vehicle anywhere, I'm just going to put four of the six lug nuts on it, and then I'm going to snug them down. I'm going to lower the vehicle to the ground and remove this axle nut. So I'm not worried about torquing these lug nuts.
Spray some rust penetrant on here. Help the axle nut come off those threads. Using a 34 millimeter socket on a long breaker bar, going to loosen the axle nut. That broke free. I'm going to switch to a long ratchet so I can along a bit quicker. I'm not going to take it all the way off but I do want to loosen it enough so that when the vehicle's in the air I can just spin it off by hand and won't give me any troubles. Leave it just like that.
Remove your wheel once again. One thing you want to check before you remove anything else is that this axle's going to come free from inside the knuckle so you can kind of push on it and it is moving so these CV axles will have in and out play, so that's a good sign that this will come out of here once I loosen all this up and move it out of the way.
If need be, you can spray some rust penetrant in here and then with the nut on here hit it with a dead blow. Tap on it just like this. Course a lot harder. You want to leave the nut on here because if you take the nut off, you run the risk of damaging the end of the shaft and could even mushroom it out that would make it difficult to remove. So at least the nut on here helps protect it. Going to loosen and remove the brake caliper and hang it off the strut spring.
Using a 13 millimeter wrench, there's two upper and lower caliper slide bolts. Loosen them up. Slide the caliper right off. Don't need to disconnect the hydraulic line. It needs a pry bar. Just pry it up a little bit. Brake pads are new so it's on here fairly tight. Then we'll hang it up here from the strut spring. Do not want to let it hang from the rubber hose, you'll damage it.
Remove the wheel speed sensor 'cause once this knuckle is free from the strut the wheel speed sensor wire's connected to the strut, I don't want to pull on the wire and break it. There's a 10 millimeter bolt in here. Loosen it up. Grab onto the base, the wheel speed sensor, and work it back and forth. Work it out of the knuckle. There it is there. Slide it up and out of the way.
Strut bolts: the head of the bolt is a 21 millimeter, the nut is a 24 millimeter, so I'm going to counterhold it with a 21 and I'll work on loosening the nut with a 24 millimeter wrench. Get this free. I'm going to use some rust penetrant on here just to help it come off, same for both of them. Just going to use a long ratchet with a 24 millimeter socket to speed up the process.
To get these out, I'm going to put the nut, thread it back on, and I'll take a hammer and just tap them out. I'm going to do the same for the other one. Our knuckle will come loose. Push it apart. I'm going to take the nut off here, I'm going to do my best to get the axle out. These brake pads seem like they're going to fall out, can take them out if you need to. Can put the nut on here and tap it a bit. Now let's try to separate this. There it is. The axle shaft goes up into this little output shaft area here. Going to reach up carefully with a pry bar, try to get it as close to the axle as I can. Hold onto it and pry it out.
There it is. I just had to bounce it a couple times. Reach up here and grab onto it. Pull it off. Brand new one from 1AAuto.com. There's no core charge on this, it doesn't need to be returned. It's a similar design. Comes with a new axle nut. This'll work great and fit great in your vehicle. You can reuse this metal washer, just going to gently pry the tabs up, there's three of them. There, got one underneath here and gently slide it off of the CV axle. I'll take the nut off of this one, slide this onto here, and reuse that.
Going to guide it up into place in the splines. There's a locking washer up there that's going to have to slide over. Get it up in here, push it in place, and leave it right there. Can lift it up, I can give it a couple tap with a dead blow to make sure it's seated. I think that's seated nice actually, you pull on it, it won't come right off 'cause it's locked. Don't pull on it too hard 'cause there is some give in this shaft. Nope, that's locked in place. Perfect.
Feed the axle shaft into the knuckle. Push this in a little bit, going to bend it down, and get that lined up. Might have to turn it a little bit, and get the splines to line up. Pull this in just like that. I'll put the new axle nut on there. I won't tighten it, just enough so that it doesn't fall out on me. We'll leave it like that for now. We'll lift this up in place, if need be you can put a little floor jack under here. Get it up. Get the bottom started, get it slid up into place. That's good. Get the bottom one. Okay. I'm going to tighten the nuts down and draw the bolts in. They feel like they're lined up with the splines but it's not super big deal to get them lined up perfectly and these will just draw themselves in. We'll come back and torque them. I'm going to torque these nuts on the strut bolts to 144 foot pounds. Once it clicks you're all set. Do the same for both.
Don't forget to reinstall your ABS sensor. I put the bolt on there so it wouldn't get lost. I'm going to take it back out. Slide the sensor in place. Just going to wiggle it down in. There it is. Reinstall the bolt. It's just going into an aluminum knuckle, holding a small plastic piece in so I'm not going to tighten it very much. I don't want to break it off or strip the aluminum. Just feel it get tight, I'll just snug it up. Put the caliper back on and unhook it from the bungee cord. Don't forget to take your bungee cord out of here when you're done. I've also got the brake line coiled up here. I'm going to uncoil it, slide it over, it should fit right back on 'cause this came off of here. Put it right back on.
Reinstall the caliper slide pin bolts. Line them up, that one threaded in, thread in the top one. Tighten them up. Just get them snug and then torque them. Torque these caliper slide pin bolts to 47 foot pounds. Once it clicks you're all set. I'm going to see if we can snug this axle nut down. See how far how I can go before the axle starts to turn. It should go pretty far. This axle nut actually has a couple indents in it—it's self-locking so there won't be any cotter pin, the only thing that'll be holding it on will be the high torque it has.
Don't forget to take off your bungee cord. It'll get hot in your suspension and probably make a bad noise. I touched the router surface with greasy gloves. Want to make sure the surface is nice and clean so I'm going to take some brake parts cleaner and clean it off before I put the wheel back on. Reinstall the wheel. I'll snug them up and torque it with the vehicle on the ground. Lower the vehicle to the ground. With the vehicle on the ground, torque the lug nuts to a 140 foot pounds in a cross pattern. Once they click you're all set. Torque the axle nut to 173 foot pounds. When you're done you can reinstall the center cap, it'll just pop into place.
Thanks for watching. Visit us at 1AAuto.com for quality auto parts, fast and free shipping, and the best customer service in the industry.
Tools used
Hi, I’m Mike from 1A Auto. We’ve been selling auto parts for over 30 years!
You're going to loosen the lug nuts with the vehicle on the ground so the wheels and tires don't move on you. Go around and loosen all of them. Raise and support the vehicle. We've used our two post lift. But you can use a jack and jack stands. Finish removing the lug nuts and remove the wheel.
To remove this axle nut, there's no cotter pin. It's just a lock nut with a large amount of torque on it. But you want to be able to remove it. You can either have someone hold the brake because this will want to spin as you try to remove it or we can pop up the center cap of the wheel. Reinstall the wheel, lower the vehicle back down to the ground, with the vehicle's weight on it, and loosen the axle nut.
To remove the center cap, it just pops out from behind. We'll just put that aside. Reinstall the wheel. You don't have to put all the lug nuts back on. Since we've got six, I'm just going to do four of them. We're just going to put the wheel back on so it's flush, and we put the vehicle down on it. Let's spray some rust penetrant on here to help the nut come off. Use the long breaker bar and 34 millimeter socket. Break this loose.
To help me take it off, I've switched to a ratchet. I'm going to remove it just to the end of the threads. This way, when the vehicle's in the air, I'll be able to spin it off. It won't want to turn on me. Leave it just like that. We're going to spray some rust penetrant in here on the spline. You want to make sure that this CV axle will come loose from the wheel bearing and knuckle. So I'm going to tap on it.
You want to tap on it with the nut here because this way. Actually, I'll spin this down so it's flush on the end of the axle shaft. You don't want to damage the end of the axle shaft. So by tapping on it with the nut, it'll prevent you from potentially mushrooming out the end of the axle shaft if you want to reuse it. There should be some in and out play on this, and I just want to make sure that when I loosen this knuckle and pull it down that the axle shaft will actually come free. So I'm just going to tap it some more.
We're going to loosen the knuckle and tilt it down from the strut. I don't want to hang it by the rubber brake hose. So I'm going to remove the caliper and hang it from the strut. You're going to use a 13 millimeter box wrench to loosen the caliper slide bolts. There's one on the bottom and the top. Put those aside. Slide the caliper off the brake pads. Grab a bungee cord. You're going to put it around the strut. This one's a bit long. Give it a couple loops here.
Use a 10 millimeter socket extension ratchet and remove the 10 millimeter bolt holding in the wheel speed sensor. The wire clips to the strut and then bolts into the knuckle. I don't want to stretch the wire and break it when I remove the knuckle from the strut. So we're going to get this ABS sensor out of the way. Unthread the bolt. Twist it. It's kind of stuck in there. Twist it back and forth. Don't pull on the wires. Work it back and forth and then wiggle it out. We'll put that up here out of the way.
You're going to remove the strut bolts and the head of the bolt is 21 millimeters. The nut is 24 millimeters. I'm going to turn on the nut to remove that. The bolt is also splined and caught in the aluminum knuckle. So it shouldn't move. But I do want to cotter hold it just in case it does move. So we'll break this one free. Use a breaker bar. Cotter hold it. Break it free. Careful not to smash the fender. Once they're loose, you could switch to a ratchet and remove them a little quicker. We’re going to leave the nuts just like that.
I don't want to damage the end of the bolts because I do need to tap them out. We're going to take a hammer and just tap these out. We'll take the nuts off. We'll push in on the knuckle a little bit. Take the bolts out and this should want to slide down. Tap the axle knuckle. Just a little seized up in there. So tap it a little more. There is it. Pull the CV axle out of the back of the knuckle. There we go.
You can use a large pry bar. Carefully pry on the edge of the CV axle against the transmission case. This CV axle will pop out of the transmission. You may lose some fluid. You might want to have a little drain pan here and then of course, at the end, just check and top off your transmission fluid. So sometimes if you give it a couple, a little bit of a bouncing, you might have to go up this way. See that I don't pry out that hose. Go this way with it. Pry at it. It comes off the snap ring.
I'm going to switch over here. I'm going to pull it straight out. So there's some transmission fluid coming out. I don't want to damage the seal on the transmission and support it. Pull it straight out. Pull on the cup. You don't want to just pull on this. You might separate it. So there we have it. It's dripping some fluid, but we'll clean that up and top it off afterwards.
Here's our original CV axle we pulled from our vehicle and our brand new one from 1AAuto.com. There's no core charge on this. It's brand new, ready to go. It's the same style and design as the original. This'll fit great and work great for you. It comes with a brand new locking nut.
We need to swap over this little washer. It's got three tabs. We're going to gently pry up on them with a small, flat-bladed screwdriver. Pull that off real quick. Take this axle nut off. Put the new washer on. It's ready to be installed. Just go in here with a rag. I'll just clean that seal a little bit. It's going to keep leaking. Basically, you want to go straight in with this, not damage the seal.
You're going to have to turn it and find the splines. It's going to get to a point where it's going to want to stop because it's hitting the lock ring. Take our dead blow. We're going to hit it into place. There it goes. Now it's locked in place. We'll use some brake parts cleaner and clean up the spilled oil. That way, we can tell if there's leaks later on. Just going to clean off some of this dirt here.
Going to reinstall the axle. You can bend it, and then we're going to lift up on the knuckle and you might have to turn this to get the splines to line up. It should slide right in. Put our new axle nut on here. You don't have to tighten it all the way down. It is a locking one. You can see the little indents there. Let's just get it down to end of the splines. That way, it doesn't fall out.
Let's get our strut to knuckle bolts ready to go. Those are those splines I was talking about. Line them up. You can use a jack if you need to. But you want to lift this up, get it into place. Bolt goes through from the back. Get that out of the way. Do the same for the other one. You might have to push on it to get it to line up. They'll kind of collect into those splines that are in there. You can give them a little tap if you want to. But the nuts will draw them in. So we'll snug these up and then torque them afterwards. I'll do the same for both of them. Torque the nuts to 144 foot pounds. When it clicks, you're all set.
Reinstall the ABS wheel speed sensor. It'll slide back into the opening. Reinstall the bolt. Get it threaded in by hand. It's just a steel bolt going into aluminum knuckle. Just gently tighten it up. I don't want to break it off or strip. So once I feel it get tight, I'll stop.
I'm going to reinstall the brake caliper. Just unhook it from our bungee cord. Don't forget to take it off when you're done. Put the brake caliper back on. It should slide right back on because we haven't changed the brake pads. Reinstall the caliper slide bolts. Snug these up and then torque them afterwards. Torque these to 42 foot pounds. Once they click, then you're done. I'll just tighten this nut down until it stops and then lower the vehicle on the ground and we'll torque it. Don't forget to remove your bungee cord. I touched the brake rotor with greasy hands. I don't want that getting on the braking surface. So I'm going to use some brake parts cleaner. Just clean it off.
Reinstall the wheel. Lower the vehicle to the ground and torque the axle nut. You're going to torque the lug nuts in a cross pattern to 140 foot-pounds. We’re going to torque this axle nut to 173 foot-pounds. When you're all set, simply push the center cap back in place. In a well ventilated area, we're going to start it up and run the vehicle until it comes up to temperature so we can check the transmission fluid. With the vehicle up to temperature, the transmission fill and dipstick is down here. We're going to turn it counterclockwise to unlock it. It'll pull straight up. The dipstick's on the end. You're going to wipe it off and put it back in. So that's actually low.
Let me just check it again. Turn it in and it'll unlock it. Pull it out. So, yes, that is, in fact, low. It's not even showing on the stick. It's very, very low. We're going to use a long funnel and add the appropriate amount of transmission fluid. I'm going to take the funnel out and just check the amount. Reinstall the dipstick. So right there, it's at the max line. That's perfect. You're going to reinstall the dipstick and the cap. Turn it clockwise to lock it in place and clean up any spilled fluid.
Thanks for watching. Visit us at 1AAuto.com for quality auto parts, fast and free shipping, and the best customer service in the industry.

CSA82448