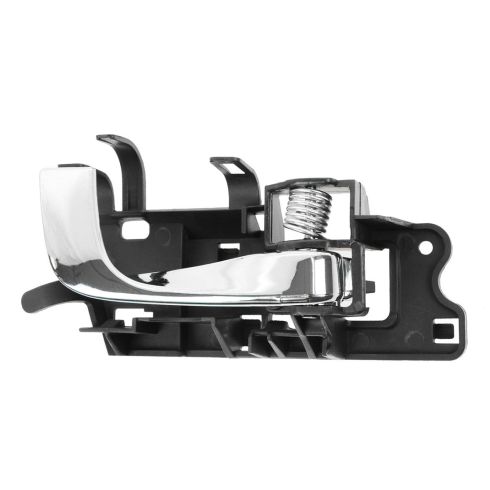
This replacement interior door handle is just what you need to get your vehicle in good working order again!
Specifications:
RH (Passenger Side) Front or Rear Door
Replaces dealer part number: 25759728
Injection molded plastic
Black and Chrome finish
Built to strict quality control standards
This interior door handle is a great replacement and has good cost savings over a dealer unit.
Handle is the original color shade.
Pro Tip: Replace Handles in pairs or sets. Fading from the sun or age can make your Vehicle Handles and Bezels appear a hue difference next to new Handles.
Item Condition:New
Lifetime Warranty
This item is backed by our limited lifetime warranty. In the event this item should fail due to manufacturing defects during intended use, we will replace the part free of charge. This warranty covers the cost of the part only.
FREE Shipping is standard on Orders shipped to the lower 48 States (Contiguous United States). Standard shipping charges apply to Hawaii, Alaska and US Territories. Shipping is not available to Canada.
Expedited is available on checkout to the United States, excluding Alaska, Hawaii and US Territories as well as P.O. Boxes and APO/FPO/DPO addresses. Final shipping costs are available at checkout.
How To Replace Broken Inside Door Handle 2003-07 Cadillac CTS
Created on:
Tools used
Socket Extensions
Phillips Head Screwdriver
Putty Knife
10mm Socket
Door Panel Removal Tool
Ratchet
Cloth Rags
1. Removing the Door Panel
Wrap the blade of a putty knife with a rag
Pry off the door handle bezel with the putty knife
Disconnect the door lock wiring harness
Pry off the manual lock button with the putty knife
Pry off the trim piece inside the door pull the putty knife
Remove the two Phillips head screws behind the door pull
Pry out the door panel by hand
Lift the door panel up and off
2. Removing the Door Handle
Remove the 10mm bolt from the door handle
Slide the door handle forward
Unclip the latch rod from the door handle
3. Installing the Door Handle
Clip the latch rod onto the door handle
Slide the door handle backwards
Insert the 10mm bolt into the door handle
4. Installing the Door Panel
Lift the door panel into place
Line up the door panel using the locating pins
Push in the door panel clips
Insert the two Phillips screws behind the door pull
Push on the door panel trim piece
Slide the door handle bezel on
Connect the door lock wiring harness
Push on the door handle bezel
Push in the manual door lock button
Brought to you by 1AAuto.com, your source for quality replacement parts and the best service on the Internet.
In this video, we show you how to remove and reinstall your front inside door handle on this Cadillac CTS. We do the driver's front door. It's pretty much the same for all four doors. Tools you'll need are a putty knife or a similar flat blade tool, a Philips screwdriver and a 10mm socket with a ratchet and extension.
I use a little household putty knife. Take a paper towel and just wrap it and then you're going to put it up in, underneath and pry up and pull out on this handle. Then up in here, pry up and pull out. The handle comes out.
Behind here, there's a little tab. Pull up on that tab and pull the lock connector. Make sure to leave it unlocked. Pull that off. Then this bezel just comes right off. Carefully, just use the very corner right here on your lock button. Pry out very lightly. This thing comes right up and off. Then again, just carefully, there's a little plug right in behind your door pull here, and inside that plug two Philips screws. We'll speed it up here as we're just removing those two Philips screws. Once those screws are out, start up here at the top and pull. Work your fingers in behind and just give little sharp pulls, tugs. That's out and off.
To remove the inside door handle, there's a 10mm bolt right here. Remove that. The panel slides forward. It comes off and then it just goes down and off of the rod like that.
Take your inside door handle, put it face down. The lock goes like that, right up and in. Put it in the door and push it backwards. Put your bolt back in. It has larger line-up pins here and down here that go into holes. Basically just line that one up there. Line that one up there. Push the top on. Line that clip up. Make sure you can look down and you can see the connector going together. Now put in our two Philips screws. Again, we'll fast forward just to speed through putting those screws in. You want to get them tight. They don't have to be extremely tight, but you want them nice and firm, so they hold the door panel in place well. This trim plate just goes back in and pushes into place. Put this panel back on your door handle, reconnect your lock switch. Just put it back into place. It locks in. Then last but not least, for the lock button, put it down until that touches there and push in the lock.
We hope this video helps you out. Brought to you by www.1AAuto.com, your source for quality replacement parts and the best service on the Internet. Please feel free to call us toll-free, 888-844-3393. We're the company that's here for you on the Internet and in person.
81833
In Stock
Product Reviews
Loading reviews
There are no reviews for this item.
Customer Q&A
No questions have been asked about this item.
Customer service
877-844-3393
Monday - Friday 8:00am - 9:30pm ET Saturday - Sunday 8:00am - 4:30pm ET
Cadillac is a registered trademark of General Motors Company. 1A Auto is not affiliated with or sponsored by Cadillac or General Motors Company.See all trademarks.
Enter Vehicle Year Make Model
Specify your vehicle's year, make and model to guarantee fit.
Year
Make
Model
Options
Drivetrain
This part doesn’t fit a . Select from parts that fit.