Replaces


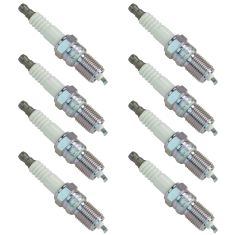
Recommended for your 2000 Ford F150 Truck
Frequently bought together
Part Details
Specifications
Returns: Parts with electrical components cannot be returned once installed.
Lifetime Warranty
This item is backed by our limited lifetime warranty. In the event this item should fail due to manufacturing defects during intended use, we will replace the part free of charge. This warranty covers the cost of the part only.
Returns: Parts with electrical components cannot be returned once installed.
FREE Shipping is standard on Orders shipped to the lower 48 States (Contiguous United States). Standard shipping charges apply to Hawaii, Alaska and US Territories. Shipping is not available to Canada.
Expedited is available on checkout to the United States, excluding Alaska, Hawaii and US Territories as well as P.O. Boxes and APO/FPO/DPO addresses. Final shipping costs are available at checkout.
Created on:
Tools used
Brought to you by 1AAuto.com. Your source for quality replacement parts and the best service on the internet.
Hi. I'm Mike Green. I'm one of the owners of 1A Auto. I want to help you save time and money repairing and maintaining your vehicle. I'm going to use my 20 plus years experience restoring and repairing cars and trucks like this to show you the correct way to install parts from 1aauto.com. The right parts installed correctly. That's going to save you time and money. Thank you and enjoy the video.
In this video, we'll be showing you how to replace the spark plugs and plug wires on this Honda Accord V6. Process is similar for most Honda V6s. Tools you'll need are a five eighth inch spark plug socket, an extension and ratchet and maybe an extendable magnet.
Replacing spark plugs and wires on these Honda V6s is actually a pretty easy job but it's also kind of easy to mess up. Many times I've heard people say, "I took all the wires and plugs out and then I put it all back together but now my car doesn't run right." That's because you have to put everything back together correctly. The key is just do them one at a time. Take one wire off and one plug off, put the plug back in and put the wire back on. Very easy to work on like I said; all these six plugs are accessible.
On the rear, you can easily see, they're all very easy to get to. What you want to do is you pull the plug out over to here and then you give it a good twist. While you're twisting, pull it up and out. That's your plug wire. You'll need a five eights spark plug socket and an extension and put it right down in there and then just take the plug out. Once it gets easy to turn, it's usually a pretty good sign that your plug is all the way out and if you have a good socket you should be able to pull it up and out. My socket is a little worn out so my plug stayed down in there.
So a good tool to have around is a little extendable magnet which goes right down in and pulls the plug out. Actually, you can see somebody that did this before. It looks like they put a little bit of a paper towel around it to hold it into their socket probably. So you got the plug out and if you're replacing the wires at the same time or if separately. Now, you want to just take the whole wire off and, again, here at the distributor, twist and pull and then the wires on this car are actually fairly new so I'm not going to replace them, but you would not put your new wire on right in place because you have to make sure that you put each wire back on the same spot on the distributor. That's why you don't want to just take them all off and then try and put them back on, you just do them one at a time. Always route the back the way they were originally.
Before your installing your plugs, you want to check the gap and according to the sticker that's on the hood, right there, it tells you what kind of plugs to have and it also tells you what the gap is supposed to be. I'm sure you can't read it, maybe you can, but it says the gap is 1.1 millimeters which translates into .044 inches. I have a little gap tool and .044 just barely gets through there. That's set correctly. You might have noticed I've skipped through a different hole, but a good way to put these plugs back in is actually with a little bit of glue. Just put a little glue on there because my socket is worn and it won't hold on to the spark plug. A little bit of glue makes it so the spark plug sticks in there. You get it down in, start turning.
You always want to make sure you could turn it by hand first because if it's difficult to turn at all then you might be cross-threading is and you don't want to do that. Okay, tighten it. You want them snugged but not too tight. Put the spark plug wire down in there, make sure it clicks. Make sure you put the wire back into its correct spot.
We hope this helps you out. Brought to you by www.1AAuto.com, your source for quality replacement parts and the best service on the internet. Please feel free to call us toll free, 888-844-3393. We're the company that here's for you on the internet and in person.
Tools used
Tools used
Brought to you by 1AAuto.com, your source for quality replacement parts and the best service on the Internet.
Hi, I'm Mike from 1A Auto. I hope this how-to video helps you out, and next time you need parts for your vehicle, think of 1AAuto.com. Thanks.
In this video, we're going to change the spark plugs on this 1996 Tahoe with a 5.7 liter Vortec motor, same engine and same procedure for any Chevy or GMC pickup, Tahoe, Suburban or Yukon with this body style. We don't show you every plug. We show you the general best practice that we have, as well as really the number three plug is probably the hardest one. You need a couple of special tools. The tools you'll need are a ratchet, a 5/8 inch spark plug socket, as well as a 5/8 inch regular socket. You'll need a 6 inch and 12 inch extension, and you'll also need a flexible joint.
I'm looking at the driver's side. I've got the vehicle lifted up so that the tire is as far down as possible. Actually, if you take a pair of needle-nosed pliers and carefully pull out these clips, you'll be able to see this is your best shot right at all the spark plugs. You can get these from up top as well, but this is your straightest and really your easiest shot. Just to further explain here, on these trucks you can fairly easily go from the top and reach all your spark plugs, but quite honestly, I find it a whole lot easier on my back just to jack up the truck a little bit so that the wheel is all the way down in its travel. Then pull out these flaps on the side and then you have a pretty straight shot from the inner finder and I always find it easier to do something kneeling down rather than trying to bend over or standing on a stool over the fenders and front end and stuff. That usually makes my back spasm, so I find it a whole lot easier to do it going in from this way.
Now, obviously, to replace a plug, reach in there, be careful if your engine is warm. It's better to do this with the engine cold. I'm just reaching in and trying to turn the boot on the plug a little bit and pull at the same time. That comes off. Now you want to use a 5/8 inch plug socket. This is a 12 inch extension. It will get you right on a plug. It keeps your hands out here on the inner fender. Once you loosen them, they should come out pretty easily. Now, I'll I just speed it up here as I remove that. That first one is a pretty easy one.
Most of the time on your truck, you're going to have a sticker on this, and you're can see right there it says spark plug gap 0.060.We take our new plug, it's our 0.060. I can tell it's pretty closed here. I'll use this to open up the gap a little bit. I'll open it up there until it slides through there with a little bit of friction, just like that.
Now, fast forward as we load the plug up into our plug socket and then start it out by hand first. You always want to make sure that the plug starts in and turns easily by hand before you put a wrench on it. Then the plug should be torqued to 20 foot-pounds. Actually you can see the best strategy for this next one is just a regular 5/8 inch, deep socket because, the spark plug kind of angles down right at the steering shaft and that heat shield gets in your way. The next plug is the number three plug. That's the second one from the front on the drivers side. It's basically the toughest. What you want to do, is use your regular spark plug socket on there. You want to use a regular 5/8 inch socket. Basically what I'm doing here is I'm putting the socket onto the spark plug first. There you can see the socket's on the spark plug. Then what I'm going to do is put a universal or a flexible joint on the end of my extension and then get that in there. That is really the best way to get to that spark plug. After that, the number five, which is the third one from the front, is pretty much the same or actually it's pretty straight forward. When you get to the rear plugs on each side, you just want to use a shorter extension, probably a six inch extension because the inner wheel well's in the way. You can see on the passenger side it's just even easier. There's less obstruction without the steering shaft and you can go right in there.
We hope this video helps you out. Brought to you by www.1AAuto.com, your source for quality replacement parts and the best service on the Internet. Please feel free to call us toll-free, 888-844-3393. We're the company that's here for you on the Internet and in person.
Tools used
Brought to you by 1AAuto.com, your source for quality replacement parts and the best service on the Internet.
Hi, I'm Mike from 1A Auto. I hope this how-to video helps you out, and next time you need parts for your vehicle, think of 1AAuto.com. Thanks.
In this video, we're going to show you how to replace the spark plug in this 2005 GMC Savana 2500. The only tools you're going to need are a 10 mm socket, a 5/8 socket, and a ratchet.
To start it off, go to the driver side of the vehicle, and you'll see there is a panel right here and you're going to want to remove these two 10mm bolts that secure that panel, and also you'll see that there is a latch back here. Pull that back towards you, and it should unhook that clip there and then you just want to remove those bolts. We'll just fast forward as he does this. Now with the bolts removed, you can just pull on that panel. Just reach underneath it and pull it out. Be careful not to pull out the panels above it. Now, on the other side, again, there are two more 10mm bolts securing the panel. You want to just remove these two 10mm bolts and also, like on the other side, you want to pull back this clip and unlatch that. We'll fast forward as he removes these two 10mm bolts. Now, you just want to pry this panel off. It'll pry off pretty easily.
Now in the center of the center console underneath, there are two more of these latch clips, and what you want to do is you want to just push up on the clips and free them, and then once you have these unlatched, just lift up and pull forward. It'll pull right out. Now, to make more room for yourself, the engine is behind this panel, so what you can do is you can see you can't come out of this vehicle; the seats are in the way. The seats are only a few bolts if you want to remove them, but if you just want a little bit more room to save time, what you can do is you can just remove this. You see these four 10mm bolts inside this panel, you just want to remove those. With those bolts out, you can now pull that panel up and off, and remove that little top piece, and now with the overall access panel being shorter, you can push it under the dash. Now, you can access those spark plugs and ignition coils. We'll push it under the driver side. Now, you can see the other spark plugs and ignition coils.
Now, we're going to just show you how to change one spark plug, but they're all the same pretty much. You just want to pull out the spark plug wires and stick your 5/8 socket up into the hole there and just start twisting out the spark plug.
Now, with your new spark plug, you want to use a gap tool, and you just want to make sure that the gap on the spark plug is the right size. In this case, we would want .060.
Now, to install the new spark plug, you just want to put it into the socket, and then feed it down into the hole and twist the spark plug in by hand. It's a lot easier to line it up this way. You just want to twist it until it's firm and then reattach your ratchet and tighten it the rest of the way. Most of the plugs are reachable from the back. As an alternate, some of the front ones you may want to go in through the wheel well. That may be able to give easier access, but you want to plug the wire back in and then repeat seven times for the other plugs.
So, to put the panel back together, what you want to do is you put that top piece on and line up the access panel, and you just want to keep pushing it back into place, and what you'll see is you'll see those clips have to line up. There are hooks on the van, on the floor of the van that you need to line the latch hooks up with. Once you have it lined up, you just want to start connecting all those latches. So, just hook on to the hook. Pull the tab and lock it, and you want to do that with all four of them. Now, you can replace the cup holder panel, so put it into place and place those four 10mm bolts. It helps if you do it by hand. You can hold onto it, line up all the bolts. Just start it out by hand and then we'll fast forward as he uses the ratchet to tighten them the rest of the way. Now, you can put on that little panel right there. It just clips into place. Now, replace the panel underneath the driver side. Just push all the clips in. You should hear them snap, and then you just want to replace those two 10mm bolts, and we'll fast forward as he does this. Now, you just want to push that panel into place. On the passenger side, you just want to line up the clips, push it in, and then replace these two 10mm bolts, and then you're all set.
We hope this video helps you out. Brought to you by www.1AAuto.com, your source for quality replacement parts and the best service on the Internet. Please feel free to call us toll-free, 888-844-3393. We're the company that's here for you on the Internet and in person.
Tools used
Brought to you by 1AAuto.com, your source for quality replacement parts and the best service on the internet. Hi, I'm Mike Green. I'm one of the owners of 1A Auto. I want to help you save time and money repairing and maintaining your vehicle. I'm going to use my 20+ years' experience restoring and repairing cars and trucks like this to show you the correct way to install parts from 1AAuto.com. The right parts installed correctly, that's going to save you time and money. Thank you and enjoy the video.
In this video we're going to show you how to remove and replace spark plugs on this 2000 Lincoln Town Car with a 4.6 liter. Tools you'll need are a 7mm socket with a ratchet and extension, a 5/8 sparkplug wrench or socket with a ratchet and extension as well, and you will also need a spark plug gapping tool.
Take an 8mm wrench and disconnect your negative battery cable. Replacing your coil and spark plugs- pretty easy. I'm going to show you on this side because it's easier to film and get to. The other side is just as easy. You do just need to remove your intake hose which is three clamps and another couple of hose connections on the back. Then you can remove that whole intake hose and get to your coils pretty easy.
The coils are held in place by a 7mm bolt. Get the socket ratchet down on there. It can be a little tough to break loose. I just want to get my socket off of here before I get too far. This connection, you just reach underneath and there's a little tab right here. Squeeze that tab and the harness pulls loose. You can just kind of pull your coil up and out like that. To get your spark plug out I've got a spark plug socket. It's a 5/8 spark plug socket. It's designed to grip onto the plug although I know mine is pretty worn out so I'm just going to put a little piece of paper towel in there and then you can put your wrench right down in. There's usually a little bit of angle. Break the spark plug loose.
Just fast forward through loosening that and then what happens is I actually get another piece of paper towel just to stuff in there to grab onto the spark plug. There's my plug. You can see these plugs are in pretty rough shape. Here's the spark plug we took out, and then here's the new platinum tip. You can see that there is quite a bit more to the new plug than the old one. This one is pretty worn out. On this Lincoln Town Car with 4.6 liter, you want to make sure that the gap between the tip of the plug and the diode is at .054. My gauge only goes to .050. So we're just going to have to just say the .004 is going to be okay which I'm sure it will be. I don't think the engine is going to mind a .004 difference in gap. What we can do is, let's see here, so we use this part of the tool to kind of bend that diode, and then we run the gauge through, and we want the gauge to basically go through and have a little bit of drag. Then that will be fine. That's .050 which is only .004 off which is perfectly acceptable. Again, I have a spark plug wrench. My wrench is a little worn out so what I'm going to do is wrap paper towel around it, stuff it into the wrench, make sure none of that paper towel was down near the threads or anything so that it sticks in there.
Now I'm going to put it down in and I'm just going to kind of lightly turn it and it goes in. When you're turning this in, it should offer some resistance, but it shouldn't be hard. If it's hard to turn you may be cross threading although it's a little hard to cross thread these plugs. Then these should be tightened to about 18 to 20 foot pounds, which is just kind of tight with the wrench like that. This happens to me a lot. I've removed a bolt, but it twisted in the socket so it's now stuck. So what I do, I take a screwdriver or something that fits right up in there, let's see here, and then I just drop it and basically that usually almost always gets the bolt from the socket. Just make sure you watch where it goes. Put is right down in. Press it in. Your 7 mm bolt. Reconnect your lead and you're all set. Just repeat that for the other seven cylinders. Then reconnect your battery and you're engine should be purring like a kitten.
We hope this helps you out. Brought to you by www.1AAuto.com, your source for quality replacement parts and the best service on the internet. Please feel free to call us toll free, 888-844-3393. We're the company that's here for you on the internet and in person.

NGETK00022