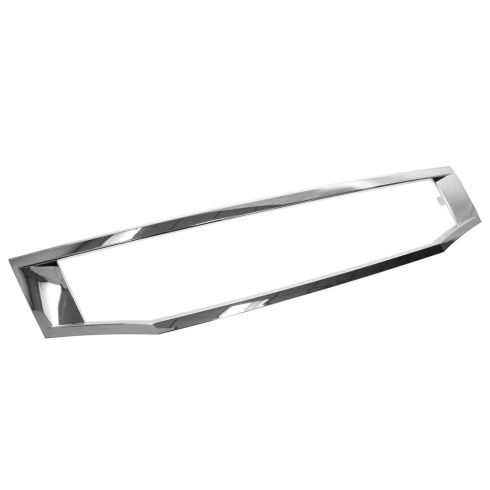
Complete Repair in One Purchase - Stop searching for parts individually and complete your repair with a customized kit or set from DIY Solutions.
High-Quality Parts from Trusted Brands - DIY Solutions' kits and sets are selected from the best automotive brands and include hard-to-find and even obsolete parts you may need for your vehicle.
Guaranteed Fit - DIY Solutions ensures its selected parts are quality-tested to guarantee fit and function.
NOTE: It is necessary to reuse your original hardware, as new hardware is not included with this item.
Attention California Customers:
WARNING: Cancer and Reproductive Harm - www.P65Warnings.ca.gov.
Lifetime Warranty
This item is backed by our limited lifetime warranty. In the event that this item should fail due to manufacturing defects during intended use, we will replace the part free of charge. This warranty covers the cost of the part only.
FREE Shipping is standard on Orders shipped to the lower 48 States (Contiguous United States). Standard shipping charges apply to Hawaii, Alaska and US Territories. Shipping is not available to Canada.
Expedited is available on checkout to the United States, excluding Alaska, Hawaii and US Territories as well as P.O. Boxes and APO/FPO/DPO addresses. Final shipping costs are available at checkout.
How to Replace Front Grille 2008-10 Honda Accord
Created on:
Tools used
Flat Blade Screwdriver
Phillips Head Screwdriver
Trim Tool Set
1. Removing the Bumper Cover
Remove the eight push clips from the upper grille cover with a flat blade screwdriver
Slide off the upper grille cover
Remove the Phillips screw from the recess in either end of the bumper
Remove the 10 push clips along the bottom front edge of the bumper
Pop the bumper up off the upper pins on each side
Pry each edge of the bumper out of its clips
Lift the bumper up and off
2. Removing the Grille
Pry out the four plastic push clips from the grille
Press in the clips on the grille
Remove the grille from the bumper
3. Installing the Grille
Insert the grille into the bumper
Press the push clips into the grille
4. Installing the Bumper Cover
Insert the bumper into the upper pins
Press the bumper into its clips
Press in the 10 push clips along the bottom front edge of the bumper
Tighten the Phillips screw to the recess in either end of the bumper
Insert the upper grille cover into place
Press in the eight push clips to the upper grille cover
Hi, I’m Mike from 1A Auto. We’ve been selling auto parts for over 30 years!
Open the hood. Reach down, and pull the release. Located far down here by your left foot, where it rests. Pull it open. Release the secondhand latch. Just push up on it. Lift it up. Put those down for a second.
The hood has two positions. Normal position, and then if you open it further, there is a second service position here. I'll put it there for now. Remove the eight push clips from the upper grille cover. Just start on one side. Pry it up with a small plastic screwdriver. Pry it up with a small, flat bladed screwdriver. Prying open the middle unlocks the clip when you pry open the outside to unlock it. You may need to get a trim clip tool that can help to unlock it. Pull it right out. Just repeat that for all of them. Last one here. Pull this cover off. It slides behind the grille, just lift it up. Slide it out from the chrome grille.
From underneath the fenders, slide off of the safety lock and put it aside. We're going to lift the vehicle up to get to the clips under the bumper. You could do this with the vehicle on the ground. But in order to show you, we're going to put it up in the lift so it's easier to see. On both sides of the car, there is a Phillips head screw up in this recessed opening. You're going to remove that. I'll repeat that for the other side.
There are ten push clips on the front edge of the bumper. These are removed just like the ones up top using a small flat bladed screwdriver. Push out the middle, and then pry them out of the bumper. They get filled up with dirt. Sometimes they're hard to unlock. Just pry them open with a small flat bladed screwdriver, and then get the trim clip tool in there. Kind of work them open. Work along the edge, find all the clips, and pull them out. They might break. You might have to replace them. They get brittle with age. Front bumper is setting on two pins on either side. Just kind of pop it up like that, and over here. That's the front.
Now we'll come to one side and pull it straight out. It's going to sound like it's breaking, but you're just pulling it off of the clips. Just work it down around the headlight. Make sure it's off of that pin that we'll pop back on. Do the same for the other side. Give it a bit of a swift tug. And now, I'm going to get off those pins, support it, and pull it straight off the vehicle.
To remove the grille, we're on the inside of the bumper. There are four plastic push clips. I'm on the underside here. Take a small flat bladed screwdriver and pry them up to open them. A lot of times they just break, and they get jammed up with dirt. We'll have to replace them. With those push clips removed, there are two tabs on both sides. We're going to push them up and unlock them. Do the same for this side. These are just in there, they kind of stick to the bumper cover, just kind of push it down or pop it out. Same on this side. And there is our grille.
Flip the grille the correct way. This lip here will slide under this lip that's in the bumper. Roll the bumper over. Push some new clips in. Make sure that snaps in place over here. The grille's installed.
Reinstall the bumper. Go straight on with it. It does have some pins right here that it's going to sit on, on both sides. It helps keep it from falling off. Get the bumper lined up in the brackets. Push it right in, and snap it in place. And the same for both sides.
We're going to push the fender liner up in behind the bumper. Just like that. Install this Phillips head screw, so the bumper doesn't fall off, while I put the push clips back in. Make it tight. I'll just stop. Do the same for this side. I'm going to go along the bumper now and reinstall all the push clips I removed. Push them back into place. If you have broken ones, you'll replace them. Put the last one in. Now reinstall this upper cover. Put it over the little rubber bumpers, then this part goes behind the grille. Just kind of have to bend it and flex it. It slides in like that. Do the same for both sides. And place all the push clips. Put push clips in. Hood down.
Thanks for watching. Visit us at 1AAuto.com for quality auto parts, fast and free shipping, and the best customer service in the industry.
GRI00375
In Stock
Product Reviews
Loading reviews
5.00/ 5.01
1review
5 Stars
4 Stars
3 Stars
2 Stars
1 Star
1
0
0
0
0
Great product, but ...
Steve
October 24, 2021
I bought this trim molding because the rest of my grille was in decent shape. This trim is a great product, arrived quickly, packaged well, but ... I wish I bought the whole grille assembly after all. Why? Two reasons, 1) it's a pain to replace just the trim, and 2) you're going to wish you got the whole thing after all 'cause the H won't be as nice looking as the trim.
Customer Q&A
No questions have been asked about this item.
Customer service
877-844-3393
Monday - Friday 8:00am - 9:30pm ET Saturday - Sunday 8:00am - 4:30pm ET
Honda is a registered trademark of Honda Motor Co., Ltd. 1A Auto is not affiliated with or sponsored by Honda or Honda Motor Co., Ltd.See all trademarks.
Enter Vehicle Year Make Model
Specify your vehicle's year, make and model to guarantee fit.
Year
Make
Model
Options
Drivetrain
This part doesn’t fit a . Select from parts that fit.