Replaces


Recommended for your 2006 Toyota Rav4
Frequently bought together
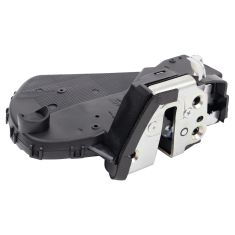
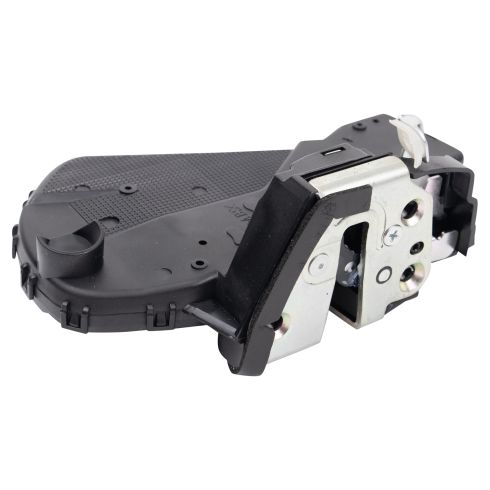
Part Details
Specifications
About TRQ:
TRQ is a trusted brand dedicated to making every repair a success story by combining premium parts with easy installation. Each TRQ part is engineered by a team of automotive experts to meet or exceed OEM standards, delivering enhanced performance and maximum longevity. With rigorous in-house testing, the brand ensures superior fit and function across every product line. TRQ also provides customers with best-in-class, step-by-step installation videos—so you can complete repairs with confidence, whether you're a first-time DIYer or an industry professional.
Returns: Parts with electrical components cannot be returned once installed.
Attention California Customers:
 WARNING: Cancer and Reproductive Harm - www.P65Warnings.ca.gov.
Lifetime Warranty
This item is backed by our limited lifetime warranty. In the event that this item should fail due to manufacturing defects during intended use, we will replace the part free of charge. This warranty covers the cost of the part only.
Returns: Parts with electrical components cannot be returned once installed.
FREE Shipping is standard on Orders shipped to the lower 48 States (Contiguous United States). Standard shipping charges apply to Hawaii, Alaska and US Territories. Shipping is not available to Canada.
Expedited is available on checkout to the United States, excluding Alaska, Hawaii and US Territories as well as P.O. Boxes and APO/FPO/DPO addresses. Final shipping costs are available at checkout.
Created on:
Tools used
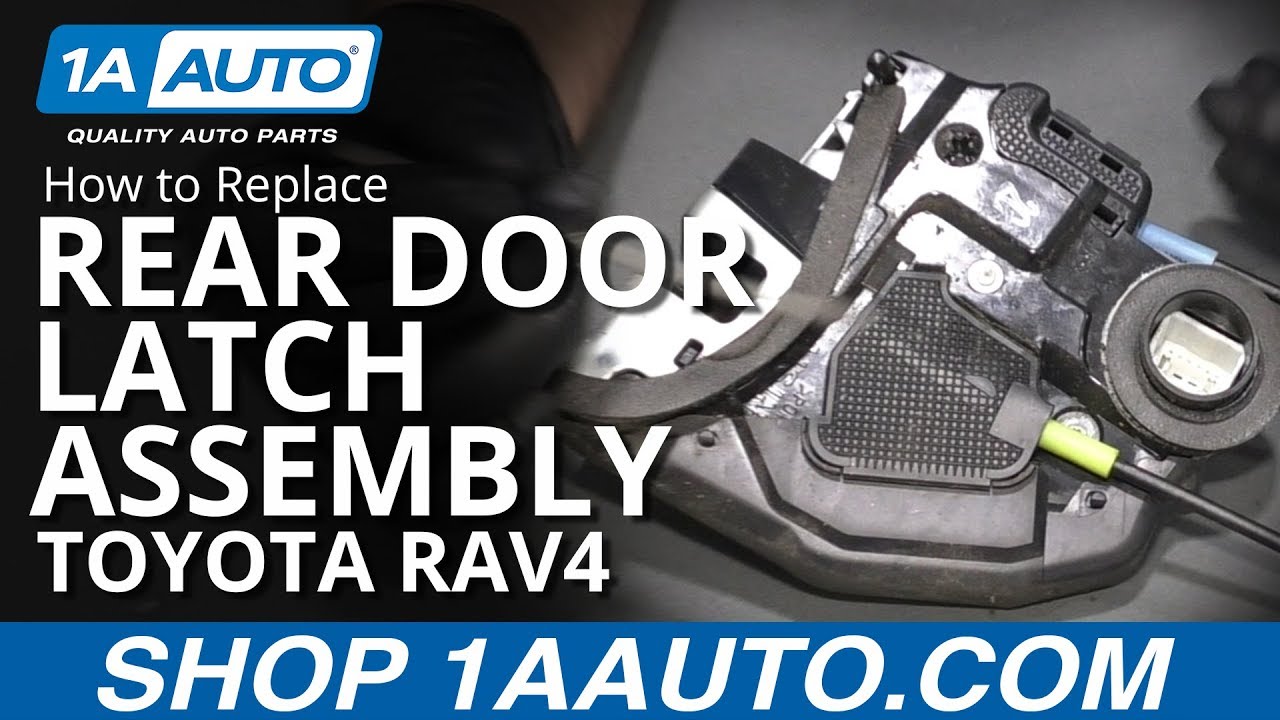
What's up guys. I'm Andy from 1A Auto. In this video I'm going to show you how to replace the rear door latch assembly on this 2010 Toyota Rav4. If you need parts for your vehicle, click the link in the description and head over to 1aauto.com.
I'm going to take a trim tool and I want to get underneath this bezel right here. Slide this up. Slide this out of the way. You can disconnect the connector right here. Just push down. Disconnect the connector. Now you don't necessarily have to take this off to take the door panel off. It just makes it a lot easier to disconnect the connector like this rather than while you're fighting and fumbling with the door pan. Now we want to take this cover out. Just take a trim tool. Get underneath here and there's some clips that hold that on.
Take this cover off right here. Sometimes you can just grab it with your fingers or you can get the trim tool underneath there. Try to rotate it off. There's clips on there, bottom, in the middle and on the top. Now there's three screws. There's one right here and two right there. I'm going to use a Phillips head screwdriver. Take these screws out. Just grab it and then these two and this last one. Take a magnet to get the bottom one out and remember these two are different than that other one. Now you can use some trim tools and I always like to start from the front of the door panel closest to the car in case you scratch anything and just go all around. There's just some push pins that hold the door panel on just like that.
Take it. Slide up the door panel. This handle should slide off here. Should just be clipped in. There we go. Just slides down. We're going to take this inside door handle off. We want to take the cables off the handle. So disconnect this cable right here and the bottom one happens to be the green one, which is the lever side and the white one is the lock side. So slide it up and then slide the retaining ball out and same with the white one. Slide it up. Twist it and slide out the ball. Disconnect this connector right here. It goes to the door latch assembly. Now I'm going to peel back the vapor barrier. You can take a razor blade or a utility knife and just cut some of this butyl tape. Generally it'll stick to itself afterwards. When you go to put it back on, if you have to add more, you can always add more butyl tape.
If you're doing this in hotter weather, it's going to be a little bit easier to peel back. I just want to pull those cables through and then that wiring harness so I can peel back on this a little bit more. Just going to disconnect this speaker wire just so I can take the vapor barrier off completely just so it's out of the way. Sometimes you can just fold it out of the way. But if it's in your way, sometimes it's just easier to pull it off completely. There we go. set this aside. I'm going to take these screws out right here. I'm going to use a T30 socket and a ratchet.
Take those screws out. Now I'll just take this latch out and just slide in. Then you slide it down. I'm going to just slide the cables this way. You want to try to get the cables around this window channel. It seems like it would be easy to just take this channel out. But this window channel goes all the way up. So we don't want to take that out if we don't have to. Slide the cables this way. You can slide the latch out just like that. Just take a pocket screwdriver. Slide in under right here. There's a little retainer that holds the door down and grab the cable. Slide it out of the slot there and slide it out of the release here. If you use the pocket screwdriver, that might help a little bit. Slide it up. That's the first cable. To get the second cable out, so there's some releases for these latches right here on the backside. So if you take a straight blade screwdriver, you can release the door. These bottom ones release pretty easy. This top one, not quite as easy.
I'm sure they make a special tool to release these. I just went in from this side, released that first one and then these bottom ones are a little bit easier. There we go. You just push on those. That releases those and take this cable. Slide it up and then slide this retaining ball out. Just like that.
I'm going to take the cable with the blue end on it. Now if you have different cables, they may have different colors. Slide the ball back in position there, the retaining ball and then slide the cable slot right there and we can close the door. Lock it in place. Now we'll do the same with this. Take this retainer. That's going to go right in this level just like that and then slide that into the slot and close the door. So we want to slide this back in position. I am going to try to slide these cables back through first. The cables come this way just like that and just twist this around. All right. That worked. It wasn't the easiest but it'd probably be easier to slide the latch mechanism in first and then slide the cables through. So either way, we got them in. Then we'll take these screws. Get these screws started on the outside here. Take a T30 socket. Just snug these up and use a ratchet. Tighten these down. They're pretty snug.
Keep in mind that child safety lock, if you wanted this to lock and not be able to open it from the outside, you're going to want to have that in the down position or up position if you don't want that function. So keep that in mind. So when you put it back together, don't think that your door latch is broken if you didn't put that in the right position. Another thing, when you're installing the latch, you have to have this lever lined up with the outside door handle. It's kind of hard to see. But you want to make sure that's lined up properly before you actually put the screws in. So now we want to take the vapor barrier. Slide all the cables and all the wires in the correct positions. Where you took them out.
Sometimes it's easiest to get it started and then take all the wires and add those just like that. It's all secured. Now reconnect the speaker wire, locking it in place and reconnect the door latch. Lock that in place. We want to reattach this to the cables. Slide the green cable into the bottom. That's the one with the handle, just like that and then through there. The white one goes on top just like that. I'll take the door panel. We'll slide the handle right through here and there's two tabs right there on the top and the bottom. It's just going to slide into place right there. If you check it from the outside, just make sure it looks good. That's right and then slide the top part of the panel in first. Pull the wiring harness through here so you can connect the switch after and then once the panel's lined up, you can just push it on.
Take a Phillips head screwdriver and these two longer screws are going to go for the handle part. Get those started first. Snug those up and then this smaller screw's going to go right here through the handle. Snug it up, not too tight. This cover is going to go over the handle. Lock that in place and this cover is going to go right behind the handle. Pull out the handle. Line it up. Lock it in place. Reconnect the window switch to the connector. Line it up. Lock it in place then there's a slide right here that slides in the back. That slides like that and then push down on the front.
Thanks for watching. If you want the parts to do it yourself, check out one a 1aauto.com, the place for DIY auto repair.
Tools used
What's up guys? I'm Andy from 1A Auto. In this video, I'm going to show you how to replace the cargo door latch on this 2010 Toyota RAV4 if you need parts for your vehicle, click the link in the description and head over to 1aauto.com.
Open the back door. All right. Just take this trim piece off. We'll just use a trim tool. We'll just get underneath here. This is connected right here as well. Slide that off. Some of these trim push pins pop out. We'll have to reinstall those afterwards. Take that off. Those are clipped in. We'll take this trim piece off. It kind of comes out at an angle, that. It was clipped in in the back side. Same on this side. Just like that.
I'll take this panel out. Just take a trim tool. I'm just going to go around. Pop these trim pieces out. There there's one, and right here. Just go all the way around. The top one's the difficult one. There's a couple push pins in right there, so sometimes it's easier just to grab it, pop it out. Just use a little force. There you go. Take those off in right there. There's a wiring harness right here. We'll disconnect that. That's for the cargo light. Just like that. And the light right here. Here we go. This harness actually goes up to the rear defroster grid. There you go. There's that panel.
All right, now I want to separate this vapor barrier from the door. You can just use a razor blade or a utility knife and just cut it. You should be able to reuse it and should stick to itself. If not, you can always replace it, add more butyl tape. Sometimes it just peels. You could always heat it up as well. Use a heat gun. All right, so just peel it back. Just be careful. Don't get any of this on your clothes. It really doesn't come off. Just leave it like that.
All right, disconnect this connector right here. Just push down on the tab, slide it out. There's a rod in here that connects the outside door handle to the latch. What I'm not going to do, I'm not going to disconnect that rod right now. The rod, there is a connection up near the handle. You could disconnect it there. But when I loosen up the bolts for the actual door latch, I should be able to slide that down and then just slide the latch out. Now we'll just take a T30 socket and a ratchet. We'll take these screws out. We'll take that last bolt out. Now I'll just slide, slide the latch out and then just slide it down. Get it and pull it right up.
There's the mechanism right there to release the door latch. We're going to line that up with that rod right there. Slide this in position here. Like I said, you could pull that rod out if you wanted to struggled with getting it in like this. Just line it up just like that. That's lined up. Just make sure you get that connector hole lined up. Take some of the screws and get those started. All right, then we'll tighten up these screws. You just want to get them all even first and then we'll just snug them up with a ratchet. Connect the connector. All right. Reinstall the vapor barrier. Get this all lined up. You can add more butyl tape if you need to, just make sure it's all sealed in there good. That looks good.
All right, I'm just going to take these push clips out. I have this tool that we actually sell at 1aauto.com. It actually works pretty slick. We just slide it in there, pop those out. That's another one right there. All right, for this panel, we'll put these clips back in here. Right there.
All right, now we can reconnect this rear defrost. We didn't need to disconnect that, but that's okay. That should slide in this area. That's actually taped to that, so if you want to retape that. Then connect this light back up. Just the line the connector up, snap it in, and just line everything up. Once that's lined up, just push it on. Make sure it's all flush the vehicle.
Put this clip back on there. We'll line this up over here. Line it up down there and then line the holes up. Lock it in place. Do the same with the other side. All right, we'll take these two clips out. Just use this tool. Slide those out. Put those in the panel line and just line the panel up. Line all the push pins up. Lock it in place.
Thanks for watching. Visit 1aauto.com for quality auto parts shipped to your door, the place for DIY auto repair, and if you enjoyed this video, please click the subscribe button.

BDA33413