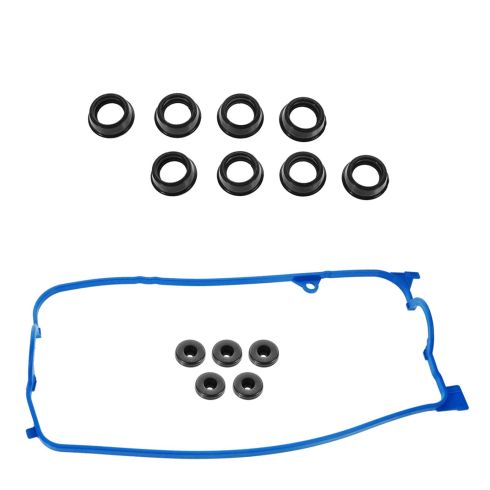
This item is backed by a 60-day warranty against defects in materials and workmanship under its intended use. The warranty does not cover normal wear and tear. This warranty covers the cost of the part only.
FREE Shipping is standard on Orders shipped to the lower 48 States (Contiguous United States). Standard shipping charges apply to Hawaii, Alaska and US Territories. Shipping is not available to Canada.
Expedited is available on checkout to the United States, excluding Alaska, Hawaii and US Territories as well as P.O. Boxes and APO/FPO/DPO addresses. Final shipping costs are available at checkout.
How to Replace Valve Cover Gasket Set 2001-05 Honda Civic
Created on:
Tools used
Socket Extensions
Flat Blade Screwdriver
Torque Wrench
Paper Towels
10mm Socket
Ratchet
Wire Cutters
Pick
1. Removing the Valve Cover
Loosen the two plastic flat head screws from the engine cover
Remove the engine cover
Disconnect the ignition coil electrical connectors
Remove the three 10mm bolts holding the wiring harness to the valve cover
Pull the cable hold-down off the stud
Pry the wiring harness off of the valve cover with a flat blade screwdriver
Remove the four 10mm nuts from the ignition coils
Pull out the ignition coils
Remove the 10mm nuts from the throttle cable
Remove the oil dipstick
Twist off the oil cap
Disconnect the PVC breather hose
Loosen the five 10mm studs from the valve cover
Pry the wiring harness retainer from its studs with the flat blade screwdriver
Disconnect the A/C line hold-down with a flat blade screwdriver
Pull the power steering line off the valve cover bracket
Pull the A/C line off the valve cover bracket
Lift the valve cover up and off
2. Removing the Valve Cover Gaskets
Pull up the valve cover gasket with a pick
Peel off the valve cover gasket
Pull up the ignition coil gaskets with a pick
Peel off the ignition coil gaskets
Pry the studs off the top of the valve cover
Cut off the valve cover stud gaskets with wire cutters or a razor
Slide the washer off the stud
3. Installing the Valve Cover Gaskets
Slide the washers onto the valve cover stems
Slide on the valve cover stud gaskets
Put the studs into place on the valve cover
Install the valve cover gasket with the tabs on the timing cover side
Firmly press in the gasket
Push in the ignition coil gaskets with the bezel facing the engine side
Firmly press in the gaskets
4. Installing the Valve Cover
Clean the gasket sealing area with a solvent and a paper towel
Slide the valve cover onto the timing cover side, first
Maneuver the valve cover into place
Put the long bolts into the intake side of the engine
Put the shorter bolts into the exhaust side of the engine
Tighten the 10mm bolts to 7.2 foot pounds of torque
Put the wiring harness retainer into place
Connect the PVC breather hose
Push the power steering hose into the bracket
Push the A/C hose into the bracket
Push the ignition coils into place
Tighten the four 10mm nuts onto the ignition coil
Putt the wiring harness into place
Connect the ignition coil wiring harnesses
Insert the two 10mm bolts into the wiring harness
Push the cable retainer onto the stud
Fasten the two 10mm nuts onto the cable retainer
Tighten all the 10mm nuts and bolts
Twist on the oil cap
Put the oil dipstick into place
Put the engine cover into place
Tighten the two plastic flathead screws into the engine cover
Start the engine
Check for leaks
Brought to you by 1AAuto.com, your source for quality replacement parts and the best service on the Internet.
Hi, I'm Mike from 1A Auto. I hope this how-to video helps you out, and next time you need parts for your vehicle, think of 1AAuto.com. Thanks.
In this video we're going to show you valve cover gasket replacement. This is a 2003 Honda Civic. This is the same for a 2001 to 2005 Civic with the 1.7 liter engine. You'll need a new gasket set from 1AAuto.com, 10mm socket with a ratchet and extension, flat head screwdriver, 90 degree pick tool, and side cutters.
Undo the two quarter-turn flat heads to uncover the wire harness and coil packs. Undo the four electrical connectors on the coil packs. Remove the three 10mm bolts securing the wire harness to the valve cover. Remove the cable hold down from the stud. Use your screwdriver to pry out and lift the wire harness from the top of the valve cover.
Remove the four 10mm nuts securing the coil packs to the valve cover, the 10mm nuts securing the rest of the throttle cables to the valve cover, your oil dipstick, oil cap, and the five 10mm bolts holding the valve cover down to the top of the head.
Using a flat head screwdriver, remove the harness from the studs. Separate the hold down for the A/C line. Remove the power steering and AC lines from the bracket on the valve cover. Lift your valve cover off the head.
Here we have our new parts from 1AAuto.com. Here we have our old parts that we removed from the vehicle. We're just going to show you where exactly all these gaskets are and how they come out. First off is your valve cover gasket, probably baked in here. Use a small pick or a flat blade screwdriver to get it going, coming out a little bit. You should just be able to pull.
You can see we have our relief for where the cam bearings ride in the valve cover. See we have the same shape. This bolt hole here lines up. Very high grade gasket.
Each hole for the coil packs also has a rubber gasket. Again, you're going to want to use a pick or a small flat blade screwdriver to work that gasket out. Here we have our old gaskets removed from the valve cover, and new ones from 1AAuto.com. As you can see, these gaskets are exactly the same size. They're going to go ahead and install just like the OEM pieces, and fix any leaks you might have.
Our kit also comes with new washers and gaskets for the five bolts that hold the valve cover to the top of the head. To remove these you're going to pry them up out of the valve cover with a small flat blade screwdriver, and remove the washer from the top. Using a pair of side cutters or a razor blade, we'll go ahead and cut the old ones off of the stud to remove the washer.
Now you can see we have the exact same part in our new kit from 1A Auto. Reinstall the gasket onto the bolt by pressing it over this bezel.
Flip the valve cover gasket over. Install the gasket with the tabs facing the timing cover side for the driver side of the vehicle. Make sure that the gasket is pressed in firmly and that all the holes and grooves line up.
Reinstall your coil pack gaskets with the bezel side facing down into the motor, up facing you with the valve cover upside down this way. Make sure that the gaskets are fully seated so they don't fall out into the motor when you reinstall your coil packs.
Be sure that your gasket surface on the top of the cylinder head is clear of debris and oils by spraying some solvent on a paper towel, giving it a quick wipe down. Slide this lip onto the timing cover. You're ready to bolt your valve cover back down. Reinstall your valve cover bolts with the longest bolts on the intake side of the engine and the smaller bolts on the exhaust side of the engine. Go ahead and tighten down those 10mm bolts. Torque the valve cover bolts to 7.2 foot pounds or 10 Newton meters.
Reinstall the harness retainers. Reinstall the PCV breather clamp. Reinstall your lines into the bracket. Reinstall your four coil packs; they simply slide in. Press on. They're held in by four 10mm nuts. Just snug is fine. There's not a lot of pressure on these coil packs. Reinstall the top of your harness. Plug in your coil packs. Two 10mm bolts secure the harness to the valve cover. Your cable retainer sits over top. There's two 10mm nuts for the cable retainers. Go ahead and tighten all that down. Again, there's not any kind of pressure on this harness, so just snug is fine. Reinstall your oil cap and dipstick. Lay the harness cover back into place. Use a flat blade screwdriver for the quarter turn clips. Start your motor and check for leaks.
Thanks for tuning in. We hope this video helped you out. Next time you need parts for your car, please visit 1AAuto.com. Also, check out our other helpful how-to, as well as, diagnosis videos.
VS50606R
In Stock
Product Reviews
Loading reviews
4.75/ 5.04
4 reviews
5 Stars
4 Stars
3 Stars
2 Stars
1 Star
3
1
0
0
0
great quality to repair the subpar job someone else did in the psat
Robin
April 14, 2018
I purchased a used Honda Civic and noticed the valve cover was beginning to leak (even after the timing belt was replaced with new gaskets). I put these in and the leaks have gone away.
Definitely take you take the time to seat this properly.
J
January 18, 2019
I like buying from u guys good quality & fast shipping so far no problems looking forwards for future purchase
Valve gasket replacements
Gary
September 11, 2020
The gasket kit work perfectly
This kit came with high quality gaskets/seals and was very easy to install.
[{"url": "https://images.turnto.com/media/pNISJll75W64CYGsite/b5e5a8658d9ef2bd448961886c5c0464_1627304540448_0.jpeg", "caption": "Ready to crack the head open. To this point I had about 30 minutes in."}, {"url": "https://images.turnto.com/media/pNISJll75W64CYGsite/667e70492efd145fdc5f0f1845adcc47_1627304637227_0.jpeg", "caption": "Finished! Just have to put that plastic piece on top that says \"Honda\"."}]
Dean
July 26, 2021
The Fel-Pro valve cover gasket is the best there is! It's bright blue, which makes it easy to see if you have installed it correctly, and to make sure it didn't fold up or crinkle while setting the valve cover back on the head. This kit from 1A was great because it not only came with the gasket, but also came with the new spark plug tube gaskets, coil gaskets, and gaskets/grommets for the valve cover bolts. The only thing it doesn't include (none do) is the silicone that you need to apply to the sharp edges of the gasket to ensure a tight seal. You will want some good RTF type silicone for this, as well as some WD-40 or white lithium grease to help lubricate all the new gaskets/seals that come with this kit. I have almost zero auto mechanic experience, but with the help of some 1A YouTube videos, I was able to do this valve cover job on my 2002 Civic in about 2 hours with no issues and a successful function test after.
I could have bought this kit for a few bucks cheaper through anot
Customer Q&A
No questions have been asked about this item.
Customer service
877-844-3393
Monday - Friday 8:00am - 9:30pm ET Saturday - Sunday 8:00am - 4:30pm ET
Enter Vehicle Year Make Model
Specify your vehicle's year, make and model to guarantee fit.
Year
Make
Model
Options
Drivetrain
This part doesn’t fit a . Select from parts that fit.