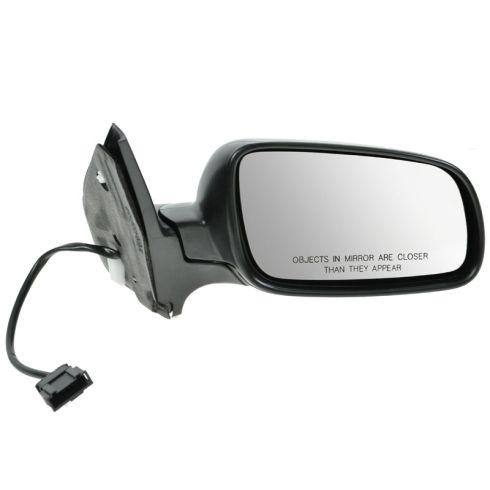
This replacement Power Heated Mirror is just what you need to get your VW Jetta in good looking form again!
This new, aftermarket Power Heated Mirror assembly features the following specifications:
RH (Passenger Side)
Non tinted mirror glass
Power
Heated
Manual Folding
Sail mount design - Mounts in the corner of the door
100% tested prior to leaving the factory!
Direct replacement mirror
Injected molded black plastic housing
Can be painted to any color desired or installed as is
Built to strict quality control standards
Note: For 1999 models you can find the production date of your vehicle on either the outer edge of the driver's front door or on the latch piller that the door closes on.
This mirror makes a great replacement and has substantial cost savings over a dealer auto mirror.
Exact fit - To obtain proper fit and function confirm your vehicle has the exact mirror options listed.
Paint To Match Note:
"Paint-to-match finish" refers to a smooth, paintable surface. This item is not painted. Paint offers better coverage and adhesion, but it is not necessary for installation.
Attention California Customers:
WARNING: This product can expose you to chemicals including Chromium (Hexavalent Compounds), which is known to the State of California to cause cancer, and birth defects or other reproductive harm. For more information, go to www.P65Warnings.ca.gov
Lifetime Warranty
This item is backed by our limited lifetime warranty. In the event this item should fail due to manufacturing defects during intended use, we will replace the part free of charge. This warranty covers the cost of the part only.
FREE Shipping is standard on Orders shipped to the lower 48 States (Contiguous United States). Standard shipping charges apply to Hawaii, Alaska and US Territories. Shipping is not available to Canada.
Expedited is available on checkout to the United States, excluding Alaska, Hawaii and US Territories as well as P.O. Boxes and APO/FPO/DPO addresses. Final shipping costs are available at checkout.
How to Replace Mirror 1999-2010 Volkswagen Jetta
How to Replace Side Rear View Mirror 2005-10 Volkswagen Jetta
Created on:
Tools used
Socket Extensions
Flat Blade Screwdriver
T20 Driver
Phillips Head Screwdriver
T45 Socket
Ratchet
1. Removing the Side Mirror
Pry off the panel inside the door pull with a flat blade screwdriver
Pull the window switch panel up and out
Disconnect the window switch wiring harness
Remove the three Phillips screws behind the door pull
Remove the three T20 Torx bolts from the bottom of the door panel
Remove the Phillips screw from the top front corner of the door panel
Pry the door panel off by hand
Lift the door panel up and off the window sill
Disconnect the mirror wiring harness
Pull the mirror wiring harness free of the foam
Remove the T20 Torx bolt from the speaker panel
Pry off the speaker and pull back the speaker insulation
Remove the T45 Torx bolt from the mirror base
Pull off the mirror.
2. Installing the New Side Mirror
Feed the mirror wiring harness through the door
Push the mirror into place
While holding the mirror, insert the T45 Torx bolt into the mirror base
Connect the mirror wiring harness
Push the speaker panel into place, bottom first
Insert the T20 Torx bolt into the speaker panel
Put the door panel into place
Push in the door panel clips
Insert the three Phillips screws behind the door pull
Insert the three T20 Torx Bolts into the bottom of the door panel
Insert the Phillips head screw into the top front corner of the door panel
Reconnect the window switch wiring harness
Push the switch panel into place
Push the door pull panel into place
Brought to you by 1AAuto.com, your source for quality replacement parts and the best service on the Internet.
Hi, I'm Don from 1A Auto. I hope this how-to video helps you out, and next time you need parts for your vehicle, think of 1AAuto.com. Thanks.
In this video we're going to show you how to replace a side mirror on this 2004 Volkswagen Jetta, and we show you on the driver's side but the passenger side is the same procedure. The items you'll need for this are a new side mirror from 1AAuto.com, a flat blade screwdriver, Phillips screwdriver, T20 and T45 Torx bits, and a ratchet with an extension.
Start off by prying off this panel inside your pull handle. Now lift your switch panel up and out, and then just push the tab on this harness and disconnect it. Then, using a Phillips screwdriver, you want to remove these three Phillips screws. We'll just fast forward as Don removes those. At the bottom of your door panel, you want to remove these three T20 Torx bolts. We'll fast forward as Don removes those. Then just remove this Phillips screw up here in the top corner of your door panel.
Reach in behind the door panel and just pull out to release the clips. Then lift it up and out of the window sill and over the lock. Now pull this harness free and then push the tabs on either side and disconnect it. Then pull the harness from this foam. Now remove this T20 Torx bolt. Pry off the speaker and then pull back the insulation if it doesn't come with it. Then you want to remove this T45 Torx bolt, and we'll just fast forward as Don does that. Once that's removed, the mirror will pull off and out.
On the left is the old side mirror. On the right is the new one from 1A Auto. You can see they're identical and they're going to fit exactly the same. Our mirror is paint to match, so you can take your vehicle to an auto parts store with a paint department and have them give you an air charged spray can of the paint that matches your vehicle and then spray the mirror to match.
Feed the harness of your new mirror through the door and then push the mirror into place. We'll just fast forward as he holds it there and replaces that T45 Torx bolt. Now reconnect your harness and then push your speaker panel back into place. Push the bottom in first, over those wires, and then you just push the tab in at the top, into the door. Now replace that T20 Torx bolt, put your door panel back down into your window sill, then pull your wire harness for your switch back through, and then line up the clips on the back of your door panel and hit them into place. We'll fast forward as Don replaces and tightens up those three Phillips screws. Then replace those three T20s and replace that Phillips screw up in the top corner and tighten it up. Now reconnect your switch panel and then just push the panel down in place. Then line up this panel and push it firmly into place, and your all set.
We hope this video helps you out. Brought to you by www.1AAuto.com, your source for quality replacement parts and the best service on the Internet. Please feel free to call us toll-free, 888-844-3393. We're the company that's here for you on the Internet and in person.
Tools used
Flat Blade Screwdriver
T20 Driver
T30 Bit
Magnet - Extendable
1. Removing the Interior Door Panel
Pry up the window switch panel with a flat blade screwdriver
For the passenger side, pull out the pull handle
Remove the inner handle
Remove the two T30 Torx screws behind the inner handle
Remove the three T20 Torx screws on the bottom of the panel
Remove the T20 Torx screw at the front top corner of the door panel
Pry out the door panel
Lift the door panel up and off
Disconnect the latch cable from the door handle
Disconnect the speaker wiring lead
Disconnect the trunk switch wiring harness
2. Removing the Mirror
Remove the T20 screw from the mirror base trim panel
Pull off the mirror base trim panel
Pry the cap out of the mirror base with a flat blade screwdriver
Pull off the mirror base trim panel
Remove the three T30 screws from the mirror
Disconnect the mirror wiring harness
Unclip the mirror wiring from the door
Pull off the mirror
3. Installing the Mirror
Paint the mirror cap to the desired color
Feed the mirror into place
Insert the three T30 screws into the mirror
Clip the mirror wiring into the door
Connect the mirror wiring harness
Push the cap into the mirror base
Push on the mirror base trim panel
Inset the T20 screw into the mirror base trim panel
If you are reusing the mirror cap, pry it off the old mirror with a flat blade screwdriver
Slide the mirror cap onto the mirror
Connect the defrost wires to the mirror glass
Push the mirror glass onto the mirror
4. Reinstalling the Interior Door Panel
Connect the trunk switch wiring harness
Connect the speaker wiring lead
Connect the latch cables to the door handle
Lift the door panel into place
Push in the door panel clips
Insert the T30 screws into the door panel bracket
Insert the T20 screw at the top front corner of the door panel
Insert the three T20 screws at the bottom of the door panel
Slide the interior door handle into place
Push the switch panel in place
Brought to you by 1AAuto.com, your source for quality replacement parts and the best service on the Internet.
Hi, I'm Mike from 1A Auto. I hope this how-to video helps you out, and next time you need parts for your vehicle, think of 1AAuto.com. Thanks.
In this video we're going to show you how to replace the side mirror on this 2005 Volkswagen Jetta. We show you on the driver's side, but the passenger side is the same procedure. It's the same part and similar process on these Jetta's from 2005 to 2010. The items you'll need for this are a new side mirror from 1AAuto.com, a T20 Torx driver, a T30 Torx bit and ratchet, a flat blade screwdriver and a stick magnet.
Pry up on the front of the switch panel and if it doesn't pop up entirely, just pry it from the back. Then it will pull free and you can just pull that out. The passenger side is similar, but instead of prying out the switch panel, you want to just pry out on this pull handle. Behind it you'll see these two T30 screws. On the driver side, you can just slide this little handle out and you'll see the same two T30 screws. At the bottom of either door panel there's three T20 screws, and then one more T20 screw up here on the side of the door panel. We'll just fast forward as Mike removes all of those. Now just pull out on the edge of the door panel. You want to do this all the way around the outside edge. Once you've released all those clips, just slide the door panel up and out of the windowsill. Then pull the door panel back.
Push out on this clip and then unhook the cable from the door handle and then push the tabs on either side of this harness for your speaker and just disconnect it. Then push the tab on this harness while lifting up on that purple lever and the harness will release. Then your door panel is free.
Now remove this T20 screw right here underneath this panel. Then pull out on the panel and pull it down. Now you want to pry out this cap right here on the side of the door. Then remove this T30 and these two T30s right here. We strongly recommend you use a stick magnet to help hold the bolt as you pull it out because if you do end up dropping it down into the door, it's a long process to get it back out. We'll fast forward as Mike removes those three T30 screws. Now push the tab on the mirror harness and disconnect it. It's definitely not secure enough, just the red tab. Then pull out these clips around the door. Then you can pull your mirror free. You will need to maneuver it back and forth a little bit and then just feed that harness through the door and your mirror is free.
The new mirror from 1A Auto comes with a primered cap. Obviously you can install this as it is if you're just looking for a functional replacement. If you wanted to paint it to match you could go to an automotive paint store and they can match the paint for your vehicle and put it in an air charged can. Then you can spray it first, but to install, you're just going to reverse the procedure. Put the connector through. Push this gasket in underneath and make sure that the holes line up. Then the mirror, you push underneath the molding. You can see that black rubber. Make sure it doesn't get caught. Then the bottom goes in. We carefully install this bottom one. I've got my magnet underneath just in case it falls. We'll fast forward as he replaces the other screws and tightens them up. Now reclip the mirror harness back into the door and we'll fast forward as Mike does this. Then reconnect your power mirror harness. Make sure it's all the way in, push down that red clip, replace that cap on the side of the door and then you want to pull this out of that panel and then feed it back into the door by just pushing in those tabs. Now push the panel back into place. Once you have it clicked into place you can replace that T20 screw and tighten it up.
There can be a number of reasons why you're replacing your mirror. It could be because just the bottom side got wiped out, maybe your cap's still in good shape, so you want to reuse your original cap. You can do that. Like I said the 1A Auto one comes with a primed cap so you could paint this to match or just install it as it is if you're just looking for a functional replacement. If you did want to get your original cap off, start with the screwdriver down here in the joint, near the base. Pry there. I'm pulling this part of it kind of out towards me. You can see the clips right there. Keep prying in here, in the base area and then there's a clip here and here as well, so there's just some prying there. Now I'm just going to push that off. I pried out to release this clip. You can see the clip in there and now I need to pry out and release this clip out here. Okay. It comes off. Sometimes it can get caught on the mirror a little bit so you just have to make sure your mirror will come off. You can actually just push the mirror a little bit.
You can put your wires through. Slide the cap down, make sure everything's lined up correctly. That goes on. Do the same thing if you've repainted your primed one. Then the glass installs. Connect your defrost wires, push them in and then you kind of look in and make sure the tabs are going around the mirror and push.
Now, to replace your door panel reconnect this harness and push that purple lever back down. Reconnect your speaker. Then rehook your door handle cable into place. Then slide that back and clip the cable back in. Put your door panel back up into the window sill and make sure the clips on the edges have lined up, then hit them back into place. Now we'll fast forward as Mike replaces those two T30s and the four T20 screws and tightens them up. Now slide this handle back into place and then put your switch panel back down. Then you're all set.
We hope this video helps you out. Brought to you by www.1AAuto.com, your source for quality replacement parts and the best service on the Internet. Please feel free to call us toll-free, 888-844-3393. We're the company that's here for you on the Internet and in person.
341-5401R9EBVM1
In Stock
Product Reviews
Loading reviews
4.80/ 5.05
5 reviews
5 Stars
4 Stars
3 Stars
2 Stars
1 Star
4
1
0
0
0
Good value for the price. Quality is acceptable.
P
July 21, 2018
Delivered quickly, considering it's power and heated I'd say the price is fair and the quality is average. I would have rated it 5 stars if two of the tabs on the mounting bracket weren't broken. If I noticed it before I disassembled the door and removed the broken one I would have sent it back to swap it out. Even with the broken tabs it mounted securely and was almost perfect. Vibrates a little due to the tabs not being there. I would recommend this part, just check it over before starting the work.
Good selections
emily
February 2, 2019
Great selections Good service fast shipping package well packed
We will go to 1A auto in the future
Roger
Great item
mark
February 6, 2019
My dad had a mirror stolen from his 2013 Impala in Bakersfield, CA while staying at a motel 3 years ago. It costs him $400.00 to have it replaced. I did this for about 110.00.
52.00 for the mirror and the rest was for labor at my local auto service. It works great, so far.
This is at least the 3rd time I have ordered a part from a1auto, a grill for my 1998 Ford F-150, the ford emblem on the front of the grill, and this mirror for my 2001 Jetta. I like this company and will probably use them again for a indoor panel on the Jetta.
Two thumbs up!
S
October 3, 2019
Arrived quickly, easy to install thanks to video, works well!