About TRQ: TRQ is a trusted brand dedicated to making every repair a success story by combining premium parts with easy installation. Each TRQ part is engineered by a team of automotive experts to meet or exceed OEM standards, delivering enhanced performance and maximum longevity. With rigorous in-house testing, the brand ensures superior fit and function across every product line. TRQ also provides customers with best-in-class, step-by-step installation videos—so you can complete repairs with confidence, whether you're a first-time DIYer or an industry professional.
Product Features
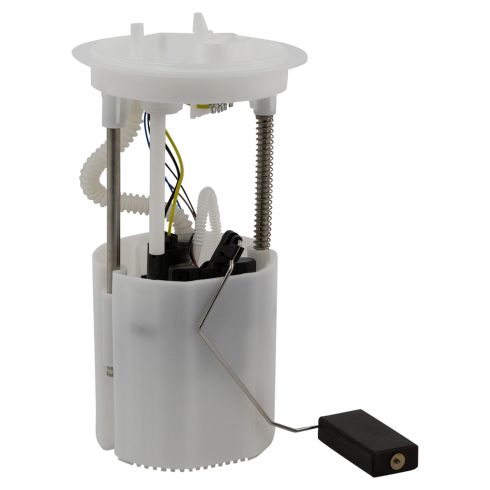
Complete Assembly: No modifications or assembly required
Carbon Brush and Commutator: More than twice the service life compared to copper
Flourine Rubber Seals: Resistant to high temperature, fuel, and solvents
Returns: Parts with electrical components cannot be returned once installed.
Attention California Customers:
WARNING: This product can expose you to chemicals including Di(2-ethylhexyl)phthalate (DEHP), which is known to the State of California to cause cancer, and birth defects or other reproductive harm. For more information, go to www.P65Warnings.ca.gov.
This part fits
19 vehicles spanning 2005-2018.
Fits these Makes
Select vehicle
Year
Make
Model
Description
2006-2009
Audi
A3
Audi A3 Fuel Pump Module Assembly TRQ FPA61970
2010-2013
Audi
A3
Audi A3 L4 2.0L Gas Engine Fuel Pump Module Assembly TRQ FPA61970
This item may be interchangeable with parts from other brands with the above part numbers.
This information is provided only for reference and does not guarantee that the item you are
purchasing is identical to parts with part numbers from the brands listed above.
To confirm that this item fits your vehicle, use the above "Check Vehicle Fit" option.
Lifetime Warranty
This item is backed by our limited lifetime warranty. In the event that this item should fail due to manufacturing defects during intended use, we will replace the part free of charge. This warranty covers the cost of the part only.
Returns: Parts with electrical components cannot be returned once installed.
FREE Shipping is standard on orders shipped to the lower 48 States (Contiguous United States). Standard shipping charges apply to Hawaii and Alaska.
Shipping is not available to a P.O. Box, APO/FPO/DPO addresses, US Territories, or Canada for this item.
Expedited is available on checkout to the United States, excluding Alaska, Hawaii.
Final shipping costs are available at checkout.
How to Replace Fuel Pump Sending Unit 2008-14 Volkswagen GTI
Created on:
Tools used
Hammer
Flat Blade Screwdriver
Pry Bar
Paper Towels
Center Punch
Drain Pan
Cloth Rags
Trim Tool Set
1. Removing the Rear Seat
Pull the plastic clips on the seat up and off
Pull the seat up from the front
Push the seat back and lift it up
Push the seat belt buckles into the seat
Remove the seat
2. Removing the Fuel Pump
Pry up the fuel pump cover with a flat blade screwdriver
Lift the tab, push back, and disconnect the wiring harness
Start the car and let it run until it dies
Press the tab and disconnect the lines
Loosen the lock ring with a pry bar and a hammer
Lift the fuel pump assembly and seal up and out
Remove the seal from the fuel pump
3. Installing the Fuel Pump
Install the seal to the new pump
Install the assembly, with the seal in first
Tighten the lock ring with a pry bar and a hammer
Connect the lines
Connect the connector
Press the fuel pump cover on
4. Installing the Rear Seat
Insert the buckles through the seat
Press the rear of the seat in
Press the front of the seat in
Replace the clips
5. Priming the Fuel System
Cycle the key on and off twice
Start the vehicle
Hi, I’m Mike from 1A Auto. We’ve been selling auto parts for over 30 years!
In this video, we are replacing a fuel pump in a 2010 Volkswagen GTI. If you need this part or any other parts, click the link in the description and head over to 1AAuto.com. All right. We're going to start by pulling these little plastic clips up. You're going to pull them down and then pull them up and towards you like that. Pull them down. Pull them up.
Now we're going to pull up underneath here. Grab your hands under there and pull up quick like that. And then in the back of the seat, you're going to push it back and lift. Over here, push it back and lift. I'm going to pull the seat out. Push the seatbelt buckles down. It's very tricky with the fabric from the seat. If you can get the fabric out of the way, it makes it easier. You can reach underneath and pull the fabric out of the way. You can pull the seat out. So the seatbelt buckles were getting caught right in this area. So that makes it difficult to remove. To access your fuel pump, it's right here. I'm going to take a flat-blade tool. Pull this cover off. You can use plastic trim tools, too.
As you can see, there's little clips that held that in. Now, to bleed off the pressure, we're going to take and disconnect our fuel pump first. All right. So you pull the red tab up. Ours is broken, but you're going to push back on the red tab and then pull it right up. You can see that's where the lock is when you're pushing on the red tab.
To bleed our pressure off, we're going to start the car and let it run ‘til it dies. Now we know the pressure is off on the fuel system, so when we disconnect it, it won't spray us. All right. We're going to use a blow gun to get some of this dirt away from the edges. You don't want any of the dirt going into the tank.
We're going to pull these hoses off. There's a little lock tab on the front, this little blue piece, and push down. The hose should pull right up just like so. That's the lock tab. And this is the one that would have pressure under it. A little bit of gas should probably spill out. Not too bad. Just move those out of the way. We're going to take our lock ring off. Keep note to about where it is because when you put the new one back, you're going to want to be in about the same location. I'm going to take a screwdriver, or this is a pry bar. I'm going to hammer on the lock ring to move it to the left. As you can see, it's starting to move. Release the lock tab. Pull that out of your way.
Going to take a bucket. Pull the fuel pump sender assembly out and then pull the seal up with it. Let it drain for a second. All right. Pull it out slowly. Lift it up. Put it in our bucket, and we can pull it out. I'm going to take the seal off.
This is our old pump assembly. This is our new one from 1AAuto.com. As you can see, they look very similar. There is some differences, but they both come with the fuel level sensor attached. The fuel pump is in the middle. All the wires are connected, and the positions for the fuel lines are the same. There's the return. There's the pressure and the connector. As you can see, the connectors are the same. So order our part from 1AAuto.com, and you'll be good to rock and roll.
We're going to install our seal on our pump. Just hold it up here for now. Now you're going to slip the level sensor in first, like that. Angle it in there, and you're going to have to twist it a little bit. Now, when the pump is here, you're going to push down on the seal so the seal's in there first. Push the seal all the way around. There's a lip on the bottom of the seal. It's just got to get over the ridge. Just make sure it's all the way around. Just push it down. Looks like we're in place.
You want that arrow pointing towards the back of the car. Take our lock ring. Take our hammer and our punch. Just lightly tap it. Going around, you want to make sure all these tabs are underneath the lock ring. That looks good. Now, the black one is the fuel supply, so that's the one that sends the pressure. This one here is the return, and we have the connector right here. Reconnect the connector. Push it straight down, and push that red lock down. There is a tab right here for this cover. It's going to go in this slot right here. Line that up. Push it down in place. So a little bit of fuel spilled, so I'm just going to use a little bit of a cleaner. Clean it up so it doesn't smell like gas. Put that back down.
Reinstall our back seat. You're going to feed the seatbelt buckles through the holes. Get it through the fabric. It is slightly difficult. It helps to reach underneath and pull the fabric through. Get the seat lined up. You're going to lock in the back part of the seat. Push it and push down, pull forward. And you want to check the front. Meet the front. It's lined up there. Push it down. Same over here. Lock that down. I'm going to reinsert these clips. You're going to push up underneath the seat. Get this slot to line up, and then lock it into place like that. And the last one.
It's a little bit tricky. If you angle it a little bit, it makes it a little bit easier. Get it over. Lock it in. All right. Now we're going to prime the fuel system. What we're going to do is we're going to cycle the key on and then off and then off again. Then we're going to try cranking it. It should be primed. There we go.
Thanks for watching. Visit us at 1AAuto.com for quality auto parts, fast and free shipping, and the best customer service in the industry.
Product Reviews
4.7/ 5
★★★★★★★★★★
18 reviews
5★
89%
4★
6%
3★
0%
2★
0%
1★
6%
★★★★★February 19, 2026
Defective fuel pump
Module assembly went bad according to mechanic. Car cranks but will not start due to fuel issue. Even though price was good, I will not be ordering any future parts due to the short working time this one worked properly.
★★★★★June 30, 2025
Exact replacement for Beetle
Exact fit for replacement in a 2012 VW Beetle. This didn't fix the problem with the car, but works the same and let me move on to the next troubleshooting step.
★★★★★January 4, 2025
Fit and fix my problem
Great
★★★★★October 9, 2024
Pump it Up
It seems a bit cheaper and lighter than the factory one that we replaced. But, it cost a heck of a lot less and seems to be working great, so I'm happy.
★★★★★June 9, 2024
Fix vw gti 2007
Funciona perfectamente en mi vw gti 2007, hasta ahora el carro rueda de maravilla, fcil de usar y es exacto como se describe
★★★★★April 27, 2024
Very well made and does excellent work and since the install has made my car run a lot better and smoother then the factory's fuel pump
★★★★★September 4, 2022
30min job. Seats are the challenge. Consider method to manage/dispose of fuel.
Product fits
High pitch noise from the assembly when running, even with sound dampening material/seat in place.
I would elect to try a more expensive product in the future, but noise is not enough for me to replace.
★★★★★September 8, 2021
Solved my GTI problem
Changing this until solved my starting problems... great price!
★★★★★August 30, 2021
Couldnt be happier
Ive had this fuel pump installed in my car for about 18 months. It was easy to install and it hasnt missed a beat. I have a Stage I APR tune in my car, so I wasnt sure, but I figured Id give it a shot. I saved hundredsCouldnt be happier.
★★★★★August 12, 2021
I recommend 1A Auto to friends and family
Well. I have no experience in mechanics but I change fuel pump myself and the help of God n my stepfather. It took longer to remove the rear seat than changing the pump. Lol
Well its been about 2 weeks now and So Far So Good. No cold hard starts no more. Yes.
Hope it last for ever. Lol
Thank You Guys
Blessings To You All
Showing 1–10 of 18 reviews
FPA61970
In Stock
Customer Q&A
Got a question about this part? Post it and get answers from our team.
MilanApril 30, 2024
Will this pump fit 2.0 diesel?
Please provide your full vehicle information or VIN number to confirm product availability and fitment.
Nick · May 1, 2024
AlvaroMarch 5, 2022
Buenas noches sirve para jetta 2.5 modelo 2010 ?
This part will not fit your vehicle, but we may have a part that is listed to fit.
Please enter your vehicle's year make and model in the search bar at the top of the page. This will display parts guaranteed to fit your vehicle. Just be sure to verify all of the information shown in the Vehicle Fit tab before ordering.
T · March 7, 2022
DOctober 12, 2018
WILL THIS FIT 2.5l ?
The fit will depend on your year range as well as your engine size.
Emma · October 12, 2018
Showing 1–3 of 3 questions
Customer service
877-844-3393
Monday - Friday 8:00am - 9:30pm ET Saturday - Sunday 8:00am - 4:30pm ET
Ask a Question
Check Your Email
We sent a verification email to .
Click the Verify Email button in the email to submit your question.
This extra step helps prevent spam.
Select Your Vehicle
Specify your vehicle's year, make and model to guarantee fit.






 WARNING: This product can expose you to chemicals including Di(2-ethylhexyl)phthalate (DEHP), which is known to the State of California to cause cancer, and birth defects or other reproductive harm. For more information, go to www.P65Warnings.ca.gov.