Replaces


Part Details
Specifications
Product Features
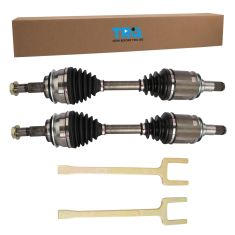
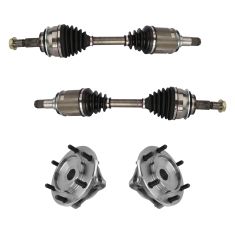
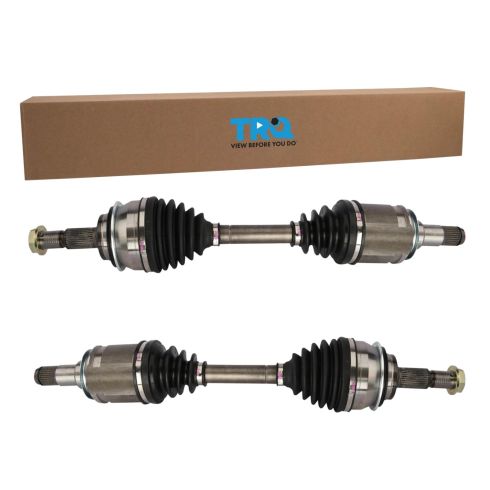
TRQ CV (constant velocity) drive axles are manufactured using premium raw materials designed to restore original performance. TRQ CV drive axles are new, so there is no core charge with your TRQ purchase. TRQ-designed drive axles utilize neoprene boots, moly grease, stainless steel clamps, and heat-treated ball tracks to ensure extended service life. Each TRQ axle is application-specific so each spline and thread will mate properly for a seamless fit. All products are fit and road-tested in our Massachusetts R&D facility to ensure we deliver on our promise of Trusted Reliable Quality.
CV axles are designed to transmit the power from your vehicle's drivetrain to the wheels while being able to flex and pivot to the demands of the steering and suspension systems. If your vehicle is making clicking noises at lower speeds or when making turns, it may be time to replace your CV axles with our 100% brand new assemblies.
Attention California Customers:
 WARNING: This product can expose you to chemicals including Lead and Lead Compounds, which are known to the State of California to cause cancer, and birth defects or other reproductive harm. For more information, go to www.P65Warnings.ca.gov.
Lifetime Warranty
This item is backed by our limited lifetime warranty. In the event that this item should fail due to manufacturing defects during intended use, we will replace the part free of charge. This warranty covers the cost of the part only.
FREE Shipping is standard on orders shipped to the lower 48 States (Contiguous United States). Standard shipping charges apply to Hawaii and Alaska.
Shipping is not available to a P.O. Box, APO/FPO/DPO addresses, US Territories, or Canada for this item.
Expedited is available on checkout to the United States, excluding Alaska, Hawaii.
Final shipping costs are available at checkout.

Created on:
Tools used
Hey friends, it's Len here at 1A Auto. Today I'm working on a 2007 Toyota FJ Cruiser and I'm going to be replacing the left front axle. It's going to be a very easy job. I want to be the guy that shows you how to do it if you need this or any other part, you can always check us out at 1aauto.com. Thanks.
Okay, so what we're going to do first is we're going to take off these six lug nuts, 21 millimeter. You can use a ratchet and a socket if you want or your air gun. There we are. Get the wheel broken free. Drop this down. Wheel it out of the way. Okay, so now we're just going to try to push back the caliper a little bit. I'm just going to go like this. Just try to push back these pistons best I can. This is just to release the pads from the rotor. Cool. Okay. Rotor can move around freely. If we need to, we can push them back a little further in a minute. Now we're going to remove the caliper.
One of the first things we need to do is take off this clip right here. Generally, cutters work pretty good for this to grab onto it. Let me grab some in a second here. There we are. Now this line can move around. It's very important so when you take your caliper off, it can move around a little bit. I'm going to use a 12 millimeter up here on this bolt. That's going to remove this bracket so it can move around.
Get my socket off of there. There we are. Okay. The bracket can move around freely. I'm going to take these off right here. If it's easier and you wanted to, you could take off the outer tie rod end. I'm probably going to do that. That way there I can turn this and I can get to those bolts easier. Let's grab some cutters. There we are. Just wiggle this around. If you have a new cotter pin, you don't have to worry about saving this one. But if you don't, you're going to have to try to save it. We do have new ones. So I'm not super worried about it. This one doesn't look like it's coming out. So I'm just going to cut that off of there. Tie rod end nut is a 19 millimeter. There we are. Took that off of there, 19 millimeter. Just going to give the knuckle a couple bonks. I want to be careful not to damage the threads on the tie rod or hit the boot. It's super important you don't break your boot open. If you do, you'll have to replace the outer tie rod end.
All right, around this way. There we are. Now when we go to install this, we're going to have to make sure that we get that cotter pin out of there. Okay, because we want to put a new one in there. We'll set this aside. Now we can pivot this and we can do what we need to do. We're going to use a 17 millimeter to remove the two bolts for the caliper to the knuckle. Same thing to the other one. At this point, the caliper may come down. You want to make sure you hold onto it so it doesn't fall down and hang too far.
Bolt number two is the same as the first. Set it aside with the other one. Now I want to hang the caliper not by its flex hose obviously. So just grab whatever you've got, coat hanger or something that everybody would have. There you are. We can remove our front rotor. Okay, so now we're going to take off this cover right here. It's just a tin cover. So you don't want to completely destroy it. Along the hub and the cap itself, there's a little lip. There's kind of a little a gap. Hopefully you can try to get a pry bar or screwdriver or whatever you've got in there. You just kind of want to get in between, break it free. If this bends a little bit, that's okay because you can just bend it back if you have pliers or anything like that. Like I said, you just don't want to damage it too bad because it needs to create a good seal. Okay. Let's see if I can get something else in there. Looks like we're pretty close. Let's get this here.
There's our cover. It's not too damaged. I can try to straighten that out a little bit. When I go to reinstall this, I'm just going to use a little bit of RTV or gasket maker. It's just going to help keep moisture out of here and protect this nut area. I'll set the cap side. We're going to remove this cotter pin. I'm going to use my cutters. Again, if you have a new cotter pin, you can go ahead and cut it. If you don't, you need to try to save it because you do need to have the cotter pin in there. I have access to new cotter pins so I'm going to cut this. Just watch your eyes.
It's a little locking thing. Okay? Just slides over the nut there and then you line up the slots with the hole and put your cotter pin through. It makes it so this nut can't loosen up when you're driving down the road. Not that it should. You're going to have it torqued down anyway. It's just precautionary. We'll set this aside because we're going to reuse it. Now we're going to take off this nut. So I'm going to grab the socket we need and we'll move along. We're going to take off this nut right here. 36 millimeter. It's easiest with an air gun. If you don't have access to an air gun, what you're going to want to do is you're going to grab a bar. You're going to bring the vehicle closer to the ground and set this up against your lug studs just like this pretty much.
So when you go to loosen up this nut, your hub won't be able to turn. Okay? You can use your 36 with a long ratchet. Break it free. It'll come loose. With an air gun, you don't need to worry about that. Just hold this. Easy peasy. Okay. Now you want to try to push your axle in. This one feels like it moves a little bit. So we know we're in good shape on that. I'm going to go with a little bit of penetrate here. Let it do its job. It's going to hang out in there. Oh yeah. So that's moving freely. We're going to take off this outer tie rod end nut.
Bonk that out of there. Now we can turn this. Next what we want to do is we want to disconnect the ABS wire from the sensor itself. We're going to take it off of here, here. We'll get it off of here just so it's out of the way. All right, and we'll try to just move the ABS wire out of the way so we don't put any tugs on this because what we're going to need to do optimally is remove this knuckle so we can get the axle out of here. So what I'm going to do, I'm going to try to get my pocket screwdriver in here, right like this. Let's see if I can get that to do its thing. When I go in between right here where this white dot is, there's a little nub, like a squeezy nub. You can't grab with your thumb obviously because it's in there. So you need to use something small like this. Wedge it in. Give it just a little pry and it lifts up on that little lock right there. Okay? When that lifts away, you can just grab this, wiggle it.
Disconnect your ABS wire. You always take a peek. Make sure there's no funny colors in there, no reds, greens, blues, rust, dirt, water. That looks really great. You can move along. We'll start disconnecting these clips. Just use your pocket screwdriver still. Stick it in there. It should lift right up. Okay. Do the same thing to the other one right along the edge. Lifts right up. Okay. This one doesn't look like we have to do anything with it because it's very far out of the way.
So I'm really not worried about that. Now when we try to take the knuckle off of here, we don't have to worry about the ABS wire getting a tug and/or breaking because last thing you want to do is break your ABS wire or your ABS sensor. It's going to cost you a couple more bucks and who needs to spend more money? Let's do it right. That's out of the way. We're safe with that. We can move on to the next step. We're going to take off this sway bar link right here. Okay? To do that, we're going to hold right along here. You can use some locking pliers if you want or you can find the wrench that fits along it. Then you're going to take off this nut right here. We'll grab the tools and I'll show you how. So now I'm going to take off the sway bar link. This is 1A Auto sway bar link. I'm going to use a 24 millimeter on the link side and an 18 millimeter for the nut side. Remove that nut. We'll set this aside.
Just going to get this link out of here. Grab my pry bar. Okay, we're cruising. This cotter pin right here is going to have to come out. It's kind of a funny cotter pin though. On the backside that curls around, so right here, normally you'd have two straight pins that go straight through this. This one has one that goes through it and then the other one goes around the outside and it curves like this. So you want to grab that leg, pull it out and away, bring it down. Then you should be able to walk this out of here if you can't, with a small screwdriver just grab some cutters and then pull it out. So that's what it looks like. Just like I mentioned, it was through like this and there's a little hooky do, goes around the backside there. We're going to remove this nut and then we're going to put it back on a few threads and we're going to give the knuckle a couple bonks and try to break it free from the upper control arm.
I'm going to use my 19 millimeter to remove this nut. Safety glasses of course. There we are. We'll take it off just so I can show you. But then I'm going to put it back on, like I said, a few threads because now what I'm going to do is I'm going to bonk right here on the knuckle. I'm going be careful for my boot. I don't want to damage my boot. I'm just going to hit right here. Okay? Once this breaks free, it's going to want to drop down. That's the purpose for the nut being on there. If you don't have that and you just let this drop down, it can swing down. It'd hit you in the face. So, safety first. It's the number one concern here at 1A Auto. I'm just going to go ahead and hit right here. It broke free. Okay?
Pull down on it like that if you want. I'm going to slowly bring this down so can't hit me in the face. There we are. Cool. So this is pretty much ready to come out at this point. Okay? We just have two more bolts down at the bottom here that we're going to remove, one here and one here. Once we do that, the knuckle is going to be ready to separate from this bracket right here. We can draw it right out and then we'll take off the axle. So here we go. I'm going to use a 19 millimeter socket. That's what the bolt looks like. Okay? Set that aside. I'm going to hold the knuckle at this point.
Bolt number two, the exact same as the first. Now the knuckle is going to pull straight off just like this and we've removed our left front knuckle. So now I'm going to use something as simple as a small bungee cord here and I'm just going to go around the axle and the strut and that's just for safety's sake because what I'm going to do next is remove this axle and I'll be doing that, if I can get this thing on there. There we go, and I'll be doing that by trying to drive the axle out of the front differential. Once it breaks free, it has the possibility of coming off, hitting the ground. I'm going to be under there. So I don't want to get hurt. So I'm just going to put that under there and we're going to go ahead and remove this axle now. I'm going to use a large pry bar. I'm going to try to grab on this lift. I'm going to try to pry the axle out. When the axle comes out, it's going to go in this direction.
Let's see if I can get over here. Doesn't feel like it wants to go there either. Okay, so the axle isn't coming out that way, which is common. Sometimes it does. Sometimes it doesn't. It doesn't hurt to give it a try. Now I'm just going to come underneath it like this and I'm going to give my bar a couple of bonks and see if I can drive this out. Okay. Looks like it's starting to come out a little bit. So we're going in the right direction. Just got to get this up in there.
If you wanted to, you could try to take down your skid plate. Get a little bit of gear oil. As you remove this, there's going to be fluid that comes out from around the seal and the axle. It's going to come down. You want to make sure it goes into your collection bucket. Now I'm just going to pull the axle out of here or pry it, depends on what we need to do. There we are. So now we're going to take off our bungee cord or whatever you used to tie up your axle or maybe you didn't even use anything. That's up to you. It's your prerogative. I'm going to pull the axle out through here. Now we've removed our left run axle. Easy peasy. Okay, friends, a quick product comparison for you. Over here, we have our original axle out of our 2007 Toyota FJ Cruiser. We just removed it.
It was very easy. Over here, we have our brand new quality 1A Auto part. As you can tell, they're both the same length, which is important. If it looks like one's a little bit different, you just squeeze it in. They can expand and they can contract. Okay? Just like that. So if it looks like it's a little longer, it's okay. If it's a lot longer, you've got an issue. Okay? We got brand new boots, super important. A lot of times what happens is these get dry and crack. They start spraying grease all over the place. Once that happens, you get debris in there, you get a clicking noise every time you turn your wheel while you're driving. So everything's brand new here, essentially. Right along here, you've got your splined area. You got this little clip right here. That's what presses into the transmission and locks it in. That's why when we took out the old one, we had to drive it out. It just breaks it free from the little slot that's in there. This side, you got your splined area even comes with a brand new nut.
Another great thing about this axle, comes with a cotter pin and your little castle lock there, super important. All that said, I don't see any reason why this wouldn't be a quality part to install under the vehicle. So I'm going to go ahead and do it. If you need this or any other part, you can always check us out 1aauto.com. Thanks.
Okay, so now we're going to go ahead and install our axle. I'm just going to bring it over to the seal. Try to get it just past it. There we are. Shake the axle around a little bit. Okay. You might notice that really doesn't want to go in very easy, right? That's because at the end, it has a little lock clip. So I'm just going to go ahead and hold the axle. I'm going to give the end of bonk. I like to keep the nut on there a little bit and use a rubber mallet and that way there, I can drive it without actually hurting any of the threads. You definitely don't want to mess up your threads. Okay. Take a look at it. Looks like we're getting close. There we are. Okay. Just a couple of light slams like that. Easy peasy. Broke a sweat. It's okay. All right. We can move onto the next step. All right, so we'll get our knuckle. So now we're going to slide our axle into our knuckle. Bring the knuckle over the lower ball joint bracket.
Take our two bolts. Try putting one in this hole, one in this hole. I'm going to ahead and tighten this up with our 19 millimeter. Those are both tight. I'm just going to get this sway bar link up in here just like that and when we do this, we can use a pry bar. Go right in between one of the coils and the upper control arm and we can bring it down to where we need it. So I'm going to get my nut ready. You just need to get a few threads on it. There we are. Let's see. Get our sway bar link nut started here. Okay, now we're going to tighten these down. We'll get the torques back in. Just going to tighten this up. It's tight. You can grab the torque spec for that. We're going to tighten this down too. So we'll bottom this out with our 19. There we are. We'll grab the torque spec. We'll torque it down. So now we're going to torque the ball joint nut, 81 foot pounds with a 19 millimeter. There we are. That's torqued. Now we just want to look at it.
We can see where the hole in the ball joint is. Needs to line up with the next slot. So at this point we're going to need to tighten this a little bit more to get it so it lines up. Then I'm going to use my ratchet. So you can see the hole in the slot are lined up. Now we're going to replace that cotter pin. This little pin right here, same thing we removed. We're just going to slide it back over just like we did before. Then pull it over the ball joint so it clips into the slots. Can't fall out. It feels nice and tight. I'm just going to go ahead and put on the axle nut now. So I'm going to take my bar. I'm just going to go straight across the studs just like this. That's going to make it so the hub can't turn while I torque this down. I'm going to get my torque wrench and we're going to torque this down to 173 foot pounds with my 36 millimeter socket. So here we go. 173 foot pounds. There we are. Set it one more time. Torqued.
So now it's time to put on our new lock. This just slides over the nut. You line up the slot with the hole, put your new cotter pin through. Then you could choose which way you want to peen it. Some people like to make one of these gears go one way, one go the other. It really depends on what you want to do. It's your prerogative. I'll leave it up to you. Some people will bring it up around the front. Basically, as long as you bend them over and the cotter pin can't come out on its own and then the axle nut can't unlock on its own, you're doing all right. Okay? That's never going to come off on its own. We're all set. Now we'll grab our cap. Okay, so I'm just going to use a little bit of gasket maker here. Just go right along the edge.
There we are. We're going to put this right into the hub just like that. I'm going to grab my rubber mallet. Give it a couple of bonks. There we are. Let's make sure it's in. Okay. No moisture is going to get in there. Now if you want to clean it up, go ahead and clean it up. Just go around it. Do the best you can. It doesn't have to be anything too pretty.
Well, it's your vehicle. Maybe you do want it to look pretty. It's going to be hidden though, FYI. Get that out of there. Cool. I'd say that looks decent. It's getting worse the more I touch it. So I'm just going to stop. We're just going to plug in our ABS wire. Listen for it. Clip. Give it a nice little tug. Feels good. It goes right in these little plastic brackets here. I'm going to push that down in one second here. I'll just get this on there. Okay. We'll just clip these in. ABS wire can't go anywhere. It's not going to get caught on the axle anywhere. You should be good to go. Now we'll put on a little bit of copper Never Seize. Perfect. We'll grab our rotor and we can move along. All right, we've got our rotor. Just put it right on here.
I'm just going to grab a lug nut. I'm going to try to put this on as far as I can. I want this to make sure or this is going to help me make sure that the rotor can't move around on the hub. The more it moves around, the more chances you have of rust flakes falling in between the rotor and the hub, which will cause a brake pulsation down the line. We'll just kind of give it a little spin like this. I don't hear any brake grinding. The backing plate isn't hitting up against there. It's very common for it to happen. Maybe you are moving something around. You tweak the backing plate a little bit. This one sounds good. Carefully put it back over.
Grab your mounting bolts. If you want to use a little thread locker on these, you can. It's your prerogative. For the purpose of this video, I'm not going to worry about it. We're just going to turn these all the way in and then we'll torque them down. So now we're going to torque down these two bolts to 91 foot pounds using a 17 millimeter. I'm just going to turn that. Okay, I'll check them again real quick. We can set our bracket back up. Get the hole for the bolt and then the hole for the ear on the bracket. I'm just going to go like this. Going to turn it so there's less pressure. That's going to come up here. A bolt like this, you definitely don't need to use thread locker on it. Might actually be better to use a little bit of Never Seize if you have access to some. But I'm not going to worry about it for the purpose of this video. I'm going to use my 12 millimeter, tighten this up. Okay.
Take our line, try to bring it down so we can see the groove. We're going to use this clip. This is going to go through with the little flippy ear facing our thumb. I'll just try to bring it in. Sometimes getting these in is pretty difficult. I'm just going to loosen this up again real quick a little bit. Maybe that'll let us get some more movement out of this once it's set up where we need it. As soon as I let go, it goes back. Okay. Now, I'm just going to bonk that in. That's what I had in my hand. So small hammer would work for this. Okay. Snug this back up. Tight. Okay. Tight, tight. All that's tight. Okay. We've get this right here.
When we took it apart, we had to break the cotter pin. So I'm just going to need to drill that out real quick. So I'll do that. Okay. So we got the hole through that. Easy peasy. Now we'll just clean it off and we can tighten it down and put a brand new cotter pin in there. So now we're just going to take the tie rod nut. We're going to bottom it out and then we'll go ahead and torque it down using my 19 millimeter. We'll go with the assumption that it doesn't want to tighten down. It's just spinning inside the the knuckle there. Something you can do, if you have access to a long pry bar, just apply upward pressure. Be careful of course for your axle, wherever you need to go that you're not pressing on your axle. Just going to keep moving around until I find a nice safe spot. That'll be all right I guess. I'm just going to apply upward pressure. There we are.
Now we're going to go ahead and torque this down and then we're going to have to bring it continually clockwise until we get to the closest slot that lines us up with our locking point. Okay. We're going to torque this down to 67 foot pounds. Okay, that's torqued. Now it's important to pay attention to, like I said before, where the holes are. There's a hole right here. But it kind of lines up with the castle nut, the castle part of the castle nut. So we need to bring it a little further until it lines up. So I'm just going to use my ratchet. I'm just going to go as far as I feel like I need to here. A little bit more.
There we are. Slide that right through. It's your prerogative how you want to set this. Some people go side to side, one ear to one side, one ear to the other side. Some people go over the top. As long as it's bent and it can't come out on its own, you're doing all right. So you do you, booboo. Get that on there. That cotter pin can and go nowhere. There is no way that this nut's going to be able to loosen up on its own and the tie rod won't be able to come off causing the wheel to go out of control. So we're tight, tight. Everything's tight coming around here. Perfect, clear to move on to the next step. Okay, so we've got our caliper on there. Now all you're going to do is you're going to get up inside the vehicle. Well, actually you want to make sure that your brake fluid's topped off of course.
I mean, that's just generally speaking and then get inside the vehicle and then just pump up the brake until the brake pedal's nice and firm and then you should be clear to go for a road test. Okay, so now that you've finished that service, you want to make sure that you top off the fluid. To do that, you'd want to take out the fill plug or the check plug. Once that's out, you can stick your gloved finger or if you have a little pick, you can put it inside and just see if you feel a little bit of fluid right there. If you don't feel any fluid, just go ahead and top it off. You're going to use a little bit of 80W-90 weight GL-5, very simple. Once it's topped off, you just want to make sure that you put the plug back in, snug it up so it's nice and tight and off you go. Okay, so now we're going to get the wheel up on here. I've got a couple of lug nuts in my hand.
I'm going to take the wheel, put it up against my leg and I'm going to lift with my leg/ab muscles just like that. I'm going to try not to use my back. I don't want to hurt my back. Go like this. Lift this up. There we are. I'm holding the wheel. Get one lug nut started on there. Number two started on there. Now I can release the wheel and I can grab the rest of my lug nuts. We have all of our lug nuts on. All right? We still have to snug them up. To snug them up, what we want to do is go in a snowflake pattern on this. Generally speaking, go criss cross. But this is more like a snowflake. So you go boom, boom, boom, boom, boom, boom. Okay? Never go around in a circle. You go ahead and go around in a circle, you tighten it up along this way, pulls it in, right? You get over to this side, you think you have a tight. You might even torque it down and it's still cocked off to the side a little bit.
You go ahead and hit a bump, boom. Next thing you know, your wheel's ready to fall off. Okay, so just go ahead. Go criss cross, start pattern, whatever you want to call it. I'm just going to bottom it out and then we're going to torque them down after. We're going to go ahead and torque down the wheel now to 85 foot pounds with our 21 millimeter socket. We're going to continue in our snowflake pattern or crisis cross, whatever you want to call it. Start here. Go to the opposite side of the wheel. There we are. We know they're all torqued. If you want to hit him again, hit him again. Small price to pay for a little bit of safety. There we are. Easy peasy.
Thanks for watching. Visit 1aauto.com for quality auto parts shipped to your door, the place for DIY auto repair and if you enjoyed this video, please click the subscribe button.
Tools used
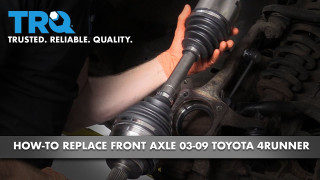
Hey friends. It's Len here from 1A Auto. Today we're going to be working on our 2006 Toyota 4Runner and I want to show you how to remove and install a front axle. If you need this or any other part, check us out, 1AAuto.com. Thanks.
Okay, friends, so it's time to remove our wheel. To do that, you're going to remove all of your lug nuts. You're going to use a 21 millimeter socket. If you're going to be using a ratchet, it might be easier to do this while the wheel's still on the ground so it can't spin while you try to loosen up your lug nuts. I'm using an air gun, so I've got my eye protection, my hand protection. Here we go.
This one I'm going to leave on a few threads. Now I have a spare hand. I'm going to try to wiggle this around. A lot of times on Toyotas, they don't want to break free right away. That's not really that big of a deal. You could use something as simple as a rubber mallet or if you have a pry bar. Either way, what you want to do is make sure you have a lug nut on at least a couple threads, but it's still nice and loose. Come right under here. I'm going to bonk right on the edge of the rim. If you're using a real hammer that's not a rubber mallet, definitely don't hit your rim. You'll mar it up, cause issues. You could try bonking on the tire. You just have to be careful because when you bonk it's going to want to come back. Rubber mallet right on the rim. There we are, that lug nut did its job, made it so the wheel didn't come falling off and hurt anybody. Super important. Safety's number one. Take our wheel off, and we'll roll it out of the way.
All right, so we're going to take out this clip right here. Just a little forky looking clip does this, it goes right over the line. Can use a screwdriver, small pry bar, some cutters if that's easier for you to grab with or even pliers. Once you get it so it wants to break free, should be able to wiggle it right out of there. And that's what it looks like. It's got a little ear here, and that ear faces towards you or away from the vehicle.
Okay, so now it's time to take out these caliper slider pins here. Sometimes they'll be frozen in there if your caliper's old, and that's pretty common. But basically what you need to do is grab like this with your small pocket screwdriver, you're going to take off this clip right here. And do the same thing to the other one. Pull off that clip. It's the same as the first. You don't have to worry about mixing them up. Awesome. Now what you would need to do, just take your small hammer, give these a couple of bonks.
These ones come out nice and easy because it's a brand new caliper, but if it wasn't and they didn't come out easy, you just use your hammer, bonk, bonk, bonk, until it's level. Take your punch, drive these all the way through as far as you can, and then come from this side and pull your pin all the way out. You'd want to inspect your pins, make sure that they're not rotted or rusted or anything like that. If they are, you'd want to replace them so they look something like this. Nice and smooth because your pad needs to be able to slide around on them nice and easily. We'll set those aside.
We've got a little clip up here. This comes out very easily. Just got a little ear right there and it slides into the hole on the pad. And then same thing over here. At this point, if this wasn't a brand new caliper, your pistons are going to be holding your pads probably up against your rotor. We'll go with the assumption that they are. You would take your small pry bar, just come right between the rotor and the pad and just try to push like this and that's going to slowly push in this piston. Same right here, over here and over there. Once you have it so your pistons are pushed back and your pads are plenty of distance away from your rotor, you can grab your pad, slide it right out of there.
We'll set that aside for recycling. This one. Now you're going to want to make sure you have maybe something like this or even a small bungee cord, whatever you need, because we're going to be taking out the two mounting bolts that hold this caliper to the knuckle and we're going to have to hang this somewhere, so just get it ready. Wherever you think you can probably put it. We're going to take out those two bolts and we can continue. Now I'm going to use a 17 millimeter socket. This one's just a swivel and it's on my impact wrench and that's just so when I come in I can get the right angle. You can use a 17 millimeter socket and a long ratchet if that's easier for you. Of course. If you're using your air gun, you want to make sure you're wearing safety glasses at all times.
Got both of our bolts set these aside. Just grab this, bring it down here. Should be able to move around fairly decently. Just going to put that there. There's no pressure on this flex hose. You definitely don't want to put a tug on your flex hose. When you're trying to take the rotor off, you'd want to have a lug nut on there, at least a few good threads, and then when you're taking your hammer and you're going bonk, bonk, bonk to try and get this to break free, if the rotor did decide to pop off, it can't come down and potentially hurt you anywhere. This rotor's already broken free. Here's our rotor.
Okay friends, so we got a little punch, we've got our hammer, you've got your cover. All we're going to do is just make a little divot in the cover just like that and now I'm going to try to drive the cover off. All right, so as you can tell, I did not make a hole inside the cover there, the tin cover. If I did make a hole, I would just have to seal it up. The reason why I had to make that is just so I had something to grab onto so I can knock the cover out. Now we have a clear view of where our axle comes through the wheel bearing and then all the rest of the stuff we're going to have to take off to that axle out.
Now I'm just going to use a pair of cutters, you can grab these ears, can either bend them up and cut them off. I wouldn't cut them unless you have a brand new cotter pin because you can't put this back together without a cotter pin. If for some reason you don't have access to another cotter pin, just straighten out these ears the best you can, then you should be able to get the cotter pin out. We do have access to cotter pins, but I'm just doing it this way just to kind of show you what I'm talking about, about trying to straighten this stuff out. Of course, it'll straighten out more along the way as we do this and at this point I would say that it's fairly reusable. It's not broken in any way. I didn't try to cut into it very much. I just gripped in. Like I said, I'm going to replace it because we have access to new ones, but you definitely need to have one of these to lock this in.
All right, so we're going to use our 36 millimeter socket, I'm going to use my air gun and I'm going to take this off. If you're not using an air gun and you're just using a socket with a ratchet, when you go to turn it to the left to loosen, this is just going to spin. That causes an issue. What you can do, grab yourself a pry bar, put it like this, going across to your lug studs and then bring it down close to the ground so that this is all right down on the ground. As you go to loosen, it's going to bring the pry bar around, rest this on the ground and it's going to hold the bearing from spinning around on you and you'll be able to remove the nut. For me personally, I don't need this because I have this. I have my eye protection on, my hand protection of course. Here we go.
Take that nut off of there. I'm going to put it with the rest of the stuff. Grab this, see if we can push it through. I cannot push this through. This is going to need to come out of the bearing. What we're going to do now, right in the center here, you can see there's a little pilot hole. You can either use a punch with a hammer, bonk, bonk, bonk, try to drive this through, or you can use your little air chisel with a punch that goes in the center. But what you need to make sure that you don't do, use your hammer, give it a couple bonks, if you peen over the threads on your axle, the axle's going to be unusable. You'll have to try to file it down. Hopefully you can get it going good. It's kind of a pain in the butt. Maybe you might even need to replace the whole axle and that will be fairly expensive. If you do do something like that and you need to replace the axle, check out the video. We'll do one on that as well.
I'm going to grab a punch and I'll show you what I'm talking about. I'm just going to use my air chisel with my little punch bit. I got my eye protection on. Here we go. I can see the axle driving its way in. This comes in handy. You can get yourself an air chisel if you want, right off 1AAuto.com. The next thing we're going to do is we're going to take off this cotter pin for your outer tie rod end. Do that. Bend this over. I'm going to grab the cotter pin with some nice cutters. I grabbed cutters instead of pliers because they seem to grab on much better than grabbing a simple pair of pliers. If you have access to new cotter pins, obviously you don't have to worry about trying to save these. If you don't, well then you're going to have to try to save it, which at this point you're past that. We have access to new cotter pins so I'm really not worried, too worried about it, which is a good thing because this one, gonzo bonzo. Cool.
I'm going to use a 17 millimeter socket with an extension and you can use a ratchet or an air gun, whatever you have access to, but it's a 17. We're going to use our 18 millimeter socket, our short extension. I've got my hammer, safety glasses, of course. I'm just going to bonk this down. Get it on there as far as I can. Leave that right like that. Take the socket off in a minute. Next what I'm going to do is I'm going to bonk right on the knuckle itself and try to make enough vibration that the outer tie rod end will break free from the knuckle. Awesome. We'll get the nut out of there as well. If you happen to bonk the backing plate, it's really not that big of a deal. You can bend it fairly easily. Just be careful for any sharp edges.
All right, so now we're going to remove this bolt right here and this bolt right here. To do that, you're going to use a 19 millimeter socket. Awesome. There's one bolt. Bolt number two, same as the first. We'll set both of these aside. You can grab this, you can wiggle it around. Awesome. You can see the reason why we're replacing this axle. That's very bad right there. What you're going to do now is you're going to push your axle through the wheel bearing area here, being careful not to put any tugs on anything, your ABS wires, your brake wire, brake hose, anything like that. Just see if we can pull it out far enough to get the axle out. We're going to go this way. Awesome. Set this off to the side.
Now what we're going to do is we're going to get underneath the vehicle and we're going to try to pry the axle out of here. All right, so now what I'm doing is I'm just trying to create something and it's very basic. All this is set up to do is just to make it so when I knocked the axle out of the differential, it won't be able to fall down. It'll hopefully be caught by this, at least. At least for the couple seconds that it's going to take me to put down my tools, come over here, undo this, and grab the axle right out of here. As a safety precaution just so the axle doesn't come flying out. Now I'm going to take a big old pry bar. I'm going to come through the hole in my skid plate here. I'm going to go right up against one of these lips on the axle. You'll notice that they're all over the place and that's just a good point to put your pry bar onto, give it a try.
Sometimes a few good whacks. Looks like it's starting to come out now. We'll just keep doing what we doing. It's looking good. Awesome. There's that. If you happen to have a rag or something, you can catch your gear oil. Just put that right down under there. At some point it's going to come pouring out. What we'll do is we'll make sure we have our catch bucket under here of course. And then we're just going to take out this rubber plug. I'll grab a pocket screwdriver or something around here see if I can get this to pop out. There it is. Awesome. That's going to give an area for the gear oil to come out into our catch bucket. Did a great job. Thank you. Grab our axle. Of course we got lots of nice grease coming out all over the place and there's our front axle.
All right, so I'm just going to take my rag. I'm going to clean up along the edge of this seal here. There's still going to be some more fluid that comes out. I'm really not worried about that so much as just any type of dirt or debris or anything that I might force in there that could put a tear in that seal. If you notice that your seal was leaking prior to doing the axle, obviously now would be the time to do it. That one looks good so I'm just going to grab my axle.
You've got the side that goes into the transmission, and then of course the side that the wheel bearing is going to be on. Just put this so it's pretty level. I'm going to get this up and in here. Line it up with the splines and the transmission. Awesome. We're going to leave this right here like this. I'm going to grab my rubber mallet and it's important that you use a rubber mallet. You don't want to use a regular hammer if you can avoid it. And if you have to use a regular hammer, I would definitely make sure that you have your nut on here just like this, and have it as level as possible so when you're bonking, you don't have to worry about messing up any of the threads on your axle. Because if you mess up the threads, obviously the nut's not going to want to go on there and you're going to have major issues, hence the rubber mallet. I'll try it with a rubber mallet. All right, here we go.
Looks like it's going in. We're going to keep going until it feels like it bottoms out. Sometimes it can be hard and that's just because of that metal clip that's in there. That's the locking clip. Right now we're trying to get the locking clip to go into its happy spot. Let's just give it a couple more taps here just to be sure. But it looks like we're pretty darn close if not there. Perfect. I love it. I can spin the axle. Feels good. I don't hear any noises. Let's move along.
We'll take off our nut. This comes off nice and easy. We made no damage to the axle or the threads. We can tell because the nut goes on and off no problem. We'll set that nut aside because we're going to be using it in a minute. At this point, you're going to take your knuckle, bring it out, try to slide it over here. If you wanted to, you could use a little bit of a never seize on here. That's completely up to you. I'm going to be putting my hand here to try to maneuver it around so it just kind of seems like it's a bad idea to do it that way. What you could do though, just come from the backside, just give it a couple little sprays so it goes into where the splines are. That's right where this is going to ride. Just need another place to grab onto aside from this terribly crumpling backing plate.
Just going to slide our axle through. Just going to leave it just like this. Nice and far away from here so that way there I can keep in the back of my head that this is not tight yet. I'm not screwing it all the way down. If you want to, you can just leave it completely off that way there if you happen to find it on the ground or wherever you are, you'll be like, oh no, the axle nut. For me personally, I just put it here. And that just prevents this from coming all the way out as I maneuver things around. All right, so let's keep moving.
We're going to line these back up. We're going to put our bolts up through here. We've got our bolts. If you wanted to, you could use a little bit of threadlocker. This is just an instructional video. I'm really not too worried about it, but we'll say that it's your prerogative on if you wanted it to do it or not. You do you Booboo. Sometimes getting these things lined up can test your patience, but if that's the hardest thing I have to do all day, I guess I'm doing all right. All right, got one. Two.
Just make sure you straighten out your backing plate the best you can. If you happen to bend it when you're in the process of moving it around, the axle. This backing plate right here, it looks as though it could use a little bit of help, maybe even replacement. To do that of course you would take off your wheel bearing here. Just a couple of bolts. Take that off, out of the way. Obviously you'd have your axle nut off and then take your bearing off and then here you go. Replace that, put it back on.
Okay, so we have that broken cotter pin in here. I'm just going to go ahead and put my drill bit in here. I've got my safety glasses on, of course, and I'm just going to try to drill out this hole so we can put a new cotter pin through. That looks pretty great. Clean off any metal debris that we might've made so it doesn't get down into this boot area. You can see right through there. Oohoo, take this. We have our castle nut. Snug that up. All right, let's find the torque spec for this real quick. We're going to go to 67 foot pounds. All right, just going to check it one more time.
Okay, so now what we need to do is we need to find where the hole that we made in the tie rod end is, and then line it up with one of the slots on our castle nut. If you find that the slot does not match up with the hole, you need to continue tightening. You don't want to loosen up to get to the next slot. You want to tighten it until the next slot. This one's very close so I would say we're lucky. Just going to put this on here. See if I can bring it a little further. That looks pretty good. We'll grab a cotter pin, put it through, we'll grab a little bigger. I like to go with the biggest size cotter pin I can fit. That feels great. Love it. Grab my cutters, bring the ear up.
You can do whatever you want with these ears. You can bring one up, you can bring the other one down. You can bring one side to side, whatever you want to do, as long as you have it straight through and then bent up and over to the point that there's no way that this cotter pin can come out. That's what locks this nut in. If you don't have a cotter pin, there's nothing holding this nut. The nut comes free, tie rod comes down, wheel does whatever it wants. Lock it in. That looks great. Let's move along.
All right, let's torque these down, 103 foot pounds. That feels good. This one. Tight. Tight. All right, so we've got our axle nut. Start it on here. We're just going to bottom this out now. We're not going to put the hammer down or anything. Perfect. Let's grab the torque specification and we can move along. All right, so now what I'm going to do is I'm going to take a nice long pry bar. I'm just going to go right over my lug studs like this and I'm going to try to keep my bar flat along the stud threads. And that's just so I'm not damaging the threads while I do this. The reason why I put my bar going like this, is so the hub can't turn when I go to torque this nut. We're going to use our 36 millimeter socket and we're going to torque this nut to 203 foot pounds with our torque wrench. Try it one more time. We know that's definitely torqued. Grab our bar, move along.
Okay, so we've got our lock and you'll notice that it has a whole bunch of slots where the corners of your axle nut can go into and you've got a whole bunch of little slots here for where your cotter pin's going to go through. The reason for that is so when you go to put it on, in case when you go to put it on, the hole doesn't line up with the slot, you just keep turning it and turning it until you find an area where it lines up perfectly. Once you do, I like to use a brand new cotter pin for this. Obviously this is super important that it stays on there and hold that in there. Grab some cutters, come down like this, grab this one, bring it up. Just give them a couple of bonks. Awesome.
When we go to put on the cap, I like to use a little bit of gasket maker or RTV and I just go right along the edge here where this is going to mate with the bearing itself and if for some reason when you were taking this cap off originally, if you happen to have poked a hole through here and you can see it coming through the other side, this doesn't have a hole, it's just pushed in. But anyway, if it did, you would want to make sure that you put some kind of gasket maker there as well to make sure that no moisture can get inside this cap and then get this all rusted up on you. All right, we're just going to use a little bit of gasket maker here. See if we can get it working. Sometimes it likes to be a pain in the butt. Looks like it's trying to. Just going to go right along here. It doesn't have to be anything pretty. I'm not trying to win a coloring contest or anything like that. That looks pretty decent. Just as long as it's going all the way around.
If you wanted to and you had a gloved finger, you could just kind of schmutz it all around. Make sure that you have a nice layer. Going to use my rubber mallet. Set this in just like this. Just give it a couple loving bonks all the way around. It's best if you try to bonk along the edges and drive it in instead of in the center. obviously if you bonk in the center, you could collapse it in so just along the edges. And if for some reason you're not using a rubber mallet, you're using a metal hammer, when you go like this, if you bonk and you end up hitting one of these studs, that's going to become an issue, so you're going to want to keep that in mind. If you damage the threads on this, you're just going to have to try to clean them up with something. You use a small file, tap and die set or something like that, but you need to make sure your lug nuts can go on there. That's why I'm using a rubber mallet.
I'd say that that looks pretty great. Going to use my gloved finger or you can use a rag. Definitely don't use your bare hand or bare finger. This is of course a chemical. I don't want anybody getting sick. I'd say that that looks wonderful. Give it a little spin. I love it. It looks perfect. Let's continue.
All right, so we're just going to clean up our rotor here. A lot of times brand new rotors come with a coating on them that just helps prevent rust and anything really from messing up the nice, beautiful surface that they made. I just like to take a little bit of parts cleaner, give it a little spray, wipe it down. That looks great. I'm going to grab some copper never seize, I'm just going to try to spray the base of this. That's right where the rotor's going to be mating up against. The reason for that is it's going to help keep moisture out of there and also make it so the rotor's going to come off easily when it's time to take it back off someday to do another brake job like this.
Now's a great time before we get the caliper on here, just to double check and make sure that the backing plate hasn't been bent in, because if it's hitting up against the rotor now, it's obviously going to hit up against the rotor later. Give it a little spin. That sounds horrible. Let's check it out. Carefully give it a little push. Obviously there are some sharp edges. Your backing plate may or may not look like this, but if it has sharp edges, I want you to be super careful. Just going to take a pry bar. Just try to help this backing plate along. It's seen its day. It's obviously not in the best condition, but just keep working your way around. Find all the places where it might be hitting and just maneuver it away a little bit. Looks like it's hitting just a teeny bit right down here still. Ooh, love it.
Now we're going to take our caliper, bring it right over here, work it right down. I know what you're thinking. Who puts on the caliper without putting the pads together first? Well, you can think that if you want, and that's fine. I'm not going to get mad at you, but I'm going to show you why. We're going to get this all together. We're going to get it torqued down and then we'll install the pads. I'm just going to grab my ratchet with my 17, snug it up. Going to bottom both these bolts out then we'll torque them down. Torque specifications for this is 91 foot pounds. Torqued, torqued. Awesome.
Now it's time to get the brake hose back into the bracket here. And you might notice that, when you were hanging it or whatever happened, maybe the lines straighten itself out or it changed its position. Or as we move this around, start noticing that it gets kind of close, which is good. Just going to try to spin this now. This forky's going right through. It's got this locked in perfectly. We don't have to worry about our flex hose moving around. I'd say that looks pretty great. Let's move along.
Okay, so it's time to grab our pads. Just slide it right in just like this. That's cool. Same thing with this one. It should slide right in. If for some reason your pads don't slide in like this one does and it moves around very freely, odds are you need to clean up your caliper. Obviously this is a new caliper, so it's going to slide perfectly. If it wasn't, and it was an old caliper and we tried cleaning it up with our brush and our screwdriver or whatever you use to get off the large chunks, if the pads can't move, you've got a little bit more work to do. Just going to go through like this. I'm going to leave that one just like that. This one, I'm just going to go all the way through.
Grab one of my little clips here, put it through this one. That feels great. Can't fall out. Awesome. The reason why I left this one like this, is because we've got this little clippy-do here. And what this is going to do is it's going to want to separate the pads. When you step on the brake, the pads, the pistons are going to squeeze the pads and then you release the brake, the pistons are going to want to go back in and this is going to make the pads go back out. Okay, very nice. I'm going to go right over the pin just like this. Now I'm going to take this here, put it in, everything's lined up great. Grab my other little clip, slide it through. Awesome.
Next what we're going to do, we're going to make it so this little piton goes inside the hole there and this ear comes up over the top of the pad. Do the same thing for this one. Awesome. Now let's assume we're inside the vehicle and we step on the brake, we release the brake, step on it, release. That's doing its job. Something to pay attention to is when you mount this in, you want to make sure that this area of the clip isn't hitting up against your rotor. It's very possible that maybe it's bent a little bit and it wants to hit like this one is. Super close. What I like to do at this point, just grab it, give it a little tug.
Now I've got a pretty good distance between there and there. Just give it a little push. It goes back down. Let's try again. Give it a little push. It goes back down, but it's still clearing the rotor. It's not hitting at all. At that point it looks perfect.
Now we're going to grab our wheel. These wheels can be heavy and I don't want you to hurt yourself, so instead of grabbing your wheel like this and trying to lift with your back and potentially hurting yourself, show you a little secret. You take your leg. I'm assuming you're not worried about your pants getting a little dirty. Just going to grab it like this. Roll it right up your leg. Now you can use your legs slash ab muscles to lift it right up. Can use your leg to hold it, balance it. See, that works pretty good. I'm going to take my lug nut, my socket. Put it right on here. Now that we know we've got one locked in, we can release it, grab the rest of our lug nuts. We're going to start all these on. We'll bottom them out and then we'll torque them down.
All right, so let's bottom out these lug nuts. Perfect. We'll get this down on the ground and we'll torque them down to manufacturer specifications. Okay, friends, let's get our torque down. We've got our 21 millimeter socket. We've got our torque wrench set to 83 foot pounds. We're going to go on a crisscross manner. Okay, I'm just going to go around one more time. It's a small price to pay for safety. Awesome.
Thanks for watching. Visit 1AAuto.com for quality auto parts shipped to your door, the place for DIY auto repair. And if you enjoyed this video, please click the subscribe button.

CSA82458