Replaces
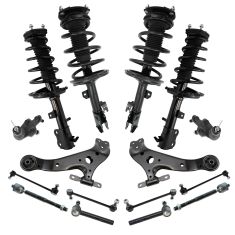
Replaces Toyota Highlander Lexus RX330 RX350 Front & Rear 16 Piece Steering & Suspension Kit TRQ PSA45931
$604.95
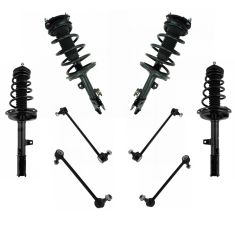
Replaces Toyota Lexus Front & Rear 8 Piece Suspension Kit TRQ SCA67142
$473.95
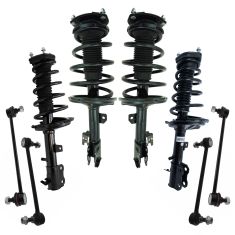
Replaces Toyota Highlander Lexus RX330 RX350 Front & Rear 8 Piece Suspension Kit TRQ SCA67080
$472.95
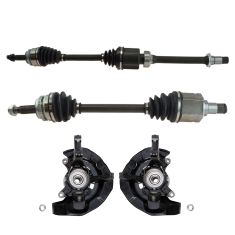
Replaces 2004-07 Toyota Highlander L4 2.4L Front Wheel Drive Front Driver & Passenger Side 4 Piece Drivetrain Kit TRQ PSA52911
$435.95
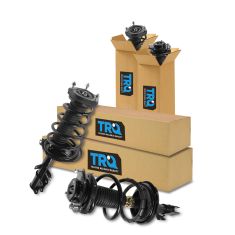
Replaces Toyota Lexus Front & Rear 4 Piece Strut & Spring Assembly Set TRQ SCA57353
$427.95
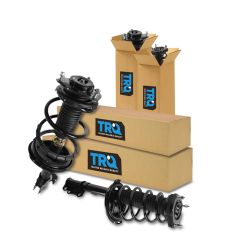
Replaces Toyota Highlander Lexus RX330 RX350 Front & Rear 4 Piece Strut & Spring Assembly Set TRQ SCA57283
$419.95
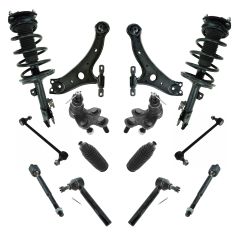
Replaces Toyota Highlander Lexus RX330 RX350 Front 14 Piece Steering & Suspension Kit TRQ PSA69925
$413.95
Replaces Toyota Highlander Lexus RX330 RX350 Rear 2 Piece Drivetrain Kit TRQ PSA72640
$389.81
Replaces Toyota Highlander Lexus RX330 RX350 2 Piece Drivetrain Kit TRQ PSA72639
$384.19

Replaces Toyota Highlander Front 4 Piece Drivetrain Kit TRQ PSA77283
$378.95
Product Features
Assemblies may include halogen or incandescent test bulbs that should be replaced before installation.
Attention California Customers:
 WARNING: This product can expose you to chemicals including Chromium (Hexavalent Compounds), which is known to the State of California to cause cancer, and birth defects or other reproductive harm. For more information, go to www.P65Warnings.ca.gov
Lifetime Warranty
This item is backed by our limited lifetime warranty. In the event that this item should fail due to manufacturing defects during intended use, we will replace the part free of charge. This warranty covers the cost of the part only.

Created on:
Tools used
Hi. I'm Mike from 1AAuto. We've been selling auto parts for over 30 years!
To remove the grille there are four push clips on the top. Use a flat bladed screwdriver to pry them up and unlock them. Both sides. Use a trim clip tool, kind of pry on them a bit. Sometimes they take a little bit of force to get them to unclip. There are two clips on either side of the grille. They're kind of hidden. You can get to them. You'd access the clips through here to release them on either side. Ours are broken. They actually clip through the headlights. So without those in place, there's some, the bottom of the grille clips at the top of the bumper, just kind of slide it out. You may need to slide a screwdriver in there and just push the lock tabs in, but this one's pretty loose so it came right out.
With the grille removed you can take the headlight out. Install them with two 10 millimeter bolts on the top. They have a Philips head in them. You can use a Philips head screwdriver. Or I'm going to use a 10 millimeter socket extension and a ratchet because it'll be a little bit quicker. These are self-tapping bolts, going into little grommets. Take them out. You should be able to lift the head light up and slide it out of the body.
To pry this up and off with a little grommet, do the same over here. We've got the vehicle up in the air. You don't have to do this. You can do it on the ground, but you will need to maybe turn the tire in or out because we need to get to these fasteners here and remove them from the wheel well splash shield. Use a flat bladed screwdriver and unlock them. Kind of turn them. Push the tire in just like that. Turn these 90 degrees and then you might have to pry on them a bit to get them to pop out. You can pull this shield out of here.
With these two clips removed from the splash shield we can just reach up behind the splash shield. There's a 10 millimeter bolt that's hidden. This one is kind of broken, but you'd unscrew it. There should be a plastic bracket here. The vehicle is missing it, but you would pull this out and unclip it and then pull it forward slightly.
We need to remove this lower bracket here to get the headlight out of the opening. It's a 10 millimeter bolt on this side. Again, remove that. It's a 10 millimeter bolt here. We use a 10 millimeter ratcheting wrench to loosen it and remove it. Lift this up and off the stud. Then I can pull this out.
There's a clip on the back right here, the plastic clip underneath. Pull it straight out. The clip might come loose. This plastic clip here it clips to the headlight and then it's supposed to clip into here. It came out with the headlight after I clipped it on. I'll worry about that afterwards.
Now unplug the lights pushing in the lock. And is off. These connectors are really dirty. Let's spray some water displacement oil in here to try and free them up. Basically just kind of push them in and out a little bit without trying to unlock them. Try to break them free. They get gummed up with dirt. Then push down on the lock. Then do your best to unplug them. Repeat that for all of them. If they're really stuck just turn them counterclockwise and take the bulbs out. You want to take the headlight out of the way.
Now with the headlight out of the way I'm going to try and plug this bulb, pushing in the lock. They just get jammed up with dirt and don't want to come loose. I'm using a flat bladed screwdriver to help me push this in. My goodness. We can take the bulb out by just pushing in and turning. My hands are kind of greasy so I'll wipe the bulb down afterwards. I’m just trying to get this free. We need to change the socket. We just have to work it back and forth. See all the dirt and grime that gets stuck in there. I'm going to take some water displacement oil, spray it in there, spray it in this one, and spray in here. Wipe these down, get a lot of the dirt out of there.
Take some electrical contact cleaner. I've got access to some compressed air. I'm going to take a towel, wrap it around the connector, and just face this away from me. Blow out all the dirt. You can also use electrical contact cleaner, if you’ve got access to that.
This is a very good example of why you should always wear gloves when you're changing headlight bulbs. If you touch the bulb by accident with your bare fingers, because you have oil on your skin, you can cause the bulb to fail prematurely. We can see on this one it started to bubble and burn. It hadn't blown out yet. The filament still looks good. But eventually this would overheat and pop. Basically the oils get on the surface of the bulb, the bulb was very hot, the oil start to boil and bubble just like if you are burning say like olive oil in a cooking pan, and then eventually it will ruin the glass of the headlight bulb. This is a nice conditioned bulb right here. It doesn't have any burning or anything so when we install this bulb, we will make sure to wear some gloves.
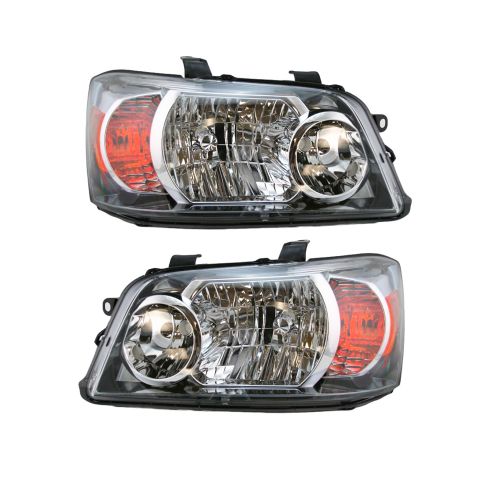
Here's our original headlight assembly and our brand new one from 1AAuto.com. You can see this one has been yellowed and destroyed from the sun and rocks and sand and stuff as you drive down the road. You really can't see that well with this at night. It doesn't put out good light. Brand new are ones nice and clear, shiny. It has the same style mounts at the top and on the bottom. Before you install it, remove these little rubber caps.
Put your bulbs back in. You can adjust the aim here by turning the screw. This will fit great and really look great in our vehicle. I'm going to install our high beam bulb in here. Just line up the little openings. It'll push into place and then we'll turn it clockwise to lock in. The same for the low beam bulb. Reinstall the turn signal bulb.
Let's take our connectors, plug them back in. They'll snap when they lock into place. There is a metal pin. There's a metal pin right here. It's going to go into this plastic grommet. This little tab at the bottom of the headlight is going to go to this clip here. It's on the radiator support. Let me get this lined up. Get this lined up.
Put this bracket back up, just like that. Open this nut back on this stud here. Install our screws at the top. Slide the bumper back into place. Clip it back into the bracket. There should be a clip bracket here. It's missing so I'm just putting this bolt back in. Reinstall, and reattach the fender shield splash shield. Kind of slide it back in here. We'll push these clips back in. Repeat this for the other side. Just reinstall bulbs in the sockets. Line up the tabs.
These are the clips and brackets that are supposed to be mounted to the back of our grille. It's broken on both sides, but they would clip into here. The headlights on both sides to help hold the grille in. You don't 100% need them but if you have yours you can clip them back in. These clips on the bottom of the grille are going to go underneath this lip. Push it down like that. Slide it up under that lip into place. And put the push clips back in place. Grille is back in place.
This is a basic tutorial on how to aim the headlights on your vehicle. Find the access of your headlights. This is usually indicated with a small dot or the headlight bulb size on the lens. If not, it's the actual center point of your headlight bulb. Transfer this mark to a vertical wall with a preferably dark color that'll allow you to back up 25 feet. Pull up and find the center line of your vehicle, as well as the center line of your headlight access. Mark the wall with the height of the headlights, and a straight line going across at that access height. Back your vehicle up 25 feet from the wall to the front edge of your vehicles headlights. Turn your headlights on, and locate the adjusting screw, usually on the back side of your headlights. You'll want to rotate this until the passenger hotspot or focus of the beam is approximately two inches below the line and the driver's side is four inches below the line. We change the heights on each side so you can still get a good beam to the offside of the road on the passenger side, and have the driver’s side low enough to not blind oncoming traffic
Thanks for watching. Visit us at 1AAuto.com for quality auto parts, fast and free shipping, and the best customer service in the industry.