
★★★★★
August 21, 2026
Right Part and came in great shape
Part was correct delivered on time and in good condition.

Replaces


About TRQ:
TRQ is a trusted brand dedicated to making every repair a success story by combining premium parts with easy installation. Each TRQ part is engineered by a team of automotive experts to meet or exceed OEM standards, delivering enhanced performance and maximum longevity. With rigorous in-house testing, the brand ensures superior fit and function across every product line. TRQ also provides customers with best-in-class, step-by-step installation videos—so you can complete repairs with confidence, whether you're a first-time DIYer or an industry professional.
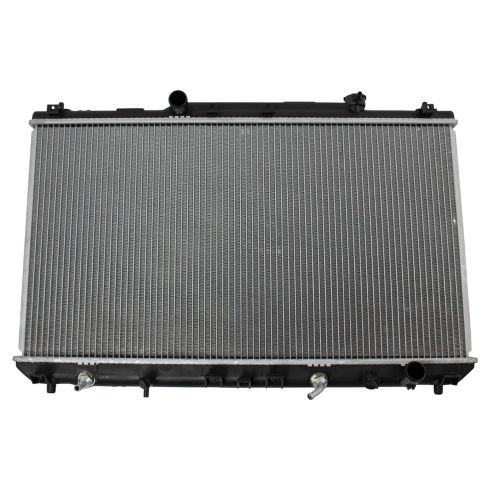
Direct Fit Replacement
Premium Aluminum Core
100% Leak Tested
Transmission Cooler Note:
Some radiators are designed to be used on both automatic and manual transmission applications. These radiator may have fittings for an automatic transmission fluid cooler. However these radiators can be used on manual transmission models without issue and require no additional parts or modifications.
Attention California Customers:
 WARNING: This product can expose you to chemicals including Lead and Lead Compounds, which are known to the State of California to cause cancer, and birth defects or other reproductive harm. For more information, go to www.P65Warnings.ca.gov.
This part fits 2 vehicles spanning 1997-2001.
| Year | Make | Model | Description |
|---|---|---|---|
| 1997-2001 | Toyota | Camry | Toyota Camry L4 2.2L Radiator TRQ RDA82651 |
| 1999-2001 | Toyota | Solara | Toyota Solara L4 2.2L Radiator TRQ RDA82651 |
| Brand Label | Part Number |
|---|---|
| Spectra Premium | CU1909 |
| Toyota | 16410AZ002 |
| Toyota | 16410-AZ002 |
| DIY Solutions | HVA01592 |
| TYC | 1909 |
| Partslink Numbering System | TO3010105 |
| APDI | 8011909 |
| Spectra Premium | CU2005 |
| Toyota | 164000A052 |
| Toyota | 1640003152 |
| Toyota | 164007A291 |
| Toyota | 1640003157 |
| Toyota | 164000A190 |
| Toyota | 164000A062 |
| Toyota | 1640003141 |
| Toyota | 1640003150 |
| Toyota | 1640003151 |
| Toyota | 164007A301 |
| Toyota | 1640020161 |
| Toyota | 164007A300 |
| Data Point | 2005 |
| Toyota | 1640003142 |
| Toyota | 1640003140 |
| Agility Autoparts | 8011909 |
| DPI DataPoint Inc | 2005 |
This item may be interchangeable with parts from other brands with the above part numbers. This information is provided only for reference and does not guarantee that the item you are purchasing is identical to parts with part numbers from the brands listed above. To confirm that this item fits your vehicle, use the above "Check Vehicle Fit" option.
Lifetime Warranty
This item is backed by our limited lifetime warranty. In the event that this item should fail due to manufacturing defects during intended use, we will replace the part free of charge. This warranty covers the cost of the part only.
Packaging:
Radiators may incur bent cooling fins or small imperfections during shipping or manufacturing. A few bent fins or small dents and scratches do not affect the fit or the function of the part. Neither our 60 Day satisfaction guarantee, nor the manufacturer's warranty, cover these types of insignificant damages.
FREE Shipping is standard on orders shipped to the lower 48 States (Contiguous United States). Standard shipping charges apply to Hawaii and Alaska.
Shipping is not available to a P.O. Box, APO/FPO/DPO addresses, US Territories, or Canada for this item.
Expedited is available on checkout to the United States, excluding Alaska, Hawaii.
Final shipping costs are available at checkout.

Created on:
Tools used
Brought to you by 1AAuto.com, your source for quality replacement parts and the best service on the Internet.
Hi, I'm Mike from 1A Auto. I hope this how-to video helps you out, and next time you need parts for your vehicle, think of 1AAuto.com. Thanks.
In this video, we're going to be working with our 1998 Toyota Camry that has the 2.2-liter 4 cylinder. We'll be replacing the radiator. If you like this information, please click subscribe. We have a ton more information on this vehicle, as well as many other makes and models. If you want this part for your car, it's available from 1AAuto.com. You can follow the description in the link.
Here are items you'll need for this repair include a 10mm, 12mm, ratchet, socket, socket extension, 19mm wrench, 8mm allen key, slip jaw pliers, flat blade screwdriver, drain bucket, funnel, antifreeze, coolant, jack, and jack stands.
Open the hood and secure the hood properly. Your A/C condenser fan is the smaller of your two fans at the back of your radiator located on the driver side. We'll disconnect the electrical connector here: push down on this tab, and pull out. We'll have to remove the harness for the cooling temp sensor here. Just use a flat blade screwdriver to prior out plastic retainer, and unclip the harness from the clips located along the side of the fan. Remove these two 10 millimeter bolts at the top of the radiator with the 10 millimeter socket ratchet. Lift up to release the tabs at the bottom of the radiator, and we'll move the fan over to the side here, and pull it out to the top.
Remove the electrical connector for the cooling fan, and the two 10 millimeter bolt at the top with the 10 millimeter socket ratchet. Bring the fan back, lift up, and remove it from the top. Disconnect the electrical connector at the bottom of the radiator. Use a flat blade screwdriver to ply out this retainer here. Lay this harness up to the side, and remove the radiator cap to allow the radiator to drain properly. We've put our vehicle on a lift to make it easier to film for you, but this job can be easily done with a Jack and Jack stand.
We'll have to remove this skid plate here on the bottom of the radiator so we can drain it and access the hoses on the bottom. Ours has six 10mm bolts. Your vehicle may have more, but we're missing an inner fender weld on the driver's side and several other pieces of hardware. The inner fender weld on the driver's side will be removed the same way the passenger is. You'll need a 10mm socket and ratchet. When removing the last bolt, you'll have to support the skid plate with your other hand. Remove the skid plate and place it off to the side.
We've placed the drain bucket underneath our radiator drain here, which is located about three quarters all the way over to the driver side. We'll unscrew that and allow our coolant to drain. To prevent from making a mess, we're going to go ahead and close off the drain on our radiator now that it's done dripping. Wipe off the bottom, and we'll relocate it under our bottom radiator hose over here on the passenger side. Using a pair of slip jaw pliers, we'll compress the spring clamp, move it back, open our pliers, and carefully twist the bottom radiator hose to free up all the corrosion that's in there we'll work it off the bottom of the radiator. Fortunately no fluid came out, but we keep the drain bucket under there just to be safe.
Now, we'll remove the transmission cooler line from the bottom. Some transmission fluids is going to come out of these. You want to remove them quickly, and then bring them up over their highest point, and tuck them behind something to secure them up out of the way and keep them from dripping.
Compress the spring clamp, carefully grab the hose with your pliers. We'll twist it to get all that corrosion out of there. I'm going to try to pinch one end with my hand while I remove the other end of the hose. Now, there will be something that comes out of the radiator, but the faster we get this hose clamped off and up high, the less it's going to drip. To contain the mess while we continue working and eventually remove our radiator, I've cut the finger off an old robber glove. We're going to place that around the line using zip tie round behind the barb where we would clamp our hose on. Pull that down nice and tight, keep that fluid from draining out and making a mess while we finish working on our radiator.
We'll move our drain bucket under the other transmission cooler line, be sure to make note of which is right and left. We will remove it the same way we did our first one. Now, we are ready to lower our vehicle down and work on the top side of our radiator. We'll remove the spring clamp on the expansion tank hose. Remove that hose, place it off to the side for now. We use our slip jaw pliers to release the clamp on the upper radiator hose. Bring that back and open them up. Again, it's going to carefully twist it to free up bad corrosion. We've placed the drain bucket underneath in case some fluid comes out of here. We've placed that hose off to the sides as well. We'll move these two twelve millimeter bolts on the upper radiator supports here. Once those are out of the way, our radiator will be free, and we can lift it up and out of the vehicle.
I’m using the 12 millimeter socket and ratchet with an extension just to give us a little more room. Once they're unbolted, this mounts simply lift off the radiator. Lift up and remove the radiator. We still have the drain bucket underneath because we may have some fluid coming out. We try to keep it tilt toward you this way. It should keep most of that fluid in there.
Here we have our old radiator that we removed from our ‘98 Camry and our new part from 1AAuto.com. As you can see, we have all the same fittings. The bottom left, the transmission cord fitting is bent a little different, but that shouldn't be a problem. We have the same drain, it comes with a new plug, same mount on the bottom, all the same fittings and fan mounting locations. We will need to reuse our old radiator cap and our old coolant temp sensor, as well as the rubber bushings down here for the lower radiator mounts.
Radiators are in a very delicate place. Being in the front of the vehicle, they can get road debris kicked up at them. It can break these plastic tanks or using too much water in your coolant can cause these to freeze and crack, but things can become bent and damaged, not allowing proper flow across the radiator, or, if it gets too hot, these tanks can also melt down, among a number of other problems and ailment. If your old radiator has become cracked, melted, broken or it's leaking in anyway, this new part from 1A Auto is going to go in direct fit, just like your original equipment, and fix you upright.
We'll use a flat blade screwdriver to work this rubber bushings off the bottom of our radiator. We use a 19 millimeter wrench to remove our coolant temp sensor. We use an 8 millimeter Allen key to remove this plug, temporarily filling the hole that our coolant temp sensor will go into. Inspect the condition of the O-ring on the cooler temp sensor. Be sure that it’s dry rotted and that it is free of any cracks or nicks for re-installing into the new radiator.
I’m tightening with the 19 millimeter wrench. We'll install the rubber bushings on to the bottom. They'll simply pop on. We're to remove all of our cups and plugs, and our radiator is ready to go back into our vehicle. Two large holes cut out in the bottom of the radiator’s support, as they are for these rubber bushings that we moved over from our old radiator. Be sure to set both of those into their proper locations.
Re-install the upper radiator supports. Hook them into their slots at the back. Reinstall your two 12 millimeter bolts for the socket and ratchet. Reinstall the expansion tank hose, and remember to squeeze together the spring clamp. Always inspect these style spring clamps, as well when re-installing, as over time they can become rusted and snap or stretched out and not hold the tension well, at which point you should replace them with screw type clamp. Ours look good, so collapse them back down, slide our hose on, and release them back into pace.
Bring down our transmission cooler. Remember to keep this pinched off to keep it from leaking. Install them over our transmission cooler fittings on the bottom of my new radiator. Inspect the clamp, it looks good. We'll collapse it, put it back into place. Repeat these steps with the other transmission cooler as well as the bottom radiator hose. Be sure to keep a drain bucket underneath when re-installing the hoses, as they may still have some fluid in them.
Line up your skid plate, and start your 10mm bolt. I like to start in the center because it keeps it balanced. We'll start the rest of the bolts by hand to ensure that it's lined up properly before tightening it down with our 10mm socket and ratchet.
Place a funnel in the radiator and then fill it with proper Toyota-approved coolant, mixed 50/50 with water. Once it's full, we'll start the vehicle, let it run and get up to operating temperature, at which point the thermostat will open and allow air to bleed out of the system. We'll top off the coolant if necessary.
Start your vehicle, turn the heat on to the lowest fan speed setting and wait for the temperature to come back up to operating temp. You can see the air bleeding out of the system here. Once the system is properly bled, you should see a full coolant level inside of the radiator. Top off your expansion tank if necessary. Turn up the fan speed and ensure that the heat is working properly in your vehicle. Reinstall your radiator cap and drive it to ensure proper function of the cooling system. Be sure to monitor the temperature gauge and the heat to make sure that coolant is cycling properly.
Thanks for tuning in. We hope this video helped you out. Next time you need parts for your car, please visit 1AAuto.com. Also check out our other helpful how-to and diagnosis videos.


Part was correct delivered on time and in good condition.
The radiator arrived at the estimated date and was a perfect fit. No leak whatsoever. One hundred percent satisfied with the purchase
I am happy with the part I got. It works great!
My local shop quoted me 700$ for that & labor but only cost me $150 through y'all !! It's been about a month & no issues !
Perfect fit for my Toyota Camry
Perfect fit, very pleased with outcome, thanks so much
Exact match, installation was easiest of any car I've ever done. Has been functioning just fine. I also installed new hoses. Previously did the water pump, timing belt and pulley kit. Wife should get another 100,000 miles ??
Perfect fit easy install
Good Part
Perfect fit, great price and i will recommend to everyone

RDA82651
This radiator is not specific for Japan-built models. As long as the specifications in the fit chart are a complete match for your vehicle, it will fit and function just like the original radiator.
