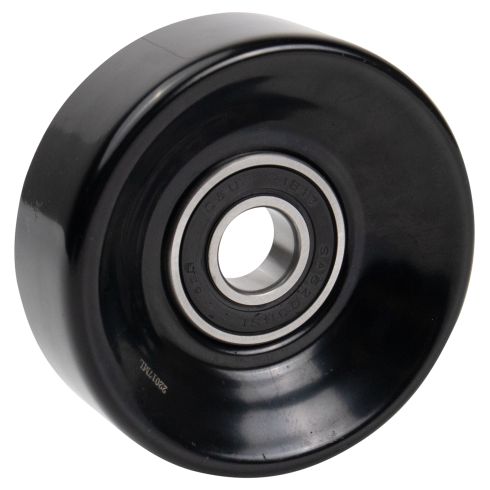
Replaces
This part doesn’t fit a . Select from parts that fit.
Specify your vehicle's year, make and model to guarantee fit.
Frequently bought together
Part Details
Item Condition:
New
Attention California Customers:
WARNING: This product can expose you to chemicals including Lead and Lead Compounds, which are known to the State of California to cause cancer, and birth defects or other reproductive harm. For more information, go to www.P65Warnings.ca.gov.
Lifetime Warranty
This item is backed by our limited lifetime warranty. In the event that this item should fail due to manufacturing defects during intended use, we will replace the part free of charge. This warranty covers the cost of the part only.
Created on:
Tools used
Tools used
If you were to look right down here, you're gonna see a clamp. If you were to look at the other end where connects onto the throttle body, you're gonna see another clamp. You can go ahead and loosen those up. Also, if you come right up here, you're gonna see an 8-millimeter bolt. If you loosen that up, you can take this right out. Once you have that out of the way and the clamps are loosened, you can wiggle this around. I'm gonna draw it off of the throttle body right here, and I'm gonna take them right there. Take it off of right here, remove it from the vehicle.
So now that we have the intake and the little shell out of the way here, it gives us a nice, clear view. You don't necessarily need to take off the shell, but I just like to have it out of the way. Go ahead and relieve your tension like that. And then I'm just gonna take the belt off of the idler pulley here and then I can let go of that. We'll get our serpentine belt tool right out of the way. Let's go ahead and remove the belt. To get started on your idler pulley, one of the best things you wanna do is to compare your new one to your old one. You wanna make sure that it's overall the same diameter, which would be the length right here from top to bottom, and you also wanna make sure that the depth is approximately the same. That's gonna be the area where the belt's gonna ride. This looks great, so let's get ready for an install.
Now we're gonna use a 15-millimeter socket, remove the mounting bolt. There it is. So now looking at the backside of it, you can see the area that's holding the mounting bolt in. It's like a little clippy do. It's a single time use and we're gonna break it off. Just going to hit it with some penetrant, let that sit for a second. Now I'm gonna grab some of these cutters and I'm gonna try to grab on to any of these ears I can, try to peen them up and rip this off. You can also use a pocket screwdriver, try to get under there. There we are. We can start separating everything. We'll pull this spacer right off of there. We're gonna reuse that. Grab this stuff, just like that.
Now we're gonna take our new pulley, our old adapter. This is the spacer that goes in between the pulley and the engine itself. We'll put that right along the backside. It should fit right in. That's great. Take it like this. Start the bolt through and now go ahead and start it right into the engine. Go ahead and torque it to 37 foot-pounds. Go ahead and take one side, go down and around the passenger side of the water pump, which is this right here, and then put it over the crank, which is the main pulley over there. I'm just gonna circle it, put it on, then slide it around.
I'm gonna take one and I'm gonna come up and over the tensioner right here. And then the other side, I'm gonna bring it down and around the water pump. And then underneath the power steering pump, it's gonna fit right inside the ribs perfectly. Then I'm gonna come up, make sure it's sitting in those ribs. There it is. Come up over the alternator right here. This looks good. Make sure everything's situated approximately where it needs to be. That looks great. I'm gonna grab my tensioner tool. Put it on there. Relieve tension.
Now we'll take this, bring it right in underneath the idler pulley. This is your idler pulley. Get our tool off, give it a nice tug. And then of course double-check all of your pulleys. Every one of them that has the rib side that goes up against the belt, you need to make sure it's sitting perfectly inside the ribs. If you're wondering what your belt routing should look like, you can find it right on the front. Get our air intake back on here. It's gonna go right underneath this hose here. Line it up there. Grab this, slide it in, push it all the way in so it's up against the whole throttle body. Make sure your clamps are nice and tight. Your hose over here should have a little clippy do. Ours is actually broken, but it's gonna push in right there and that'll hold it secure. This cover back on here, just slide it all the way back so it's sitting inside the pitons. Put this down and tighten up your bolt.
Tools used
Tools used
Tools used
Hi, I'm Mike from 1AAuto. We've been selling auto parts for over 30 years! We're dedicated to delivering quality auto parts, expert customer service, and fast and free shipping, all backed by our 100% satisfaction guarantee. So visit us at 1AAuto.com, your trusted source for quality auto parts.
In this video, we're going to be working with our 1996 GMC Sierra K1500 5.7-liter V8. We're going to show you how to remove and replace the idler pulley on your serpentine belt.
If you like this video, please click subscribe. We have a ton more information on this truck as well as many other makes and models. If you ever need parts for your car, you can follow the link down in the description over to 1AAuto.com.
Here are the items you'll need for this repair: 13mm socket, ratchet, socket extension, torque wrench
Be sure your vehicle has a belt path diagram somewhere on the cowl or under the hood before removing the belt. If it's missing or unclear, be sure to draw it somewhere under the hood or take a good picture. Put the 3/8 drive of a ratchet into the square on your serpentine belt tensioner and turn it counterclockwise to release tension. Then simply pull the belt off of any one of the pulleys, slowly release the tension from the tensioner. Remove your ratchet, and take the belt off of the pulleys.
Your idler pulley is located at the top center of the engine at the front, right between your alternator and your A/C if your vehicle came equipped. Use a 13mm socket and ratchet to remove the 13mm bolt in the center of the pulley. Remove the pulley from the vehicle.
Now our pulley is still in okay shape, so rather than waste a new part, we're going to reinstall it, but installing your new part will be exactly the same. Simply line up the bolt, which is captured inside of the pulley so it doesn't come out. We'll bring that in as far as we can by hand and then tighten it down with our 13mm socket and ratchet before torqueing. Torque this bolt to 37 foot pounds. Make sure that it rolls smoothly and freely.
Hook the serpentine belt around the crank pulley or harmonic balancer from the passenger side. Be sure that it seats fully into the grooves of the pulley and doesn't lay over the edge on either side. Wrap the driver's side of the belt around the water pump, under the power steering pump on the other side, and up and over the AC compressor. I already have the left side wrapped around the tensioner here just because that's where it falls. Then, from over the AC compressor under the idler pulley, reinstall the ratchet into the tensioner. Turn the ratchet counterclockwise to release the tension, and install your belt over the alternator. Take a second just to look around and make sure that your belt is seated and routed properly before releasing the tension and removing your ratchet.
Thanks for watching. Visit us at 1AAuto.com for quality auto parts, fast and free shipping, and the best customer service in the industry.
Tools used
Tools used
Brought to you by 1AAuto.com, your source for quality replacement parts and the best service on the Internet.
Hi, I'm Don from 1A Auto. I hope this how-to video helps you out, and next time you need parts for your vehicle, think of 1AAuto.com. Thanks.
In this video, we're going to show you how to replace the idler pulley on this 2002 Chevy Suburban. It's the same part and process on these Suburbans from 2000 to 2008. The items you'll need for this are a new idler puller from 1Aauto.com, a 10 and 15 mm socket and ratchet, and a flat blade screw driver.
Start off by loosening these two hose clamps, using your flat blade screw driver. We'll just fast forward as Don does this. Just pry this clip out and then pull the hose back. You may need a flat blade screwdriver to help you pry it free. Then pull forward and lift it up and out.
Next, remove these two 10mm bolts, and we'll fast forward as Don does that. Pry the clip on this hose out of the fan shroud. Then remove these four clips around your shroud. To remove these clips, you just pry up the center and then pull the clip out. We'll fast forward as Don does this to the other three. Now, just pull that hose back and lift the shroud straight up and out.
Using a 15 mm socket and ratchet, just put it here on the tensioner. Push down on the tensioner and pull the belt up and over the idler puller. Then, carefully release then tension on the tensioner and loosen this 15 millimeter bolt. We'll just fast forward as Don loosens that. Once you loosen that enough it will just pull free with the pulley. Now, to separate the bolt from the pulley, you just need to pry off this ring and then pull the bolt out.
On the left is the old idler puller. On the right is the new one from 1A Auto. You can see they're identical, and they'll fit exactly the same. Put the bolt back into the idler pulley and then slide that nut down, and then that ring. Make sure that ring's pushed all the way back down in and that you bend those tabs back down if they got popped up when you pried it off. Then, push the pulley back into place with the bolt and just start hand tightening it. Once you've got it started you can use your ratchet to tighten it up the rest of the way. Now, push back down on the tensioner and push the belt back underneath the idler pulley. Then carefully release the tension on the tensioner and pull the ratchet free.
Now, to replace the shroud just push it back down into place. Then replace those four clips. Just push them back down into place and push the center down to lock them. Push the hose back into place and then replace those two 10 mm bolts.
Now, take this air intake hose and push it back down into place on the air intake box, and then, on to the engine. Then just tighten up those two hose clamps. Then just re-clip that hose to the air intake hose, and you're all set.
We hope this video helps you out. Brought to you by www.1AAuto.com, your source for quality replacement parts and the best service on the Internet. Please feel free to call us toll-free, 888-844-3393. We're the company that's here for you on the Internet and in person.
Tools used
Brought to you by 1AAuto.com, your source for quality replacement parts and the best service on the Internet.
Hi, I'm Don from 1A Auto. I hope this how-to video helps you out, and the next time you need a part for your vehicle, think of 1AAuto.com. Thanks.
In this video, we're going to show you how to replace the idler pulley on this 1996 Chevy Tahoe with the 5.7-liter V8 engine. It's the same part in similar process on a large variety of GM vehicles, and it fits the Tahoes from 1996 to 2008. The items you'll need for this include: a new idler pulley from 1AAuto.com; a 10mm and 13mm socket and a ratchet with an extension; and a 3/8-inch ratchet.
First, we need to just remove this cable. Push back on that tab and pull the harness up and out. Next, you want to remove this series of 10mm bolts that line this panel. We'll just fast-forward as Don removes each of those. Now, lift that shroud up and off.
Now, using your 3/8-inch ratchet, just push it in to that square hole. Then when you push down on it, it will loosen up the tension on the belt allowing you to pull it free. Just start off by pulling off the alternator, and then carefully let the ratchet up, pull it out, remove your belt the rest of the way, and pull it over that fan. Your idler pulley is located right here, and it's held in with a 13mm bolt. Just go ahead and remove that. Once that's removed, the pulley will pull right off.
Take your new idler pulley and push it into place with the bolt already through it, and just tighten that bolt up. Now, to put the serpentine belt back on, you're going to want to use this belt routing diagram. If you don't have AC, you use the dash line. If you do, then you're going to use the solid line, and you just want to follow this and put your belt on in this order. It's kind of hard to show Don doing it, so we're just going to fast-forward as he fits it over each of the pulleys.
When all that's left is your alternator, put that 3/8-inch ratchet back into your tensioner, push down, put the belt up on the alternator, and then carefully release the ratchet and pull it out. Fit that shroud back down into place, and make sure all of your holes are lining up. We'll just fast-forward as Don replaces that series of 10mm bolts. Now, just push that harness back into that clip and push it down into place.
We hope this video helps you out. Brought to you by www.1AAuto.com, your source for quality replacement parts and the best service on the Internet. Please feel free to call us toll-free, 888-844-3393. We're the company that's here for you on the Internet and in person.
Tools used
Tools used
Tools used
Hi, I'm Mike from 1A Auto. We've been selling auto parts for over 30 years. We're dedicated to delivering quality auto parts, expert customer service, fast and free shipping, all backed by our 100% satisfaction guarantee. Visit us at 1AAuto.com, your trusted source for quality auto parts.
We're going to remove this whole panel. We're going to start by taking off the spare tire jack crank. Take that off and now there's a series of clips they have Phillips head screws in them. We'll show you how to get them out.
There's four across the front. Two more which are missing on this vehicle and then there's two clips back here which are a different style, although I'm pretty sure they should be this Phillips screw style. The way these should come out is you turn them counter-clockwise and very lightly, almost pull up on the screwdriver while you're doing it so they come out. Then once you have that out the whole clip will come up and out. You may run into them where they don't want to come out that easily, in that case you'll probably need a little 90 pick tool, although sometimes you can be successful getting. Sometimes you can get a fingernail under there, but what you'll probably have to do is get a pick tool right in underneath just to pry up a little bit when you turn it and pull it out.
These ones back here are a different style you pry up. Pull the center up and pull it out. Although I'm pretty sure these should be the Phillips screw style. I should have all the clips off, panel lifts up and off. I'm going to remove this cover. Two 10mm bolts on this side and one over on the passenger side. And remove those, 10mm socket and ratchet. Loosen the throttle body clamp with a flat blade screwdriver. Then you just kind of pull up and down on the whole ducting.
There are tubes that go in the side, once you pull it off the throttle body you can twist a little bit and pull those tubes free. Clamp for the air filter, pull that off and there's two connectors. One easy to see here, press down on the tab and disconnect. You may press on the tab, use your screwdriver and pry a little bit to help loosen it up. Connector's off and then there's another connector. Press the tab and disconnect. And the intake tube comes up and out.
Okay, you can see we have a lot of stuff off the front of our engine, which is good so we can show you how the belt routes, but obviously it's going to be more compact for you. Here at the top, the belt's on the alternator, goes down around the power steering pump, back up around your water pump then down and around the crank, up and around your tensioner, back down for your AC pulley and then back up across this idle pulley and to the alternator.
You're going to want to feed a breaker bar up from the bottom. And you're going to have the fan here, but you should be able to reach up and in and get your breaker bar in and grab and pull down. Once you pull down, you can flip it off of one of the pulleys and then release your breaker bar slowly and take it out. And now you can reach down, bring the belt up, flip it off the water pump, and pull it up and out, and then pretty much the hardest part will be get it off your AC compressor, and pull it up through.
The idler pulley has one 13mm bolt. Remove the bolt and the pulley comes off.
And put the new pulley on, put the bolt on, and then tighten this bolt to 15 to 22 foot pounds. Just make sure the pulley goes onto the casing correctly. Torque to 15 to 22 foot pounds. I've got my wrench set to 20.
Obviously we have a lot of stuff removed. This is so we can show you this process easier but you will have to contend with your fan and stuff. Take a loop between the idler and the tensioner pulleys. Push it down in and you can get it from below but push it down in and put a loop over your AC then take your belt, push it down underneath your crank shaft and put a loop around the crank shaft. Okay and then it comes up, over the water pump and down over the alternator and we'll leave it off of the power steering pulley. That'll be the last part we put on.
We're going to use a half in ratchet and the bigger ratchet you have, the better because you're going to want to feed it up into here, get it into your tensioner and keep in mind your fan will be on for some repairs. Get that ratchet as high as you can and then reach through, pull the tensioner down and then pull your belt onto your power steering pulley. It's not working on the power steering pulley, let it come off the water pump pulley, get it on the power steering pulley, sometimes it's easier to push up and onto the smooth pulley but again you'll have your fan in the way in some places. Then release the tensioner and remove your ratchet.
Put your air intake in place. Back in place over here. The tab winds up there and this clamp goes on. Just reach down and make sure nothing's getting pinched. Lock that down into place and your mass air flow connection, reconnect it. Reconnect this connector. Tube down here goes in there. Flat blade screwdriver to tighten up the clamp that holds it onto the throttle body. Throttle body cover back in place. And kind of move it around a little bit, figure out where the bolt hole is. I'm actually cheating, just looking right through here. See there, start it up and then push this side down into place and start my two bolts over here and then tighten them up.
Put the cover back on. It's in place, you can see all the holes. These back clips, just make sure the center's popped up. Push them down in, push the center in and then these ones across the front, clip in first and just push the center right in to lock it. Put your jack handle back in.
Thanks for watching. Visit us at 1AAuto.com for quality auto parts, fast and free shipping, and the best customer service in the industry.
877-844-3393
Monday - Friday 8:00am - 9:30pm ET
Saturday - Sunday 8:00am - 4:30pm ET
Specify your vehicle's year, make and model to guarantee fit.
This part doesn’t fit a . Select from parts that fit.
If your vehicle isn't listed, search Idler & Tensioner Pulleys