About TRQ: TRQ is a trusted brand dedicated to making every repair a success story by combining premium parts with easy installation. Each TRQ part is engineered by a team of automotive experts to meet or exceed OEM standards, delivering enhanced performance and maximum longevity. With rigorous in-house testing, the brand ensures superior fit and function across every product line. TRQ also provides customers with best-in-class, step-by-step installation videos—so you can complete repairs with confidence, whether you're a first-time DIYer or an industry professional.
Returns: Parts with electrical components cannot be returned once installed.
Attention California Customers:
WARNING: This product can expose you to chemicals including Lead and Lead Compounds, which are known to the State of California to cause cancer, and birth defects or other reproductive harm. For more information, go to www.P65Warnings.ca.gov.
This part fits
3 vehicles spanning 2002-2012.
Fits these Makes
Select vehicle
Year
Make
Model
Description
2002-2006
Nissan
Altima
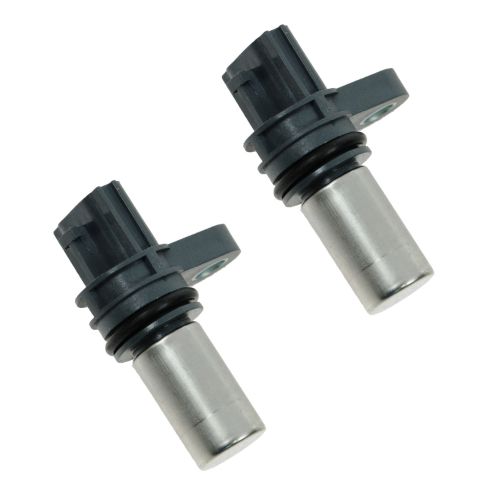
Nissan Altima L4 2.5L Crankshaft Position Sensor 2 Piece Set TRQ ESA71379
2005-2012
Nissan
Frontier
Nissan Frontier L4 2.5L Crankshaft Position Sensor 2 Piece Set TRQ ESA71379
2002-2006
Nissan
Sentra
Nissan Sentra L4 2.5L Crankshaft Position Sensor 2 Piece Set TRQ ESA71379
Part Interchange
Brand Label
Part Number
Airtex Engine Management
SU6364
TRQ
ESA94892
Walker Products
235-1203
T Series
PC464T
Dorman - TECHoice
530-010
Issyzone
ICRPSNS001
Nissan
237318J000
Nissan
237316N21A
Nissan
237316N202
Nissan
237318J005
Nissan
237316N206
Nissan
237318J006
Nissan
237316N20C
Nissan
237316N205
Nissan
237316N20A
Nissan
237316N265
Nissan
237316N20D
Nissan
237316N20B
Nissan
237316N200
SMP
PC464
This item may be interchangeable with parts from other brands with the above part numbers.
This information is provided only for reference and does not guarantee that the item you are
purchasing is identical to parts with part numbers from the brands listed above.
To confirm that this item fits your vehicle, use the above "Check Vehicle Fit" option.
Lifetime Warranty
This item is backed by our limited lifetime warranty. In the event that this item should fail due to manufacturing defects during intended use, we will replace the part free of charge. This warranty covers the cost of the part only.
Returns: Parts with electrical components cannot be returned once installed.
FREE Shipping is standard on Orders shipped to the lower 48 States (Contiguous United States). Standard shipping charges apply to Hawaii, Alaska and US Territories. Shipping is not available to Canada.
Expedited is available on checkout to the United States, excluding Alaska, Hawaii and US Territories as well as P.O. Boxes and APO/FPO/DPO addresses. Final shipping costs are available at checkout.
How to Replace Camshaft Angle Position Sensor 2002-06 Nissan Altima L4 2-5L
How to Replace Crankshaft Position Sensor 2002-06 Nissan Altima L4 2-5L
Created on:
Tools used
Gloves
Socket Extensions
Paper Towels
10mm Socket
Ratchet
1. Removing the Camshaft Angle Position Sensor
Disconnect the wiring harness
Remove the 10mm bolt from the sensor
Remove the sensor
2. Installing the Camshaft Angle Position Sensor
Lace motor oil around the sensor o-ring
Insert the sensor into place
Tighten the 10mm bolt to the sensor
Connect the wiring harness
Hi, I’m Mike from 1A Auto. We’ve been selling auto parts for over 30 years!
Cam angle sensor on this two five Altima is located here atop of the head. It's got the connector on it, and it's bolted into the head. To remove it, start by disconnecting the electrical connector. There's a lock underneath. Use two hands, one to push the lock in or up to come off it. Wiggle it off. Place that aside.
There's a 10mm bolt underneath that's holding it into the head. Just sneak a 10mm socket, ratchet and extension in here. Can't quite get the bolt out. This hose is in the way. Trying to loosen it some more with my fingers. There it is. The bolt is out. Put that aside so I don't lose it. I'm just going to have a paper towel close by in case some oil comes out when I free this from the head. Just try to push on this end here where the bolt goes in just to break the seal. It's got an O-ring. Just kind of wiggling it back and forth. Here it comes.
Here’s the old cam sensor from our vehicle and a new one from 1AAuto.com. It looks a little different, but it operates in the same way. Has a single mounting hole. These connectors appear to be upside down from one another, but you can turn the connector in the car and just plug it in, so I'll show you that when we install it. But this should work for you and get your car back on the road.
I'm going to take our new sensor, and we're going to take a little bit of oil from inside the hole that it came out of, the original one. I'll put some of that oil on the O-ring. It slides in. Move the connector out of the way. Slide this into place. It's probably going to be a lot tighter because the O-ring is fresh. Push it in. Turn it down so it lines up with the bolt hole.
Reinstall our bolt. I'm going to get it threaded in with my fingers. It is a steel bolt going into aluminum, I'm going to cross thread it. Get it on the bolt seeded all the way down. Now I can slide the 10 mm socket and ratchet in here. I'm just going to tighten it down. It's a very small bolt going into aluminum. I don't want to get it too tight and break it. I'm just going to get it tight.
It doesn't want to turn anymore, so I'm going to stop. Take our connector. Just like I said, it can be turned a little bit. So now the lock is going to be on the top. It is keyed. It can only go in one way. Cam sensor is replaced.
Thanks for watching. Visit us at 1AAuto.com for quality auto parts, fast and free shipping, and the best customer service in the industry.
Tools used
Gloves
Socket Extensions
Paper Towels
8mm Socket
White Grease
10mm Socket
Ratchet
Cloth Rags
Needle nose pliers
Engine Oil
Pick
1. Removing the Air Intake Hose
Loosen the hose clamp from the breather hose
Slide the breather hose off
Loosen the air intake hose clamps with an 8mm socket
Slide the hose off of the throttle body and air filter housing
Remove the hose
2. Removing the Camshaft Position Sensor
Remove the 10mm bolt from the sensor
Pull the sensor out
Disconnect the wiring harness
Remove the sensor
3. Installing the Camshaft Position Sensor
Lace the o-ring with engine oil or white grease
Insert the sensor into place
Tighten the 10mm bolt to the sensor
Connect the wiring harness
4. Installing the Air Intake Hose
Insert the intake hose to air filter housing and the throttle body
Tighten the hose clamps on each end with an 8mm socket and ratchet
Slide the breather hose on
Clamp the hose clamp with needle nose pliers
Hi, I’m Mike from 1A Auto. We’ve been selling auto parts for over 30 years!
Remove the upper intake tube. Start with this vacuum on here. Take some pliers, squeeze the clamp together, move the clamp down. Work the hose off. If you need to, you can take a right angle pic, work it under the hose and break that seal. Move the clamp down further out of my way. Loosen the two hose clamps. We'll start with the one near the mass airflow meter. Using an 8mm socket or a flat blade screwdriver. Loosen the one at the throttle body. This one is actually a 10 mm. If it got replaced, it could be a different size. Work the hose off the throttle body. And we're going to work if off the mass airflow meter. Move this hose out of the way and this one out of the way and lift it straight out of the car.
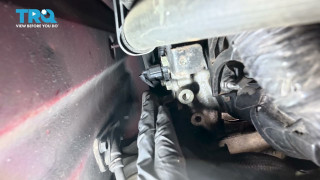
The crankshaft position sensor on this 2.5 Altima is located at the back of the engine, near the fire wall, near the bell housing for the transmission. So it's all the way right here. And there's the connector and the bolt connector. The lock part is right against the transmission. I'm going to remove the bolt first. Pull the sensor out. Then I can disconnect it. I've got plenty of harness here. Some oil may drip out, so I'll have a rag ready. Since you really can't see what you're doing, I kind of have to go in with my fingers and find the sensor, and find the 10mm bolt. And then try to guide a ratchet and extensions in there. It's a bit tricky. But once you get it, it'll go right on there. It doesn't take much torque to undo it. Not quite loose enough yet by hand, so I'm going to use just the extension, and the socket to finish removing it. There, I've got it out.
Looks like somebody already replaced this at one point cause it has a piece of tape over it, so the bolt didn't fall out. With that loose, now I can work on getting the sensor out of the side of the engine. Wiggle it back and forth. Pull it out. Now that we've got it loose, I can get to the to the lock. Now we need to disconnect the electrical connector from the sensor. Push in on this green tab to get some tension to it. Push it in and then, as you push it in, it actually pushes the senor out of the connector. When we've disconnected, our sensor is removed.
Here is our old crankshaft position sensor from our vehicle. This is our new one from 1AAuto.com. As you can see, it is identical. It'll operate in the same manner. It's with a single tab with the bolt hole. Same style connector. It's the same depth. Got a new O-ring on here. So we'll install that and get your car running again.
Before you install this, you can take a small amount of engine oil, or a little bit of white grease, and we're just going to put it around the O-ring so that it slides back into the hole okay. We don't nick the O-ring. Cause this O-ring's nice and fresh, it might be a little bit tighter. It doesn't matter if you get grease on the sensor cause the hole has oil in it anyways. Now I'm ready to install this. It'll be easier to install it without the connector plugged in. We'll plug that connector in after it's installed. Once you get it in place, rotate it a little bit. I'm just going to thread it in by hand.
So I'm going to cross thread. Take the ratchet. I'm just going to tighten it. It's a very small bolt. It's aluminum. I don't want to over-tighten it. So once I start to feel like it's tight, I'm just going to stop. With it installed, I can now reinstall the connector. The green lock is going to go towards the transmission. So I'm going to turn it this way. Once it clicks, it's locked into place. The crank sensor's installed.
To reinstall the intake tube, we'll start by feeding it into the engine compartment and placing it over the throttle body. Push this vacuum hose just out of the way for a second. Make sure that's seated on the throttle body. You can use a flat bladed screwdriver, or on this one, it's a 10 mm socket. Just bring it down until it feels tight. Make sure this is loose enough. Slide over. Slide the intake tube, it will squish down. Put it over the mass airflow meter housing. Hose clamp in place. Use a flat bladed screwdriver. On this side, it's an 8 mm. Tighten that down. Reinstall this vacuum hose. Take some needle nose pliers.
Thanks for watching. Visit us at 1AAuto.com for quality auto parts, fast and free shipping, and the best customer service in the industry.
ESA71379
In Stock
Product Reviews
3.9/ 5
★★★★★★★★★★
25 reviews
5★
64%
4★
4%
3★
8%
2★
4%
1★
20%
★★★★★February 8, 2026
Crank sensors did not work
I am so sorry. These sensors did not work for my 2006 nissan altima 4 cylinders. I am very sad they were not of good quality or just didn't work
★★★★★September 2, 2025
Parts fit perfectly on my 2005 altima.
★★★★★August 31, 2024
Good parts will be ordering again when I need something.
★★★★★October 28, 2022
Works as intended.
★★★★★September 5, 2022
Perfect fit!!!
Our 2005 Nissan Altima 4 cylinder was taking awhile to start up. Thought it may have been the starter or battery. Did some research and came across the videos. Installed the new sensors and now perfect start!!! Saved a lot of money on labor from what the shops were charging. Thanks 1A Auto, will definitely order more parts in the future
★★★★★May 16, 2022
I installed the sensor and got a print out . That the print out said get PCM reprogrammed hopefully that makes the light go outside
★★★★★April 7, 2022
Don't buy
I bought this set of sensors for my 2006 Nissan Altima 2.5l crankshaft was not accepted by my car I installed it and engine light came on I called the customer service line and I was told to disconnect the battery terminal for an hour and light will go off. It didn't work so I installed the old crankshaft sensor but first I cleaned it up and the engine light is gone.
★★★★★August 21, 2021
Only camshaft sensor worked properly. Had to purchase the original OEM crankshaft sensor from dealer.. Understandable, some electronic parts are very sensitive and require the original manufactured part...
★★★★★November 29, 2020
Great
The part cane super fast was so easy to install on my altima and there was no troubles it was the exact match
★★★★★September 18, 2020
2 sensors. Great price and quality
Had to replace on my 2005 Altima. One was easy to get to but the other was a pain to change. However they both worked well and starts every time now
Showing 1–10 of 25 reviews
Customer Q&A
Got a question about this part? Post it and get answers from our team.
ThomasJuly 16, 2025
I ordered the 2 piece set ESA94892. Are both of them interchangeable with the cam and crankshaft? They are both the exact part number.
Great question; I had the exact same question.
I'm told they're not interchangeable due to each (Cam vs crankshaft sensor) gives off different sets of signals.
Of course I would encourage you to do further research on that.
Marvin · July 20, 2025
CurtisFebruary 3, 2021
Why 2 sensors there is only one on the 2.5 engine?
The vehicles that this part fits have 1 camshaft and 1 crankshaft sensor.
Andra · February 3, 2021
CharlesMarch 1, 2020
We're is it located ?
Please view the installation video on our listing to see the location. Thank you for the inquiry!
Andra · March 1, 2020
HectorJune 24, 2016
Es el mismo censor camshaft y el cramshaft para un Nissan altima 2003? ??
S , este sensor se ajustan a cualquier motor de 4 cilindros 2002-2006 Nissan Altima
Kevin · June 25, 2016
TravisJanuary 12, 2016
If the sensor goes out, will it cause the car not to start?
I had the same problem. Replaced sensor cleared codes ran good for awhile. Found the plug for the sensor was loose. Replaced the plug problem was solved. So if you have a sensor code check the plug replace both saves time and headaches.
ANTHONY · July 10, 2018
Showing 1–5 of 5 questions
Customer service
877-844-3393
Monday - Friday 8:00am - 9:30pm ET Saturday - Sunday 8:00am - 4:30pm ET
Ask a Question
Check Your Email
We sent a verification email to .
Click the Verify Email button in the email to submit your question.
This extra step helps prevent spam.
Nissan is a registered trademark of Nissan Motor Co., Ltd. 1A Auto is not affiliated with or sponsored by Nissan or Nissan Motor Co., Ltd.See all trademarks.
Select Your Vehicle
Specify your vehicle's year, make and model to guarantee fit.








 WARNING: This product can expose you to chemicals including Lead and Lead Compounds, which are known to the State of California to cause cancer, and birth defects or other reproductive harm. For more information, go to www.P65Warnings.ca.gov.