How to Replace Upper Control Arm 1998-2011 Ford Ranger
Created on: 2016-10-27
Check out this video and our experts will show how to replace the upper control arm with ball joint yourself
-
step 1 :Removing the Wheel
- Pry off the center cap with a flat blade screwdriver
- Remove the wheel lock lug nut with a wheel lock key
- Loosen the 19mm lug nuts with the vehicle on the ground
- Raise the vehicle with a floor jack
- Secure the vehicle on jack stands
- Remove the lug nuts
- Pull off the wheel
-
step 2 :Separating the Control Arm from the Wheel Spindle
- Loosen the 15mm nut on the control arm bolt
- Tap the bolt out with a hammer
- Remove the 15mm nut from the 13mm bolt
- Remove the 13mm bolt
- Separate the control arm from the wheel spindle with a pickle fork and a hammer
-
step 3 :Removing the Inner Wheel Well Liner
- Remove the three 7mm bolts from the mud flap
- Pry off the clips from the mud flap
- Remove the three 5.5mm screws from the liner
- Remove the four 8mm bolts from the liner
- Remove the plastic clip on the backside of the fender
- Remove the liner from the fender
- Remove the vacuum lines on the vacuum reservoir
-
step 4 :Removing the Control Arm
- Loosen the two 21mm bolts from the control arm
- Tap the two eccentric plates off the control arm bolts with a hammer
- Remove the two 21mm bolts
- Pull off the control arm
-
step 5 :Installing the Control Arm
- Put the control arm into place
- Tap the control arm in with a hammer
- Slide the 21mm bolts into the control arm
- Place the plate onto each bolt
- Start the nut onto each bolt
- Tighten the 21mm nut onto each bolt
- Tap the ball joint into the wheel spindle with a hammer
- Insert the 13mm bolt into the wheel spindle
- Fasten the 15mm nut onto the 13mm bolt
- Tighten the bolt to 41 foot-pounds of torque
- Support the suspension with a jack
- Tighten the 21mm bolts to 100 foot-pounds
- Lower the jack to release the suspension
-
step 6 :Installing the Inner Wheel Well Liner
- Reinstall the vacuum lines onto the reservoir
- Insert the wheel well liner into the car
- Tighten the four 8mm screws to the liner
- Tighten the three 5.5mm screws
- Insert the outside edge into place
- Insert the plastic clips to the mud flap
- Tighten the three 7mm screws to the mud flap
-
step 7 :Reattaching the Wheel
- Slide the wheel into place
- Start the lug nuts by hand
- Tighten the lug nuts preliminarily
- Lower the vehicle to the ground
- Tighten the lug nuts to 100 foot-pounds of torque in a crossing or star pattern
- Reattach the center cap
Tools needed
-
13mm Socket
Socket Extensions
Torque Wrench
Hammer
15mm Socket
Jack Stands
19mm Socket
21mm Socket
Pickle Fork
Side Cutters
5.5mm Socket
8mm Socket
7mm Socket
Ratchet
Floor Jack
1/2 Inch Breaker Bar
Hi, I'm Mike from 1A Auto. We've been selling auto parts for over thirty years. We're dedicated to delivering quality auto parts, expert customer service, fast and free shipping, all backed by our 100% satisfaction guarantee. We've created thousands of videos to help you install our parts with confidence. That saves you time and money, so visit us at 1AAuto.com, your trusted source for quality auto parts.
In this video we're going to be working with our 2001 Ford Ranger 4-wheel drive. We're going to show you how to remove the old-style two-piece upper control arm, and replace it with a new-style one-piece upper control arm.
If you like this video, please click subscribe. We have a ton more information on this truck as well as many other makes and models. If you need this part for your vehicle, you can follow the link down in the description over to 1AAuto.com. Here are the items you'll need for his repair.
Using the taped flat blade screwdriver, locate the relief cuts in the hubcap. Stick the screwdriver in and pry out to release it from the wheel. This particular truck has a wheel lock on it, so we'll need the wheel lock key in order to remove it. Otherwise, the rest of the nuts come off with a 19 millimeter socket and breaker bar. Simply crack them loose for now. Then raise and support your vehicle and remove the lug nuts the rest of the way. Remove the wheel from the vehicle.
Your upper control arm is located here. Loosen this pinch bolt with a 15mm socket ratchet and wrench. Bring the nut flush to the end of the bolt. Tap the end of the nut with a hammer to release the bolt from the spindle. Once the nut’s off, and the bolt is exposed, you can try pulling it out, or spinning it with a 13mm socket and ratchet. Separate the ball joint from the spindle using a pickle fork and a hammer.
Remove this 7 millimeter bolt on the mud flap. Using a pair of side cutters, we'll reach under these plastic clips. Be careful not to cut them. Simply grab it and pry it out. Remove the remaining two 7 millimeter bolts from the bottom side of the mud flap. Move these three 5.5 millimeter screws with a socket ratchet and extension. Remove these four 8 millimeter bolts with a socket and ratchet. Remove this plastic clip at the back outer side of the fender. Work the inner wheel liner out of the fender. Remove the vacuum lines on the vacuum reservoir inside of the wheel well, and fully remove the wheel well from the inside of the car.
With the inner wheel liner removed, we can now access the two bolts at the back of the upper control arm more easily. Using a 21mm socket and a breaker bar with a wrench on the opposite side, we'll break loose the two bolts at the top of the upper control arms. Once the bolts are broken loose, we're going to switch over to a ratchet to finish removing them.
Remove the eccentric plate from the back side of the bolt. Remove the bolt from the control arm. You may have to tap the outer portion of the eccentric plate on the bolt to remove it from the control arm. We can now remove our control arm from the vehicle.
Install your new control arm. You may have to tap the control arm a bit to get it to slide into place. Reinstall your bolts. Remember the bolts go from the inside where the shock is and face out in each direction. Sometimes when upgrading to a single piece control arm from the two-piece style that was in the vehicle originally, you'll have to use what's called a cam or a camber bolt. You can see it has a flat spot here. What this is for is: these special washers slide on there. You can see they are not centered on this bolt, so it would go through the slotted hole for our upper control arm. This would go on the opposite side, and they would sit inside of these ears here, so if you had to adjust the camber and caster of the front end by moving this control arm fore or aft in the opening, rotating these washers while they're pressed against the backings here, would slide the bolt forward and eventually backward in the opening, moving the control arm to get the correct alignment angles. While this may not be required in all applications, it's a good idea to have a set handy in case you need them when doing an alignment on the truck.
Reinstall the plate onto the back side of the bolt. Tighten down the nut with a 21mm socket and ratchet. We aren't going to tighten these bolts all the way until we've put the ball joint back in and loaded up the suspension so the bolts are torqued at the proper ride height. Line up the spindle. You may have to tap the ball joint into place. Be careful not to crush the backing there. Reinstall the bolt and nut and tighten them down with a 15mm socket and ratchet. Torque this bolt to 41 foot-pounds.
We're going to use the screw jack to press up on the bottom control arm to put the weight of the vehicle onto the suspension so we can tighten our upper control arm bushing bolts in place. If you're doing this at home on jack stands, you can do this portion with a floor jack. Once the weight of the vehicle is on the suspension, we can finish tightening down the top two bolts. Torque these bolts to 100 foot-pounds. Lower your suspension off of your jack or screw jack.Reinstall the vacuum lines onto the reservoir. The one coming from the firewall goes on the inboard fitting and the one coming down from the top of the engine goes on the outboard fitting.
Reinstall the vacuum lines onto the reservoir. The one coming from the firewall goes on the inboard fitting and the one coming down from the top of the engine goes on the outboard fitting.
Reinstall the wheel well liner into the car. Reinstall the four 8 millimeter screws for the socket ratchet and extension. Reinstall the three 5.5 millimeter screws. Reinstall the bottom outside edge. Place the clip into the opening at the bottom of the fender. Line up your mud flap onto the bottom of your fender, and reinstall the plastic clips: one on the side and one on the top here. Reinstall the three 7-millimeter screws.
Reinstall the wheel and tire, and start your lug nuts by hand. With the weight of your vehicle on the tires, torque the lug nuts to 100 foot-pounds in a cross pattern. Line up the tabs on the inside of your hubcap to the lug nuts. Tap it back into place.
Thanks for watching. Visit us at 1AAuto.com for quality auto parts, fast and free shipping, and the best customer service in the industry.
Shop Products
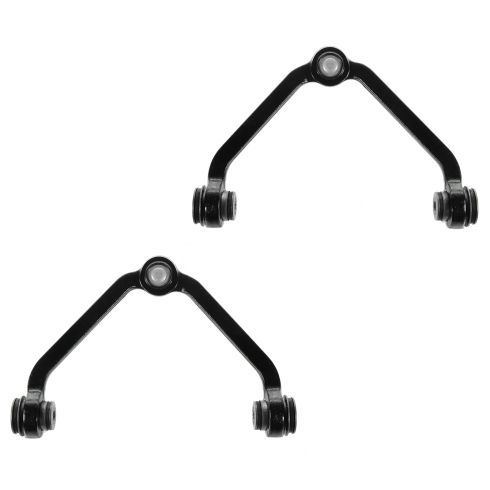
Ford Mazda Mercury Front Driver & Passenger Side 2 Piece Control Arm with Ball Joint Set TRQ PSA62468
Part Details:
- 2 Piece
- (1) Front Passenger Side Upper Control Arm with Ball Joint
- (1) Front Driver Side Upper Control Arm with Ball Joint
How to Replace Passenger Side Lower Control Arm 2007-14 Ford Edge
Control arms are a crucial part of the suspension system of your vehicle. They carry the load of the vehicle to the wheel and maintain its alignment. Control arms are large and strong. They contain rubber bushings for smoother rides at the cost of eventual wear. How to install a new quality TRQ passenger side lower control arm in your 2007-14 Ford Edge.
