How To Replace Serpentine Idler Pulley 1999-2007 GMC Sierra
Created on: 2011-01-04
This video will show how to remove and properly replace the serpentine belt in the right sequence to access and replace the idler pulley
-
step 1 :Removing the Air Intake Hose
- Remove the screws from the intake hose clamps
- Pry off the radiator hose clip with a flat blade screwdriver
- Pry off the air intake hose from the throttle body
-
step 2 :Removing the Serpentine Belt
- With a 15mm socket and ratchet turn the belt tensioner clockwise
- Pull the belt off
- Release the tensioner
-
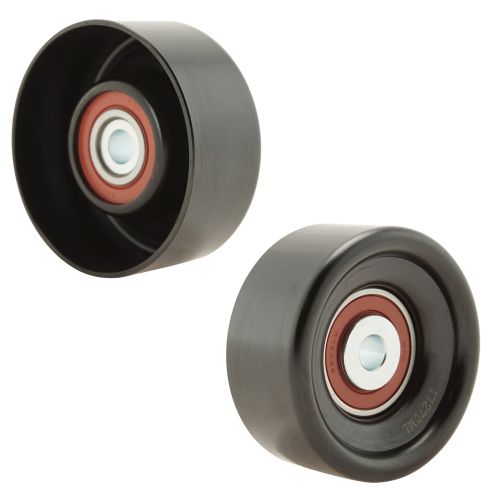
step 3 :Removing the Idler Pulley
- Use a 15mm socket and ratchet to remove the idler pulley bolt
- Pull off the idler pulley
-
step 4 :Installing the New Idler Pulley
- Take the spacer off the old idler pulley
- Put the spacer on the back of the new idler pulley
- Thread the bolt through the new idler pulley
- Tighten the bolt to between 35-40 foot-pounds of torque
-
step 5 :Installing the Serpentine Pull
- Find the belt routing diagram
- Familiarize yourself with the route of the serpentine belt
- Loop the belt around the crank pulley
- Thread it over the water pump
- Thread it around the power steering pump
- With the socket and ratchet turn the belt tensioner clockwise
- Loop the belt over the alternator
- Release the tensioner
- Check that the belt is routed correctly
-
step 6 :Reinstalling the Air Intake Hose
- Put the air intake hose into place
- Tighten the intake hose clamps
- Reattach the radiator hose
- Insert the screws into the air intake hose
Tools needed
-
15mm Socket
Torque Wrench
Ratchet
Flat Blade Screwdriver
Brought to you by 1AAuto.com, your source for quality replacement parts and the best service on the Internet.
Hi, I'm Mike Green. I'm one of the owners of 1A Auto. I want to help you save time and money repairing or maintaining your vehicle. I'm going to use my 20-plus years experience restoring and repairing cars and trucks like this to show you the correct way to install parts from 1AAuto.com. The right parts installed correctly: that's going to save you time and money. Thank you and enjoy the video.
In this video we're going to replace the idler pulley on this 2002 Sierra with a six liter. That's basically the same procedure for any 4.8, 5.3 or 6 liter Chevy or GMC from '99 to '07. The only tools you'll need are a flat blade screwdriver and a 15mm socket with ratchet.
The symptom of a bad idler is a squeaking as your engine is idling from the front of the engine which could also be your belt tensioner and if you want to see how to replace the belt tensioner just check out our other videos.
First, you'll want to move your intake hose by removing or loosening two clamps, one there and one there. We're going to kind of speed up through this part here. Use your screwdriver to kind of pry and break the rubber loose from the plastic. Maybe twist is a little bit as well, and then pull it from the throttle body and also pry it. There's a little clip that holds the radiator hose in. Pry that out with your screwdriver as well. Now I'll install it back on my intake hose. Make it easier for later. Now you can see your tensioner is right here so what you're going to do is take a 15mm socket and ratchet and put the socket on there. Then that takes the . you just move the ratchet clockwise and that takes the tension off. You can pull the belt either off of your tensioner or I'm actually over here pulling it off of the idler pulley in the middle. Then slowly release this back. It's going to actually go back further than the original point. Now get your wrench back off.
To remove the idler pulley you want to use a ratchet with a short 15mm socket. We'll just fast forward through taking that bolt out. Pull the assembly out. There's a washer on the back here. Make sure you don't lose that. The new idler pulley from 1A Auto. You can see the shape is a little bit different, but that's not going to really affect anything. Take off the spacer and then the bolt assembly. Then with the new one, make sure we put the spacer on the back here. We'll kind of speed through putting the bolt in and tightening it up. When you tighten this bolt up you want to tighten it up to probably about 35 to 40 foot-pounds.
To put the belt back on what you want to find is your routing diagram. We're going to be using this one right here and so the solid belt is the one that we're going to be looking at. What you're going to do is actually feed it down and around your crank pulley first and then up and over your water pump, around your power steering and then up in here. Then you'll pull. What I usually do is pull on here and then pull it up onto the alternator. So, I'll kind of show you that. Of course, I can't really film it very well so you'll have to take my word for it that that's what I'm doing. You can take the belt, feed it down, feed it down and just kind of make a loop. Make sure it goes all the way around your crank pulley, up over the water pump here and down and around the power steering pump. First, I went down and around my crank pulley, up and around the water pump with the back side of the belt, then around the power steering pump. Now I have this part that I can hold to put onto the alternator. I'm going to set it there for a second. Take my socket, put it on my 15mm bolt on my tensioner. Then while I pull this way on the tensioner, take the belt and pull it up onto the alternator. Then the tensioner takes over and I'm just going to push it on a little more to my idler pulley here. Make sure it's pretty well centered. After you have the belt on just a quick check. Make sure it's on all the pulleys. Look way down at the crank pulley and make sure that it's on correctly down there and also obviously over here at the alternator and the power steering pulley. Everything looks good.
We're going to fast forward though this section which is just putting that tube back in basically and pushing the rubber onto the plastic, tightening up the clamps and reinstalling that little clip that held the radiator hose to it. After that you should be pretty much all set.
We hope this helps you out. Brought to you by www.1AAuto.com, your source for quality replacement parts and the best service on the Internet. Please feel free to call us toll-free, 888-844-3393. We're the company that's here for you on the Internet and in person.
Shop Products


How to Replace Serpentine Belt Idler Pulley 1999-2008 Chevy Silverado
This video shows you how to install a new serpentine belt idler pulley on your 1999-2008 Chevy Silverado.
