How to Replace Serpentine Belt 1993-97 Dodge Intrepid
Created on: 2011-08-19
How to repair, install, fix, change or replace a broken, cracked, snapped or cut serpentine belt on Dodge Intrepid, years 93, 94, 95, 96, and 97.
-
step 1 :Removing the Serpentine Belt
- Loosen the tensioner pulley nut with a 15mm wrench
- Raise and secure the vehicle
- Loosen the 13mm tensioner bolt
- Pull the belt off and out
-
step 2 :Installing the New Serpentine Belt
- Check that the new belt is the same as the old belt
- Loop the new belt around the crankshaft pulley and the power steering pulley
- Bring it around the air conditioning pulley and the alternator pulley
- Push it underneath the tensioner pulley
- Tighten the 13mm tensioner bolt until the belt has 1/8 inch of play in either direction
- Tighten the 15mm tensioner pulley nut
- Lower the vehicle to the ground
- Briefly run the engine
- Check that the belt has 1/8 inch of play in either direction
- If the belt is too tight, loosen the tensioner bolt
- If the belt is too loose, tighten the tensioner bolt
Tools needed
-
13mm Socket
Socket Extensions
15mm Socket
Jack Stands
Ratchet
Floor Jack
Brought to you by 1AAuto.com, your source for quality replacement parts and the best service on the Internet.
Hi, I'm Mike Green. I'm one of the owners of 1A Auto. I want to help you save time and money repairing or maintaining your vehicle. I'm going to use my 20-plus years experience restoring and repairing cars and trucks like this to show you the correct way to install parts from 1AAuto.com. The right parts installed correctly: that's going to save you time and money. Thank you and enjoy the video.
In this video, we show you how to change a serpentine belt on this 1997 Dodge Intrepid with a 3.5 liter. This requires a couple of tools: a 15mm wrench and a 13mm socket with a ratchet and a 6 inch extension. You may also need a jack and jack stands because you do have to go from underneath. That's the easiest way to reach the tensioner bolt.
The serpentine belt is here. This is your tensioner and you can see there's an end of a bolt here. That is the tensioner bolt. Hopefully you can see right there is the head, that is designed to get at it from underneath. What you want to first do is use a 15mm wrench and loosen this nut right here. You can see the bolt right here from up underneath and we're going to use a 13mm socket with a six inch extension and a ratchet. I do have it up on a lift. You'll need either a jack or actually, what you could do is if you have someone to help you, you could probably reach under the front of the car and then have somebody guide the socket on for you and then you can wrench it. I'm going to speed it up here. All you do, is you turn that bolt counterclockwise and you can grab hold of the belt and start feeling it loosen and you can see I actually get impatient here and I pull out my air ratchet and loosen it way up and you want to just loosen that until you can then take the the belt and pull it off the lower pulley.
Here's the new belt from 1A Auto. Before you go and try and put it on just stretch it out, compare it, make sure it's basically the same length and it is. Take the new belt and stuff it way down underneath and have your engine crank pulley over here on the left, put it down and around that first and also around your power steering pulley. We've got the belt around the crank pulley and around the power steering pulley, and you want to push underneath the tensioner. Now we'll go underneath. For the sake of speed, I'm going to use my air ratchet first, just to preliminarily tighten this up. What I'm going to do is get it up in there, get it on the bolt, and grab hold of my belt so I can feel the tension. What I do here is, as I'm tightening it up there, I'm jiggling the belt, the lower part of the belt up and down until I see just about an eighth of inch of play up and down for a total of a quarter of inch of play. Now I'm going to tighten up this 15mm nut here. You want to start it up and just run it for a minute. Now recheck the tension on my belt, you want to have about a quarter of inch total tension so you want to be able to push it down about an eighth of inch and up about an eighth of inch. If it doesn't move at all, it's too tight. If it's too tight, it can wear out the bearings in your alternator and the bearings on your idler pulley as well as your power steering pump, et cetera. If it's too loose, it can, obviously, cause squeaking and a lost belt possibly. If after you run it, it's either too loose or too tight . if it's too loose, just loosen up that 15mm nut again, tighten it up a little bit and then vice versa if it were too tight.
We hope this video helps you out. Brought to you by www.1AAuto.com, your source for quality replacement parts and the best service on the Internet. Please feel free to call us toll-free, 888-844-3393. We're the company that's here for you on the Internet and in person.
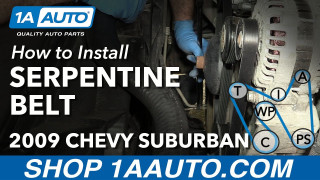
How to Replace Serpentine Belt 2007-13 Chevy Suburban
How to repair, install, fix, change or replace a broken, noisy, squeaky, worn or groaning serpentine belt on 07, 08, 09, 10, 11, 12, 13 Chevy Suburban
