Replaces
Part Details
Specifications
Product Features
Complete Repair in One Purchase - Stop searching for parts individually and complete your repair with a customized kit or set from DIY Solutions.
High-Quality Parts from Trusted Brands - DIY Solutions' kits and sets are selected from the best automotive brands and include hard-to-find and even obsolete parts you may need for your vehicle.
Guaranteed Fit - DIY Solutions ensures its selected parts are quality-tested to guarantee fit and function.
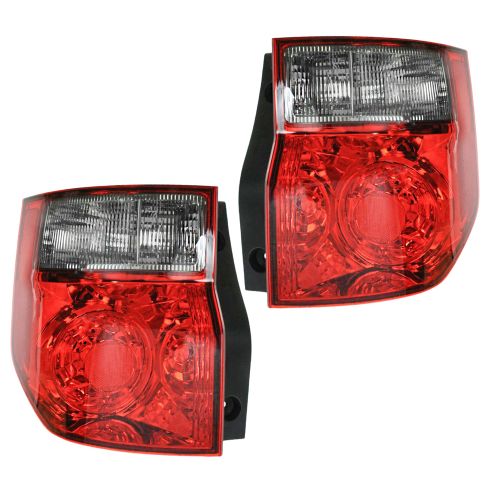
Assemblies may include halogen or incandescent test bulbs that should be replaced before installation.
Attention California Customers:
 WARNING: This product can expose you to chemicals including Chromium (Hexavalent Compounds), which is known to the State of California to cause cancer, and birth defects or other reproductive harm. For more information, go to www.P65Warnings.ca.gov
Lifetime Warranty
This item is backed by our limited lifetime warranty. In the event that this item should fail due to manufacturing defects during intended use, we will replace the part free of charge. This warranty covers the cost of the part only.
FREE Shipping is standard on orders shipped to the lower 48 States (Contiguous United States). Standard shipping charges apply to Hawaii and Alaska.
Shipping is not available to a P.O. Box, APO/FPO/DPO addresses, US Territories, or Canada for this item.
Expedited is available on checkout to the United States, excluding Alaska, Hawaii.
Final shipping costs are available at checkout.


Created on:
Tools used
Hi, I'm Mike from 1A Auto. We've been selling auto parts for over 30 years.
Hi, everyone. Sue here at 1A Auto, and today we're going to show you on a '06 Honda Element how to remove and replace the taillight assembly. If you need this part or any other part for your car, click on the link below and head on over to 1aauto.com.
So you open up the tailgate to access the rear. The mounting bolts are located here. So, the two mounting bolts here are 8 millimeter socket. We're going to take those right out. Now with firm hands, we're going to grab it down here on the bottom, and right here, and you're just going to pull it towards you. I hope we don't find the resident of that. I'm looking. No surprises. So, now we're going to disconnect the electrical connectors, and that's these plastic ears right here, and then we're going to push the harness through. And I'm going to turn this bulb and socket.
Here we have our new taillight assembly from 1A Auto, and here is the factory one. And you can see they both have the backup clearance and the same mounting mechanism. Look at the curve to it. It has the same design on the back. You just have to transfer over the sockets, and that's easy enough. This one even has a vent. That has a cap on it. So, if you need this part, or any other part for your car, click on the link below and head on over to 1aauto.com
The reverse light is a 921 bulb, and you just line the prongs up and push it in. So, here we have the stop or running lights, and this bulb has got a... see the black soot on it? It's because one of the filaments is burnt out. So you just pull on it firmly. So, just grab it, pull it out firmly from the pigtail, and that is a 7443 bulb, and I have a replacement. See how it's all clear? There's no darkness to it. I'm just going to grab that, and line up the tabs and push it in. And here we have the turn signal bulb. It is an amber bulb, and it's a 7440. And that is the same way. Line the tabs up and push it back in.
So, now we're going to install the new taillight assembly. And we're going to put in the brake light/running lights first. I'll line up the tab. It's an oval shape. Look at that. I've never quite seen one of those. It's got an oval shape to it, and some slight of tab. There we go. And turn clockwise. Here we have the reverse light. It's got three ear tabs to it. Line those up, and turn clockwise. And then the last bulb is the turn signal bulb, that is another, like a triangle oval shape. You'll line up those tabs. Turn that clockwise. It's all locked in. I'm going to run these wires back the way they had them. Perfect. Let's guide this plastic push pin right in the spot. Make sure we're over the lip. So, it doesn't snap in. It just holds it there. I've got two mounting screws. I'm just going to snug it up. Make sure it's holding it, and then put the bottom bolt in. Once it bottoms out, I'm just going to give it a quarter turn. It is plastic. It can snap if you over-tighten it.
Thanks for watching. Visit us at 1aauto.com for quality auto parts, fast and free shipping, and the best customer service in the industry.
Tools used
Hi, I'm Mike from 1A Auto. We've been selling auto parts for over 30 years.
Hi, everyone. Sue here from 1A Auto. Today, we're going to be working on a '06 Honda Element, and I'm going to show you how to take the tail light out and change your bulbs. If you need any parts for your car, click on the link below and head on over to 1aauto.com.
You open up the tailgate to access the rear. The mounting bolts are located here. The two mounting bolts here are 8 mm socket. We're going to take those right out.
Now, with firm hands, you're going to grab it down here on the bottom, and right here and you're just going to pull it towards you. Hope we don't find the resident of that. I'm looking. No surprises.
Now we're going to disconnect the electrical connectors, and that's these plastic ears right here. I'm going to fish the harness through, and I'm going to turn this bulb socket. The reverse light is a 921 bulb, and you just line the prongs up, push it in.
Here we have the stop or running lights, and this bulb--see the black soot on it? It's because one of the filaments is burnt out. You just pull on it firmly, so just grab it and pull it out firmly from the pigtail. That is a 7443 bulb, and I have a replacement. See how it's all clear? There's no darkness to it. I'm just going to grab that, and line up the tabs, and push it in.
Here we have the turn signal bulb. It is an amber bulb, and it's a 7440. And that is the same way: line the tabs up and push it back in.
I'm going to put in the brake light/running lights first. I'm going to line up the tab. It's an oval shape. Look at that. I've never quite seen one of those. It's got an oval shape to it and some slotted tab. There we go, and turn clockwise.
Here we have the reverse light. It's got three ear tabs to it. Line those up and turn clockwise.
Then the last bulb is the turn signal bulb. That is another like triangle oval shape. I'm going to line up those tabs and turn that clockwise. Once they're all locked in, I'm going to run these wires back the way they had them.
Let's guide this plastic push pin right in this spot and make sure we're over the lip. It doesn't snap in--it just holds it there. I've got two mounting screws. I'm just going to snug it up. Make sure it's holding it. Then put the bottom bolt in. Once it bottoms out, I'm just going to give it a quarter turn. It is plastic, it could snap if you over tighten it.
Thanks for watching. Visit us at 1aauto.com for quality auto parts, fast and free shipping, and the best customer service in the industry.