

★★★★★
September 2, 2025
Good

Replaces






About TRQ:
TRQ is a trusted brand dedicated to making every repair a success story by combining premium parts with easy installation. Each TRQ part is engineered by a team of automotive experts to meet or exceed OEM standards, delivering enhanced performance and maximum longevity. With rigorous in-house testing, the brand ensures superior fit and function across every product line. TRQ also provides customers with best-in-class, step-by-step installation videos—so you can complete repairs with confidence, whether you're a first-time DIYer or an industry professional.
Returns: Parts with electrical components cannot be returned once installed.
Attention California Customers:
 WARNING: This product can expose you to chemicals including Di(2-ethylhexyl)phthalate (DEHP), which is known to the State of California to cause cancer, and birth defects or other reproductive harm. For more information, go to www.P65Warnings.ca.gov.
This part fits 10 vehicles spanning 2001-2005.
| Year | Make | Model | Description |
|---|---|---|---|
| 2001 | Honda | Civic | Honda Civic with Nippondenso Style Radiator Engine Cooling Fan Assembly TRQ RFA83266 |
| 2002-2005 | Honda | Civic | Honda Civic 2 Door Coupe Engine Cooling Fan Assembly TRQ RFA83266 |
| 2002 | Honda | Civic | Honda Civic 4 Door Sedan Engine Cooling Fan Assembly TRQ RFA83266 |
| 2003-2005 | Honda | Civic | Honda Civic LX 4 Door Sedan Engine Cooling Fan Assembly TRQ RFA83266 |
| 2003-2005 | Honda | Civic | Honda Civic DX 4 Door Sedan Engine Cooling Fan Assembly TRQ RFA83266 |
| 2003-2005 | Honda | Civic | Honda Civic GX 4 Door Sedan Engine Cooling Fan Assembly TRQ RFA83266 |
| 2003-2005 | Honda | Civic | Honda Civic EX 4 Door Sedan Engine Cooling Fan Assembly TRQ RFA83266 |
| 2004-2005 | Honda | Civic | Honda Civic Value Package 4 Door Sedan Engine Cooling Fan Assembly TRQ RFA83266 |
| 2005 | Honda | Civic | Honda Civic LX Special Edition 4 Door Sedan Engine Cooling Fan Assembly TRQ RFA83266 |
| 2005 | Honda | Civic | Honda Civic EX Special Edition 4 Door Sedan Engine Cooling Fan Assembly TRQ RFA83266 |
| Brand Label | Part Number |
|---|---|
| TYC | 600380 |
| Partslink Numbering System | HO3115115 |
| Honda | 19030PLC003 |
| Honda | 19030-PLC-003 |
| Hollander | 674-59604 |
| Honda | 19000-PSL-F513 |
This item may be interchangeable with parts from other brands with the above part numbers. This information is provided only for reference and does not guarantee that the item you are purchasing is identical to parts with part numbers from the brands listed above. To confirm that this item fits your vehicle, use the above "Check Vehicle Fit" option.
Lifetime Warranty
This item is backed by our limited lifetime warranty. In the event that this item should fail due to manufacturing defects during intended use, we will replace the part free of charge. This warranty covers the cost of the part only.
Returns: Parts with electrical components cannot be returned once installed.
FREE Shipping is standard on orders shipped to the lower 48 States (Contiguous United States). Standard shipping charges apply to Hawaii and Alaska.
Shipping is not available to a P.O. Box, APO/FPO/DPO addresses, US Territories, or Canada for this item.
Expedited is available on checkout to the United States, excluding Alaska, Hawaii.
Final shipping costs are available at checkout.



Created on:
Tools used
Hi. I'm Mike from 1A Auto, and we're going to look at 1ARFA00025 today. I've got my original. It's actually a Honda part from the 2003 Honda Civic that's behind me. New one from 1A Auto right out of the box.
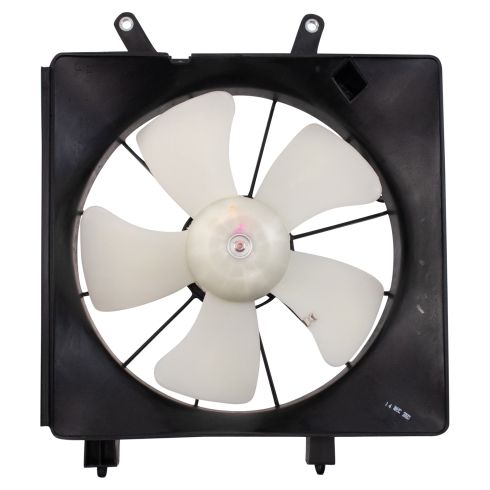
Okay, let's spin it around. So, this is the radiator fan. It's actually mounted on the right-hand side, or the passenger's side, of the radiator, and you can see, again, here's our original, new one from 1A Auto. They're exactly the same, a little minor difference. Our new one doesn't have this little heat shield, although you can remove that from the old one and put it on your new one. But everything else, the mounting points, the mounting point for the coolant bottle is the same, and then the mounting points down at the bottom are the same and the shrouds all the same. New one from 1A Auto is going to go in there, fit, and function just like the original.
Tools used
Brought to you by 1AAuto.com, your source for quality replacement parts and the best service on the Internet.
Hi, I'm Mike from 1A Auto. I hope this how-to video helps you out, and next time you need parts for your vehicle, think of 1AAuto.com. Thanks.
In this video, we're going to show you how to replace your radiator fan, which is the passenger side fan. This is a 2003 Honda Civic, same for 2001-2005 Civic. Items you'll need include a new radiator fan from 1AAuto.com, a 10mm wrench or socket ratchet extensions, Phillips and flat-head screwdrivers, standard pliers, penetrating oil, and a 10mm wrench.
Your drain is right under the center. There's actually a little hole right under this cover, and you can see it right here, and I'm just going to use a little pair of pliers just to help us get that tight plug going. Okay, want these to turn a little bit. Just turn it out slowly, and obviously you don't want to do this while the engine is hot.
Once you get it draining, we'll move the radiator cap to allow air in and allow it to drain.
Loosen your negative battery cable with a 10mm wrench. Pull it up and off and remove it. I've got a larger wrench to hold on to the bolt from this side. Then loosen it up and disconnect your positive cable second, pull it off, and you just kind of push them down so they don't come back and hit the battery. 10 millimeter bolt to remove here, and then a 10 millimeter nut here.
We're lucky enough. I did spray it down, but the way it was put together is actually just a hook at the bottom, so you can unhook that and pull the retainer up and off. Then, this little protective cover comes up and off as well.
Now you can lift your battery up and out. Remove the rest of your battery retainer.
There's a 10 millimeter bolt holding the reservoir right here. Remove the bolt with your socket, and ratchet, and extension. Lift it up and out, and just un-clip the hose as you go. Okay, there's just a little wire clip. Sometimes you can actually just use your fingers and pull it off towards the bottle, and then a pair of pliers will help you just break this hose loose. Then twist and pull it off.
We're going to remove this 10 millimeter bolt to remove the ground strap and get it out of the way, then use pliers to pinch the clamp, remove this hose, and pull it up out of the way. Then, there's two 10 millimeter bolts that hold the fan assembly: one here, and then one back over here. Then you want to disconnect the connection as well. Just a tab here to press. Sometimes you pull this. It should slide down and off, but press the connector and disconnect.
10 millimeter socket with the ratchet extension. Pair of pliers, squeeze the clamp, pull it back, twist the hose to break it free, pull it off. You may want to have a drip pan underneath, just to make sure no coolant comes out and drips on the floor.
Now we'll remove the two bolts that hold the fan. Anything that you can do to give yourself a little more space, which one thing is to disconnect this coolant temperature sensor. Just has a tab on the side. Press the tab and we'll pull it off. I just pulled the hose up out of the way.
The fan pulls up, and then you can slide it some to the side. You may have to reach down and push your lower hose a little bit. It's just a kind of matter of working it out.
The original part from the vehicle, new part from 1A Auto. You can see they're exactly the same. Just pull this cover off and slide it onto the new one, and it's ready to install.
Two pegs on the bottom here go down into the holes here. Pull the coolant hose and your lead up and out of the way. Put your fan down in kind of diagonally.
Just a matter of push on the lower hose a little bit, and continue to feed it down in. Then, this upper corner, you just have to get around the brace. To get this around, just move it out a little bit. A little bit of force, push it in behind, and then it kind of goes down in. Make sure this hose that goes to the coolant bottle's out of the way. Then you just have to kind of lift it up and try to feel for, you can kind of reach down there, feel one of the pegs, feel for the hole, and get it to slide down in place. Once you do that, the holes should line up pretty well with the holes in the radiator to mount. Connect the connector.
Then, this bolt goes in. 10 millimeter socket and ratchet with an extension, just tighten them up. Plug in your coolant sensor. Put your hose back on, and refit the clamp. Put your clamp strap back into place.
You may not need to take off the ground strap, but ours was in kind of rough shape, so we didn't want to hurt it anymore. Put the clip in place, hose down on. Again, a lot of times you can just use your fingers on this clip. Sometimes, you might want to use a pair of pliers. Lower it down in place, clip the hose in as you go. There, this one goes in there. Down in, and then clip this in up here.
There's a tab here, on your bottle, and that tab goes down into a slot right here. Replace the 10 millimeter bolt.
Battery in place; put this down in. The hook goes down and in. Reinstall your 10 millimeter bolt, and tighten it up. Reconnect your positive cable first and then your negative cable. Tighten up, and tighten.
Refill your radiator fluid. We are going to refill the radiator directly first, and I like to recycle the coolant. Never as much comes out as you need to fill it anyways, so you generally can use your old coolant, and then also augment it with fresh coolant, but if you put a piece of a T-Shirt in, and then pour your old coolant in, that will filter most of the dirt out of it.
It takes a little while to drain through the T-Shirt, but it works. Obviously, make sure you have your drain closed.
Okay, you can see that's what we filtered out of the old coolant, and we'll fill it up the rest of the way with good, fresh coolant. You want to use a 50-50 mix. You can buy coolant two ways. You can buy it full strength and you have to dilute it, and you can also buy it pre-mixed.
We'll fill the radiator first, and then we'll fill the overflow bottle, and then fill it. And after you do a repair like this it's a good idea to fill it, run your car for a little while, check the level, run your car for a while again, and just keep checking the level the first few times you drive the car.
Thanks for tuning in. We hope this video helped you out. Next time you need parts for your car, please visit 1AAuto.com. Also check out our other helpful how-to and diagnosis videos.
Tools used
Brought to you by 1AAuto.com, your source for quality replacement parts and the best service on the Internet.
Hi, I'm Mike from 1A Auto. I hope this how-to video helps you out, and next time you need parts for your vehicle, think of 1AAuto.com. Thanks.
In this video, we're going to show you how to replace your radiator fan, which is the passenger side fan. This is a 2003 Honda Civic, same for 2001-2005 Civic. Items you'll need include a new radiator fan from 1AAuto.com, a 10mm wrench or socket ratchet extensions, Phillips and flat-head screwdrivers, standard pliers, penetrating oil, and a 10mm wrench.
Loosen your negative battery cable with a 10mm wrench. Pull it up and off and remove it. I've got a larger wrench to hold on to the bolt from this side. Then loosen it up and disconnect your positive cable second, pull it off, and you just kind of push them down so they don't come back and hit the battery. 10 millimeter bolt to remove here, and then a 10 millimeter nut here.
We're lucky enough. I did spray it down, but the way it was put together is actually just a hook at the bottom, so you can unhook that and pull the retainer up and off. Then, this little protective cover comes up and off as well.
Now you can lift your battery up and out. Remove the rest of your battery retainer.
There's a 10 millimeter bolt holding the reservoir right here. Remove the bolt with your socket, and ratchet, and extension. Lift it up and out, and just un-clip the hose as you go. Okay, there's just a little wire clip. Sometimes you can actually just use your fingers and pull it off towards the bottle, and then a pair of pliers will help you just break this hose loose. Then twist and pull it off.
We're going to remove this 10 millimeter bolt to remove the ground strap and get it out of the way, then use pliers to pinch the clamp, remove this hose, and pull it up out of the way. Then, there's two 10 millimeter bolts that hold the fan assembly: one here, and then one back over here. Then you want to disconnect the connection as well. Just a tab here to press. Sometimes you pull this. It should slide down and off, but press the connector and disconnect.
10 millimeter socket with the ratchet extension. Pair of pliers, squeeze the clamp, pull it back, twist the hose to break it free, pull it off. You may want to have a drip pan underneath, just to make sure no coolant comes out and drips on the floor.
Now we'll remove the two bolts that hold the fan. Anything that you can do to give yourself a little more space, which one thing is to disconnect this coolant temperature sensor. Just has a tab on the side. Press the tab and we'll pull it off. I just pulled the hose up out of the way.
The fan pulls up, and then you can slide it some to the side. You may have to reach down and push your lower hose a little bit. It's just a kind of matter of working it out.
The original part from the vehicle, new part from 1A Auto. You can see they're exactly the same. Just pull this cover off and slide it onto the new one, and it's ready to install.
Two pegs on the bottom here go down into the holes here. Pull the coolant hose and your lead up and out of the way. Put your fan down in kind of diagonally.
Just a matter of push on the lower hose a little bit, and continue to feed it down in. Then, this upper corner, you just have to get around the brace. To get this around, just move it out a little bit. A little bit of force, push it in behind, and then it kind of goes down in. Make sure this hose that goes to the coolant bottle's out of the way. Then you just have to kind of lift it up and try to feel for, you can kind of reach down there, feel one of the pegs, feel for the hole, and get it to slide down in place. Once you do that, the holes should line up pretty well with the holes in the radiator to mount. Connect the connector.
Then, this bolt goes in. 10 millimeter socket and ratchet with an extension, just tighten them up. Plug in your coolant sensor. Put your hose back on, and refit the clamp. Put your clamp strap back into place.
You may not need to take off the ground strap, but ours was in kind of rough shape, so we didn't want to hurt it anymore. Put the clip in place, hose down on. Again, a lot of times you can just use your fingers on this clip. Sometimes, you might want to use a pair of pliers. Lower it down in place, clip the hose in as you go. There, this one goes in there. Down in, and then clip this in up here.
There's a tab here, on your bottle, and that tab goes down into a slot right here. Replace the 10 millimeter bolt.
Battery in place; put this down in. The hook goes down and in. Reinstall your 10 millimeter bolt, and tighten it up. Reconnect your positive cable first and then your negative cable. Tighten up, and tighten.
Thanks for tuning in. We hope this video helped you out. Next time you need parts for your car, please visit 1AAuto.com. Also check out our other helpful how-to and diagnosis videos.
Good
Works great and still going strong after 5 years
Always the right part and works well.
The YouTube video was a big help in installing it.
Cant take a picture because the part is in m car, the part came in on time and in good condition. Great service. thank you
Part for perfectly and came quickly!
Great product! Perfect fit and works like a charm.
My original, 15+ year old factory radiator fan would not spin well. In fact, it would only spin if I pushed really hard on it so there was something wrong and it needed to be replaced. This did the trick and the replacement process took about 45 minutes total, and that was taking my time. The wire cable is routed slightly differently than the factory unit but it doesn't affect anything.
Very fast delivery, perfect fit and is working very well. The installation video made the job simple. Thank You !!
Fan fit perfectly. What helped was the installation video. Made it easy to install. Thanks for the help

RFA83266
This is for the radiator cooling fan. Our parts are exact replacements for your vehicle's OEM parts. As long as your vehicle specifications match up with our listing, these parts will directly fit and function like the originals.
