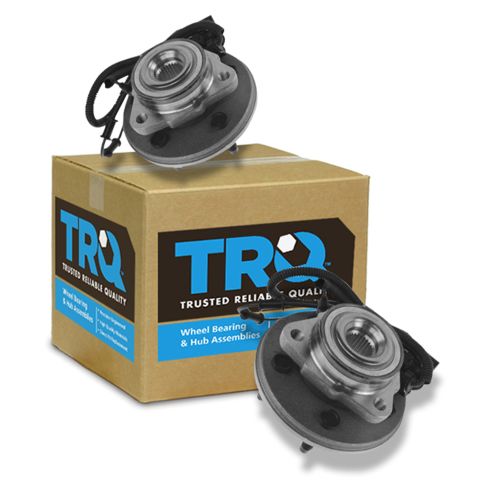
(1) Front Driver Side Wheel Bearing & Hub Assembly
(1) Front Passenger Side Wheel Bearing & Hub Assembly
Bearing Type:
Taper
Quantity:
2 Piece
Item Condition:
New
About TRQ: TRQ is a trusted brand dedicated to making every repair a success story by combining premium parts with easy installation. Each TRQ part is engineered by a team of automotive experts to meet or exceed OEM standards, delivering enhanced performance and maximum longevity. With rigorous in-house testing, the brand ensures superior fit and function across every product line. TRQ also provides customers with best-in-class, step-by-step installation videos—so you can complete repairs with confidence, whether you're a first-time DIYer or an industry professional.
Attention California Customers:
WARNING: This product can expose you to chemicals including Lead and Lead Compounds, which are known to the State of California to cause cancer, and birth defects or other reproductive harm. For more information, go to www.P65Warnings.ca.gov.
This part fits
7 vehicles spanning 2002-2005.
Fits these Makes
Select vehicle
Year
Make
Model
Description
2002-2003
Ford
Explorer
Ford Explorer Limited Front Driver & Passenger Side 2 Piece Wheel Bearing & Hub Assembly Set TRQ BHA48301
2002-2003
Ford
Explorer
Ford Explorer Eddie Bauer Front Driver & Passenger Side 2 Piece Wheel Bearing & Hub Assembly Set TRQ BHA48301
2002-2003
Ford
Explorer
Ford Explorer XLT Front Driver & Passenger Side 2 Piece Wheel Bearing & Hub Assembly Set TRQ BHA48301
2002-2003
Ford
Explorer
Ford Explorer XLS Front Driver & Passenger Side 2 Piece Wheel Bearing & Hub Assembly Set TRQ BHA48301
2004-2005
Ford
Explorer
Ford Explorer Front Driver & Passenger Side 2 Piece Wheel Bearing & Hub Assembly Set TRQ BHA48301
2003-2005
Lincoln
Aviator
Lincoln Aviator Front Driver & Passenger Side 2 Piece Wheel Bearing & Hub Assembly Set TRQ BHA48301
2002-2005
Mercury
Mountaineer
Mercury Mountaineer Front Driver & Passenger Side 2 Piece Wheel Bearing & Hub Assembly Set TRQ BHA48301
Part Interchange
Brand Label
Part Number
MOOG Hub Assemblies
515050
Timken
SP470201
Motorcraft
HUB-67
Timken
SP470200
Ford
1L24-1104AD
Ford
1L2Z-1104AB
GMB
725-0235
SKF
BR930456
Raybestos Brakes
715050
Chicago Rawhide
BR930456
Ford
2L2Z-1104AB
Ford
1L24-1104AE
Ford
3L24-1K018AB
Ford
1L24-1K018AB
Ford
1L24-1104AC
Ford
4L24-1K018AA
Mevotech
H515050
Ford
2L2Z-1104AA
Ford
1L24-1104AF
Ford
1L24-1104AG
Ford
1L2Z-1215AB
Ford
2L24-1104AA
Ford
4L2Z-1104AA
Drive Tech America
NT515050
Ford
3L2Z-1104AB
Ford
2L24-1K018AB
Ford
3L24-1K018AA
Ford
1L2Z-1104AA
Hollander
538-01616
Hollander
538-01585
Mevotech Supreme
H515050
This item may be interchangeable with parts from other brands with the above part numbers.
This information is provided only for reference and does not guarantee that the item you are
purchasing is identical to parts with part numbers from the brands listed above.
To confirm that this item fits your vehicle, use the above "Check Vehicle Fit" option.
Lifetime Warranty
This item is backed by our limited lifetime warranty. In the event that this item should fail due to manufacturing defects during intended use, we will replace the part free of charge. This warranty covers the cost of the part only.
FREE Shipping is standard on orders shipped to the lower 48 States (Contiguous United States). Standard shipping charges apply to Hawaii and Alaska.
Shipping is not available to a P.O. Box, APO/FPO/DPO addresses, US Territories, or Canada for this item.
Expedited is available on checkout to the United States, excluding Alaska, Hawaii.
Final shipping costs are available at checkout.
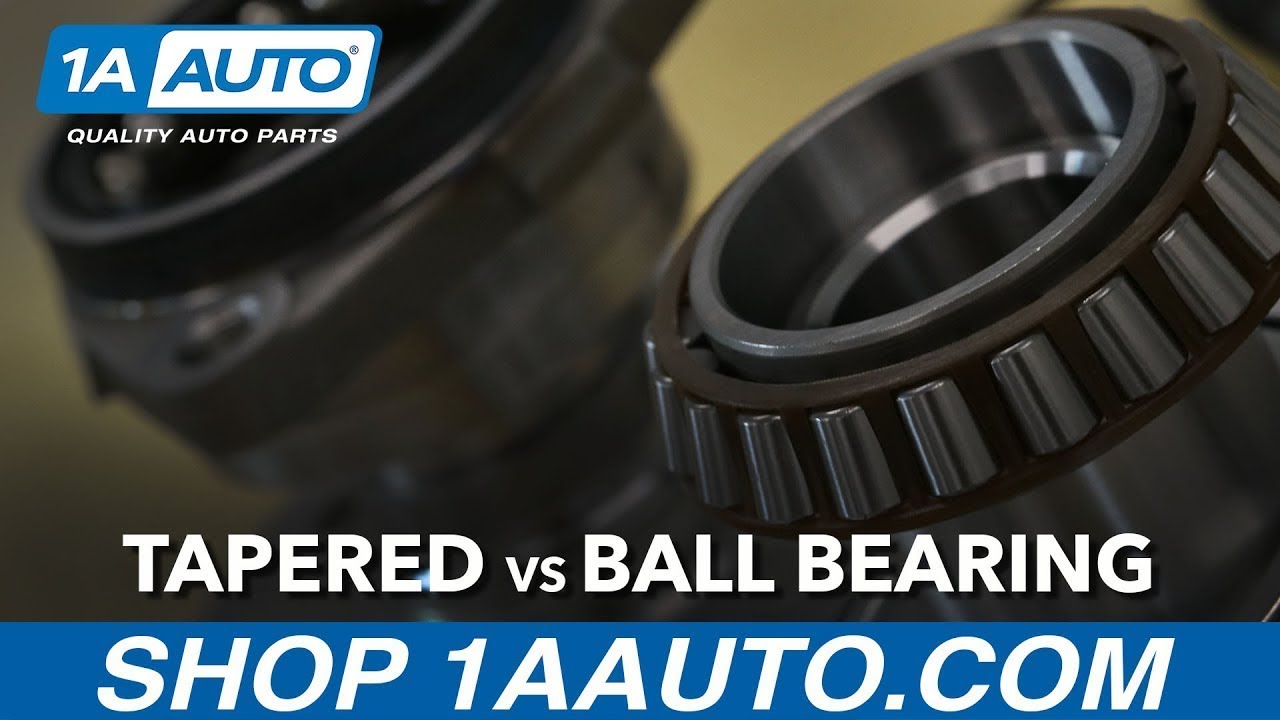
Differences Between Tapered Bearings and Ball Bearings
How to Replace Wheel Bearing Hub Assembly 2002-05 Mercury Mountaineer
Created on:
Tools used
No Tools Needed
1. Tapered Bearings vs Ball Bearings
Tapered rollers shaped like flat top cones provide more contact area, which increases their capability at receiving forces excreted by trucks and large cars.
Ball bearings are good for small cars as they do not need to sustain as much weight as the tapered roller bearings.
Hi everyone. Sue here at 1A Auto, and today we're gonna talk bearings. The difference between a roller bearing and a ball bearing type.
While both a roller bearing and tapered bearings work in the same manner. Tapered bearings use tapered rollers shaped like flat topped cones and two races angled from the outside to the inside of the bearing. The rollers have a large contact area which is what makes them better than roller bearings at handling forces exerted on the bearing during cornering in trucks and large cars.
For applications that require it, the TRQ brand offers tapered roller bearing style wheel bearings that match OEM specifications where other brands do not.
Roller ball bearings work well for small cars but replacing a tapered bearing with a roller ball bearing will result in increasing wear and faster failure.
So now that you know all parts aren't created equal, you can purchase your TRQ bearing at 1aauto.com.
Tools used
A Piece of Pipe (for leverage)
Torque Wrench
14mm Socket
15mm Socket
Jack Stands
18mm Socket
19mm Socket
5mm Hex Wrench
Flat Blade Screwdriver
White Grease
30mm Socket
Ratchet
Floor Jack
1. Removing the Wheel
Pry off the center cap with a flat blade screwdriver
Remove the hub nut with a 30mm socket and ratchet
Loosen the lug nuts with the vehicle on the ground
Raise the vehicle with a floor jack
Secure the vehicle on jack stands
Remove the lug nuts
Pull off the wheel
2. Removing the Brake Pads
Pry the ABS sensor wiring out of its clips with a flat blade screwdriver
Remove the two 14mm bolts from the brake caliper
Pry the brake pads into the caliper with a flat blade screwdriver to push in the pistons
Pull the caliper aside
Hold the brake caliper aside with wire ties
Pry the brake pads off with a flat blade screwdriver
3. Removing the Brake Rotor
Remove the two 18mm bolts from the brake caliper bracket
Pull off the brake caliper bracket
Pull the rotor off
4. Removing the Hub
Disconnect the ABS sensor wiring harness in the engine compartment
Unclip the ABS sensor wiring
Pull out the ABS sensor wire
Make sure the axle can move freely in and out of the hub
Apply rust penetrant to the hub bolts
Remove the three 15mm bolts from the hub
Pull off the hub
5. Installing the Hub
Push the hub onto the axle with the ABS sensor on top
Insert the three 15mm bolts into the hub
Tighten the hub bolts to 75 foot-pounds of torque
Feed the ABS sensor wire into place
Fasten the hub nut onto the hub
6. Installing the Brake Rotor
Slide the rotor on
Thread on one lug nut to hold the rotor in place
Put the bracket back into place
Start the two 18mm bolts by hand
Tighten the bolts to 85 foot-pounds
7. Installing the Brake Pads
Apply brake grease to the brake pad tabs
Install the new brake pads into the bracket
Remove the wire ties from the caliper
Put the caliper on
Thread the two 14mm bolts by hand
Tighten bolts to 25 foot-pounds
Push the ABS sensor wire into its clips
Clean the brake rotor
8. Reattaching the Wheel
Remove the placeholder lug nut
Slide the wheel into place
Start the lug nuts by hand
Tighten the lug nuts preliminarily
Lower the vehicle to the ground
Tighten the hub nut to 180 foot-pounds
Tighten the lug nuts to 100 foot-pounds in a crossing or star pattern
Reattach the center cap
9. Connecting the ABS Sensor
Connect the ABS sensor wiring harness inside the engine compartment
10. Testing the Brakes
Pump your brakes repeatedly until they feel firm
Test your brakes at 5 miles per hour and then 10 miles per hour
Road test the vehicle
Brought to you by 1AAuto.com, your source for quality replacement parts and the best service on the Internet.
Hi, I'm Mike from 1A Auto. I hope this how-to video helps you out, and next time you need parts for your vehicle, think of 1AAuto.com. Thanks.
In this video, we're going to show you how to replace a front hub on this 2003 Mercury Mountaineer. We show you on the passenger's side, but the driver's side is the same procedure. It's the same part and similar process on these Mountaineers for 2002 to 2005. The items that you'll for this are a new front hub from 1AAuto.com; a 14, 15, 18, 19 and 30mm socket and ratchet; a piece of pipe for some extra leverage; 5mm Allen bit or Allen wrench; flat blade screwdriver; jack and jack stands; and torque wrench.
Use a flat blade screwdriver to pry off the center cap. Once it comes off some you can just put your fingers underneath and pull it off. Then, use a 30mm socket to loosen up that center hub nut and remove it with a ratchet and a pipe for some extra leverage. You can also use a larger breaker bar. If you have the benefit of air tools, you can do this step later as you'll see us do but we're just showing you how to do this in the beginning. Here you'd also want to loosen the lug nuts up with a 19mm socket and breaker bar or ratchet and pipe. We're just going to speed it up here. We've raised and secured the vehicle and we're using a ratchet or an air gun to remove the lug nuts, wheel and tire.
Now, just open up this clip with a flat blade screwdriver. You just have to pry the tab and pull it open. Then just pry the harness out of this clip and pull it out of these three. Then you want to remove these two 14mm bolts. We'll just fast forward as Mike does that. Now using a flat blade screwdriver, just pry right here and that will push the piston in on the caliper and make it easier to pull the caliper off, do it again down here, and pull the caliper free. Then you want to set it up and out of the way so we're just going to put it up here. Just to make sure it doesn't fall down use a wire tie to just secure it up there.
Now, pry out your brake pads. The best way to tell the life left in your pads: this little slot right here is a wear mark so you can see it pretty much goes away once you have about an 1/8 of an inch of pads left. Like I said before, these pads have quite a bit of life left on them.
Now, remove these two 18mm bolts. You can see he's using a piece of pipe for some extra leverage. When you pull out the last bolt, the caliper bracket pulls free. Now pull your rotor off.
Now up here, you just want to reach down here behind your radiator reservoir and just push on the tab on this harness and pull the harness free. Then just open up this clip up here with a flat blade screwdriver and pull the harness down.
Now if you don't have air powered tools, you want to remove this 30mm nut with the tire on and the wheel on the ground. If you do have air powered tools, you can remove it right now. Then just make sure the axle moves in and out. Then come back here and you want to remove these three 15mm bolts. We're just going to start off by spraying them with some penetrating oil and then using a piece of pipe for some extra leverage, just break them free and remove them. Now a tip on these: I start with 1/2 inch sized tools which are larger, heavier duty tools and once I get them loose I switch to 3/8 inch drive tools which are smaller and get in to the area a little better. It makes it a lot easier if you just turn your wheel so that you can get better access to this bolt back here.
Tap the hub with a hammer until it starts to move out. We realize that we have a bolt still in the hub a little bit so we're just going to remove that and then pull the hub free. We'll push the axle out of it.
On the left is the old hub. On the right is the new one from 1A Auto. You can see they're identical and they'll fit exactly same. Take your new hub and push it onto the axle with the ABS harness on the top and then just push it back into place. When you have it lined up, just replace those three 15mm bolts and tighten them up. Then torque each of those to 75 foot-pounds. Now we're just going to use our old clips, so we're just going to pry off the new clips and you could always just pry out your old clips and push these ones into place. Ours are in good condition so we're just going to use them. Feed the harness back up and get it up over the control arm and then just clip it back into that clip and push it back up into place. Replace the hub nut and just tighten that up preliminarily.
Take your rotor and push it into place and then replace a lug nut just to hold it there while you reassemble the caliper bracket and caliper. Now take your caliper bracket, line it up and then just replace those two 18mm bolts and tighten them up. Then torque both of those to 85 foot-pounds.
Just push your brake pads back into place and it helps if you just apply some brake grease to the tabs to help them go back in. Now remove your wire tie and pull your caliper back down. Move the C-stand and the brake pad and the caliper piston is pushed all the way in. Then take your caliper and push it back into place over your brake pads. You want to make sure that those slides push down underneath and line up. Once they're lined up, replace those two 14mm bolts and tighten them up. Then torque both of those to 25 foot-pounds.Then just push this back into those three clips, and then back into this bracket, and then close that final clip.
Wipe down any dirt that may have gotten on your rotor while replacing the caliper and then remove that lug nut, replace your wheel and then replace all of the lug nuts and tighten them preliminarily. Then you want to lower the vehicle and tighten them the rest of the way and then torque each of these in a crossing pattern to 100 foot-pounds. Now torque that hub nut to 180 foot-pounds. Now replace your hub cap. Just line it up and hit it back into place.
Then just grab your harness up here and push it back into the connector until it clicks.
Whenever you've done any work on your brakes, you just want to pump the brake pedal until it firms up. Then you want to do a stopping test from 5 miles per hour, then 10 miles per hour.
We hope this video helps you out. Brought to you by www.1AAuto.com, your source for quality replacement parts and the best service on the Internet. Please feel free to call us toll-free, 888-844-3393. We're the company that's here for you on the Internet and in person.
Product Reviews
4.8/ 5
★★★★★★★★★★
93 reviews
5★
91%
4★
5%
3★
0%
2★
0%
1★
3%
★★★★★March 25, 2026
Great prices, parts and "how to" videos
Great price on top quality parts. Everything fit and works perfectly. A1's videos on "how to" install their parts are excellent and saved me a lot of time. I'm very happy with A1 auto parts and will continue to use them.
★★★★★July 26, 2025
Helpful customer service fast shipping. Perfect fit, and repair.
★★★★★June 1, 2025
Good
★★★★★February 10, 2025
Exact replacement, perfect fit.
Perfect OEM replacement. Exactly as described.
★★★★★December 4, 2024
The right part and did the job works great
Good quality parts fit and worked flawlessly
★★★★★August 20, 2024
Get the SET!
As described, came with new hardware, fast delivery! I recommend the set for both sides, because while one side had the tell-tale signs of wear with noise especially at higher speeds when changing lanes, the opposite side was definitely worn and would have not lasted much longer. Would have been doing same job next year. This set fit perfectly for my 2WD '04 Mountaineer and now I'm back on the road!
★★★★★January 17, 2024
Great product
★★★★★December 5, 2023
Fit Well. Worked Well. Back on the Road. Good shipping. Thank You!
Parts fit well. Worked well. Vehicle back on the road. Shipping was good as well. Thank You 1A Auto. Have used 1A Auto now a few times. Service has always been excellent. Will continue to use and recommend to others. Keep up the good work and service. Love the fact that when I call a real person answers who can actually help you.
★★★★★October 30, 2023
Great fits perfect!will always and forever shop with 1a auto! Thanks for the great service guys!!!!!
★★★★★July 11, 2023
Thanks 1A Auto
Parts fits perfectly on my Ford Explore
Showing 1–10 of 93 reviews
BHA48301
In Stock
Customer Q&A
Got a question about this part? Post it and get answers from our team.
MichaelMarch 21, 2024
i have a 2005 4x4 ford explorer xlt will it fit?
This part will fit your vehicle as long as you have the 4 door model.
Andra · March 21, 2024
JohnJanuary 4, 2023
Do these work on a 2005 rear end drive ford explorer ?
Hello, these are listed for 2005 Ford Explorer 4 Door Front
Ricale · January 4, 2023
EdwinFebruary 13, 2022
specifically some of these parts are marketed as left and right or any of them can fit on either side?
These bearings are interchangeable, they can be used on either side!
T · February 14, 2022
RobertFebruary 9, 2022
Does this fit on a 2003 Explore 2wd with the 4.6L?
most ford parts fit mercury mountainer suv . you should check to be shure. . 2003 mountaineer was about same as ford explore.
Marvin · February 14, 2022
KSeptember 7, 2019
Is this for both the left and right side? Or just one side
It will work on either side
Robert · September 8, 2019
ResaJuly 14, 2018
Do these work for 4x4, 03 explorer?
Yes
samuel · June 22, 2020
ResaJuly 14, 2018
Do they come with abs sensor/ speed sensor?
yes
V · August 5, 2020
D.J.June 23, 2018
Is grease already applied to the bearings?
yes
V · August 5, 2020
JuanJune 29, 2017
How long till I get it?
I allways get them in 4 th day when order.
Dennis · June 29, 2017
GregMarch 28, 2017
Is the driver and passenger side the same? Or do I need to buy different ones
They are both the same. You don't need different ones. I used them for a Ford Explorer 2002 RWD, when my driver side bearing was making aloud noise on the Freeway. I decided to change both at the same time as old ones were the original factory ones.
Pooshan · March 30, 2017
Showing 1–10 of 13 questions
Customer service
877-844-3393
Monday - Friday 8:00am - 9:30pm ET Saturday - Sunday 8:00am - 4:30pm ET
Ask a Question
Check Your Email
We sent a verification email to .
Click the Verify Email button in the email to submit your question.
This extra step helps prevent spam.
Select Your Vehicle
Specify your vehicle's year, make and model to guarantee fit.










 WARNING: This product can expose you to chemicals including Lead and Lead Compounds, which are known to the State of California to cause cancer, and birth defects or other reproductive harm. For more information, go to www.P65Warnings.ca.gov.