Replaces


Part Details
Attention California Customers:
 WARNING: This product can expose you to chemicals including Carbon black(airborne, unbound particles of respirable size), which is known to the State of California to cause cancer. For more information, go to www.P65Warnings.ca.gov.
Lifetime Warranty
This item is backed by our limited lifetime warranty. In the event that this item should fail due to manufacturing defects during intended use, we will replace the part free of charge. This warranty covers the cost of the part only.
FREE Shipping is standard on Orders shipped to the lower 48 States (Contiguous United States). Standard shipping charges apply to Hawaii, Alaska and US Territories. Shipping is not available to Canada.
Expedited is available on checkout to the United States, excluding Alaska, Hawaii and US Territories as well as P.O. Boxes and APO/FPO/DPO addresses. Final shipping costs are available at checkout.
Created on:
Tools used
Brought to you by 1AAuto.com, your source for quality replacement parts and the best service on the Internet.
Hi, I'm Don from 1A Auto. I hope this how-to video helps you out, and next time you need parts for your vehicle, think of 1AAuto.com. Thanks.
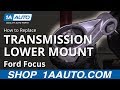
In this video, we going to show you how to replace the torque strut mount on this 2005 Ford Focus and the tools you'll need are a jack and jack stands and a 13mm socket and ratchet and a 13mm wrench.
Your torque strut mount is located right here. You can see it's held in with two 13mm bolts: one here and one right here. You want to start off by just removing those. We'll just fast forward as Don removes both of them. Push the torque strut mount back and then next you want remove these two 13mm bolts on this bracket. You want to use a wrench and another wrench so you can have some added leverage here and just break those bolts free. Then you can just remove them the rest of the way and you'll see he starts off using a wrench but then he switches to using a socket and ratchet. Now repeat this same process for the upper bolt. For this one, it may be easier to use the socket and ratchet from up above. Then once you twist out that last bolt, you can just pull that bracket and the torque strut mount down.
Take your new torque strut mount and put it up into place and push your bracket in place. It's easier to do the top bolt first. Just replace that bolt and tighten it up. We'll just fast forward as he replaces the other bolt and tightens both of those up. Once the bracket is tightened into place, replace your two bolts on your torque strut mount and tighten those up.
We hope this helps you out. Brought to you by www.1AAuto.com, your source for quality replacement parts and the best service on the Internet. Please feel free to call us toll-free, 888-844-3393. We're the company that's here for you on the Internet and in person.
Tools used
Hey, friends. It's Lenny here at 1A Auto. Today, I'm working on a 2001 Ford focus, and I want to show you how to do a lower transmission mount. It's going to be a very easy job, and I want to be the guy that shows you how to do it. If you need this or any other part, you can always check us out at 1aauto.com. Thanks.
Okay, so here's our part. This is what we're going to be replacing. All we're going to do is just put a little bit of pressure underneath the transmission here just to hold it up. We don't want to try to lift it up or anything. You can use a floor jack or a post Jack or whatever you want. Just enough so it can't really go any place because we're going to take out this bolt right here and then this bolt right here.
To do that, I'm going to use my 13 millimeter socket or ratchet. Just wiggle it around and get it past the grooves. That's what our bolt looks like. Now, we're going to move along to this one. There we are. Pull that one out of there. That's what it looks like. Set it aside.
I've got my 13 millimeter wrench. I'm just going to break that free. Just try to get that completely out of there so we have access to getting out the upper one. There it is. Set this aside. We'll do the upper same way. See of I can get my ranch up in there. Doesn't look like it gives me very much. I try breaking this free with my ratchet. See if this gives me enough room to slide it out. Looks like not yet. So I'll just keep continuing here what I'm doing, just try to get that upper bolt out. I'll try switching back over to the 13. I don't know, maybe try to pivot it. So close. There we are. Second bolt. Get this bracket out of here. Just make sure you pay attention to which way it goes. This little hooky-do goes facing down. Grab this of here. That's what that looks like.
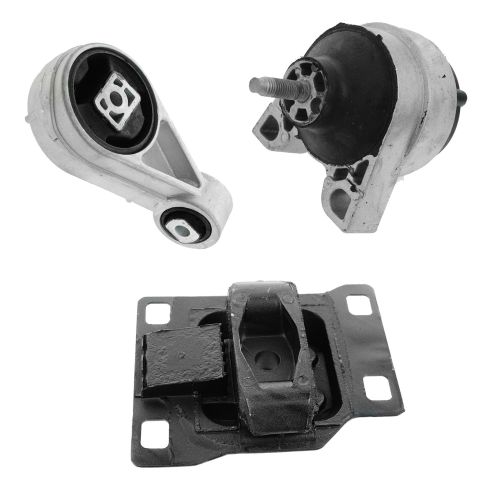
Over here, we have our original 2001 Ford Focus lower transmission mount. Over here we have our brand new quality 1A Auto part. As you can tell, they're both shaped the exact same. You've got the same mounting holes, new rubber. Everything looks exactly the same. I don't see any reason why this wouldn't be a quality part to install into the vehicle, so I'm going to go ahead and do it. If you need this or any other part, you can always check us out at 1AAuto.com. Thanks.
All right. It's time to install this. Just going to go like this. Go up in there like that. Bring this over. We've got our little tabby thing facing down. I'm going to get my top bolt in there. Find the hole. There it is.
Generally speaking, I like to start them both before I go ahead and tighten it down. This one right here, I'm going to tighten up the majority of the way first though, just so I can have the space that I need. Feels like it should still be able to go quite a bit more here. Just want to get that top one almost all the way in. It's not completely tightened so that way there we can still move the bracket around. Get this one, so it's bottomed out as well.
Here we go. It's getting snug now. That one's snug. Go ahead an do this lower one. Tight, tight. Let's move along. We'll get these two. The longer of the two goes straight up here. The shorter goes this way. Put this in. Few good threads here. Very nice. Now, we have to get this one lined up. To do that, I'm just going to lower the engine/transmission down a little bit, just wiggling it around, try to get it started on the threads over there.
Looks like it's going in. Ford really wanted to make sure you had plenty of threads sitting out on these. Make sure that's nice and tight. Go ahead and do the same to this one. Tight, tight, tight, tight.
Get this out of the way. We can lower the vehicle safely back down to the ground. And off we go.
Thanks for watching. Visit 1AAuto.com for quality auto parts shipped to your door, the place for DIY auto repair.
And if you enjoyed this video, please click the subscribe button.
Tools used
Hey, friends. It's Len here at 1A Auto. Today, I'm working on a 2001 Ford Focus and I'm going to be replacing a motor mount. It's going to be a very easy job. I want to be the guy that shows you how to do it. If you need this or any other part, you can always check us out 1AAuto.com. Thanks.
We're going to need a couple of things here. We're going to need a 10mm. We need to take this off right here. We're going to need a flat head. I'm going to come around the backside there. Disconnect the rearward side. We're going to get this out of the way. Get this one out. I'm going to use my socket. We don't have to disconnect the coolant hoses, we just need to move this stuff out of the way.
Let's see what that screw looks like in one second. That's what it looks like. Nice and rusted. Set it aside for later. Sometimes you can just lift up on this, other times you need to pull a tab. This one just comes right up. It's missing the little clippy-do there. Let's pull this aside. Got a clear view of this motor mount here. Now we need to remove this power steering. This just slides right up. There we go. Set this aside as well. Try not to put that upside down. Not that it really matters. Stay. Thank you.
Now what we're going to do, we're going to come over here. There's three 15mm headed bolts, one, two, and three down there. Okay? I'm going to loosen those up slash take them out. I'm just going to use my safety glasses, hand protection, 15mm and an airgun. Yo can use whatever you have, but the bolts are 15mm.
We've got our floor jack. I've got a nice pad. If you don't have a pad, make sure you use wood. We're going to wheel this under. We're going to go underneath the corner slash edge of the oil pan. The edge should have a plenty of support. If you go underneath the center, there's a possibility that you could crush it. We don't want to do any of that. All we want to do though is be able to lift up this engine a little bit. Just like that. Okay?
Now we're going to remove these two nuts. 18mm. Grab the Mount Assembly. Okay. We're going to remove this nut. 18mm. I'm just going to go ahead and grab onto this shaft with my locking pliers. Continue with my 18mm There's our nut. Nice and hot. Set that aside. Grab our mouth. Here's our old mouth. Easy peasy.
Here we are, friends. A quick product comparison for you. Over here, we have our upper engine mount, passenger side upper engine mount, on our 2001 Ford Focus. Over here, we have our quality 1A Auto part. They're both the exact same. You got your mounting holes, mounting stud, and of course brand new rubber. I don't see any reason why this wouldn't be a quality part to install into the vehicle, so I'm going to go ahead and do it. If you need this or any other part, you can always check us out at 1AAuto.com
It's time to install the mount onto our plate. You'll notice you have the stud hole and the little piton hole. We've got a stud and the piton. We're going to line those up. It's just going to go in like that. Here we are. Just set it down. Use my 18mm, blast if together. Okay. Piton's in the hole. I just want to make sure before I go ahead and tighten this up all the way. Nice and tight. Let's go ahead and install it into the vehicle.
We got our unit, set it down in here where it goes. It looks pretty good. Okay. I'm going to jack up the engine a little bit more here. That looks good. We'll take our nuts, starting one here. There are three bolts started. Can do those 15s. I'm going to lower the engine real quick. There we are. Tight, tight, tight, tight, tight. Looks good. We can continue.
Get this situated. Just get it all lined up back to where we took it apart. Press this down in there. A weird one. Needs to go in better. Very nice. Okay. This right here should have a little a thing that comes out and slides over this. We're going to pretend it's there. Slide it over. I've got a little 10mm bolt right here. I'm just going to see about starting it in. There we are. All right.
Thanks for watching. Visit us at 1AAuto.com for quality auto parts shipped to your door, the place for DIY auto repair, and if you enjoyed this video, please click the subscribe button.

MTA35050
