Replaces
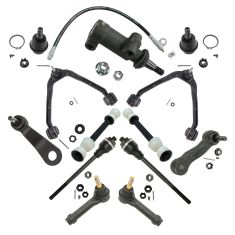
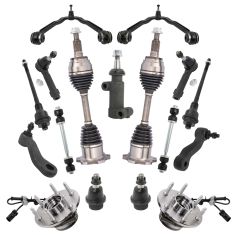
Replaces Chevrolet GMC Cadillac Front 13 Piece Steering & Suspension Kit MOOG MGSFK00141
$734.95
Replaces Chevrolet GMC Cadillac Front Steering, Suspension, & Brake Kit TRQ PSA64825
$709.95
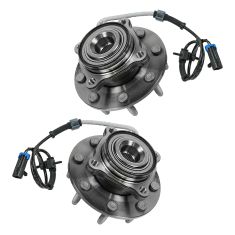
Replaces Chevrolet GMC Hummer Front 2 Piece Wheel Bearing & Hub Assembly Set Timken TKSHS00304
$669.95

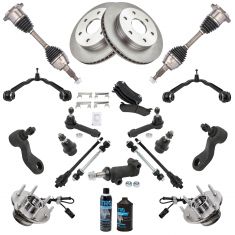
Replaces Chevrolet GMC Front & Rear 21 Piece Steering, Suspension, & Drivetrain Kit TRQ PSA38054
$634.95
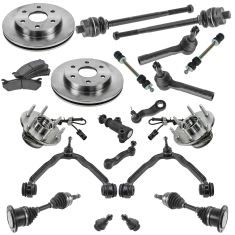
Replaces Chevrolet GMC Cadillac Front 17 Piece Steering, Suspension, & Drivetrain Kit TRQ PSA69967
$579.95
Replaces Chevrolet GMC Cadillac Ceramic 22 Piece Steering, Suspension, & Brake Kit 12oz TRQ PSA72850
$519.95
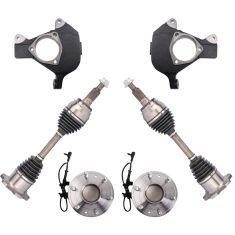
Replaces Chevrolet GMC Cadillac Front 6 Piece Drivetrain Kit TRQ PSA25391
$481.95
Returns: Parts with electrical components cannot be returned once installed.
1 Year Warranty
This item is backed by our 1-year warranty. In the event this item should fail during intended use, we will replace the part free of charge. This warranty covers the cost of the part only.
Returns: Parts with electrical components cannot be returned once installed.
This item ships directly from supplier.
FREE Shipping is standard on Orders shipped to the lower 48 States (Contiguous United States).
Shipping is not available to Canada. This item cannot be Shipped to AK Alaska, HI Hawaii, US Territories, P.O. Boxes, APO/FPO/DPO addresses or Expedited due to size limitations.


Created on:
Tools used
Hi, I’m Mike from 1A Auto. We’ve been selling auto parts for over 30 years!
To drain the coolant, I'm going to go down here to the lower radiator hose at the radiator outlet, undo the spring clamp with a pair of pliers, and pull this hose off. I already have a drain pan underneath the truck to catch any coolant or all of the coolant that will leak out. All right, and then we'll release the clamp with a pair of pliers. Work the hose off the radiator. Pull it back and forth.
After you drain this coolant, if you're not going to reuse it, just make sure you dispose of it properly. With the majority of the coolant drained out, I'm going to put the lower hose back onto the radiator, and just kind of slide it back into place. We're not going to clamp it yet.
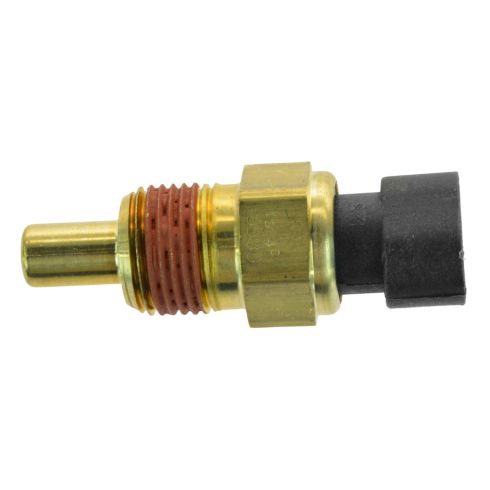
The coolant temp sensor on this 4.3 liter is down here on the side of the block. There's a connector to it that threads into the block. I'm going to take some brake parts cleaner, just sort of clean it off so you can have a better idea of what I'm doing, and kind of see it. There's an electrical connector on the top. I'm going to open it up. There it is. What I did, I had to find this little tab on the connector and pull it up to unlock it, and the connector came right out. We'll leave it up here, so we know where the connector is.
Engine coolant temp sensor is down here on the side of the block. There is an engine harness that normally runs along here and a bracket. We just pushed it out of the way and moved the engine harness up, just to give you a better idea of what we're doing. You don't have to move those things out of the way to replace it, but this makes it easier to see on video.
Take a 19mm deep socket—it's going to go over the sensor. Just kind of unthread it from the block. Before you do this, you want to make sure the coolant is drained because coolant will come of there. You could swap it, but it gets pretty messy, and you'd have to be pretty fast. I see it's still pretty tight, I'll loosen it some more. That is the coolant temp sensor if you want to know. This is our old coolant temp sensor.
Here's our brand new one from 1AAuto.com. See, they're identical in design, same style connector, same lock, two pin. Comes with new thread sealant. This'll go right in and work great for you.
Take the new sensor, install it in the same place. Get it started. It'll get harder to turn because of the thread sealant. Use the 19mm deep socket again to install it. I can see the red thread sealant is almost all the way in, and it's getting pretty tight. When I feel it getting tight, I'm going to stop.
Reinstall the harness. Coolant temp sensor is replaced. I've just got some slip joint pliers in here and reinstalling the clamp on the lower radiator hose, squeeze it together. Got to refill the system with the correct coolant. Open up the reservoir and then refill it. I'll just kind of refill it slowly and let any trapped air bubbles escape.
With the coolant filled to the full cold, I'm going to reinstall the cap. Start the truck up. It may suck some of the coolant back into the system. Then, I will shut the truck off and recheck the level, top it back off, then start it and let it run to bleed the system and come up to temperature. Just needs to be topped off a tiny bit. Let the engine come up to temperature and make sure the fluid level is correct afterwards. Top off as needed.
Thanks for watching. Visit us at 1AAuto.com for quality auto parts, fast and free shipping, and the best customer service in the industry.