
★★★★★
November 15, 2021
Elated
Always have what i need.

Replaces








About TRQ:
TRQ is a trusted brand dedicated to making every repair a success story by combining premium parts with easy installation. Each TRQ part is engineered by a team of automotive experts to meet or exceed OEM standards, delivering enhanced performance and maximum longevity. With rigorous in-house testing, the brand ensures superior fit and function across every product line. TRQ also provides customers with best-in-class, step-by-step installation videos—so you can complete repairs with confidence, whether you're a first-time DIYer or an industry professional.
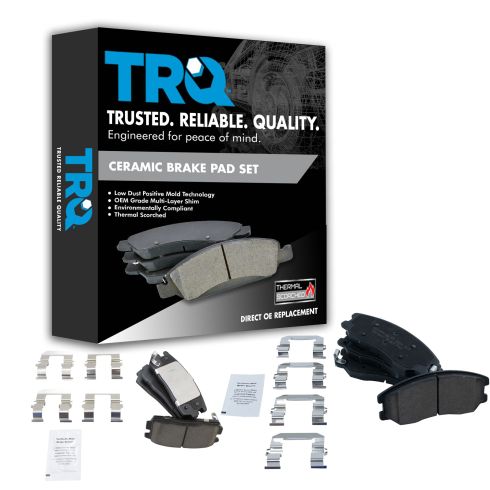
TRQ brake pads are manufactured using premium raw materials and design standards to restore original performance. TRQ brake pads are positive molded and utilize a multi-layer shim for enhanced performance and service life. TRQ’s combination of materials and design ensures a low dust and low noise braking experience. TRQ recommends replacing your brake rotors when you replace your brake pads to ensure even wear of components and improved braking comfort. All products are fit and road-tested in our Massachusetts R&D facility to ensure we deliver on our promise of Trusted Reliable Quality.
Attention California Customers:
 WARNING: This product can expose you to chemicals including Lead and Lead Compounds, which are known to the State of California to cause cancer, and birth defects or other reproductive harm. For more information, go to www.P65Warnings.ca.gov.
This part fits 5 vehicles spanning 2007-2015.
| Year | Make | Model | Description |
|---|---|---|---|
| 2012-2015 | Chevrolet | Captiva Sport | Chevrolet Captiva Sport Front & Rear Ceramic Brake Pads TRQ BFA13031 |
| 2007-2009 | Chevrolet | Equinox | Chevrolet Equinox Front & Rear Ceramic Brake Pads TRQ BFA13031 |
| 2007-2009 | Pontiac | Torrent | Pontiac Torrent Front & Rear Ceramic Brake Pads TRQ BFA13031 |
| 2008-2010 | Saturn | Vue | Saturn Vue Front & Rear Ceramic Brake Pads TRQ BFA13031 |
| 2007-2009 | Suzuki | XL-7 | Suzuki XL-7 Front & Rear Ceramic Brake Pads TRQ BFA13031 |
| Brand Label | Part Number |
|---|---|
| Raybestos Brakes | MGD1275CH |
| Raybestos Brakes | SGD1275C |
| Raybestos Brakes | MGD1264CH |
| Raybestos Brakes | EHT1275H |
| Raybestos Brakes | EHT1264H |
| Raybestos Brakes | SGD1264C |
| Chevrolet | 19168900 |
| Suzuki | 5580078J01 |
| GMC | 20801538 |
| Chevrolet | 19149903 |
| Chevrolet | 19171816 |
| Pontiac | 19168900 |
| Chevrolet | 19168899 |
| Suzuki | 5580078J00 |
| Suzuki | 5520078J00 |
| Saturn | 20801538 |
| Pontiac | 19149903 |
| Saturn | 19168899 |
| Chevrolet | 20801538 |
| Pontiac | 19168899 |
| Saturn | 19168900 |
| Chevrolet | 22850988 |
| Pontiac | 19149904 |
| Suzuki | 5520078J01 |
| Chevrolet | 19149904 |
| FMSI | CD1275 |
| FMSI | CD1264 |
This item may be interchangeable with parts from other brands with the above part numbers. This information is provided only for reference and does not guarantee that the item you are purchasing is identical to parts with part numbers from the brands listed above. To confirm that this item fits your vehicle, use the above "Check Vehicle Fit" option.
Lifetime Warranty
This item is backed by our limited lifetime warranty. In the event that this item should fail due to manufacturing defects during intended use, we will replace the part free of charge. This warranty covers the cost of the part only.
FREE Shipping is standard on orders shipped to the lower 48 States (Contiguous United States). Standard shipping charges apply to Hawaii and Alaska.
Shipping is not available to a P.O. Box, APO/FPO/DPO addresses, US Territories, or Canada for this item.
Expedited is available on checkout to the United States, excluding Alaska, Hawaii.
Final shipping costs are available at checkout.
Created on:
Tools used
Hi, I'm Mike from 1AAuto. We've been selling auto parts for over 30 years! We're dedicated to delivering quality auto parts, expert customer service, and fast and free shipping, all backed by our 100% satisfaction guarantee. So visit us at 1AAuto.com, your trusted source for quality auto parts.
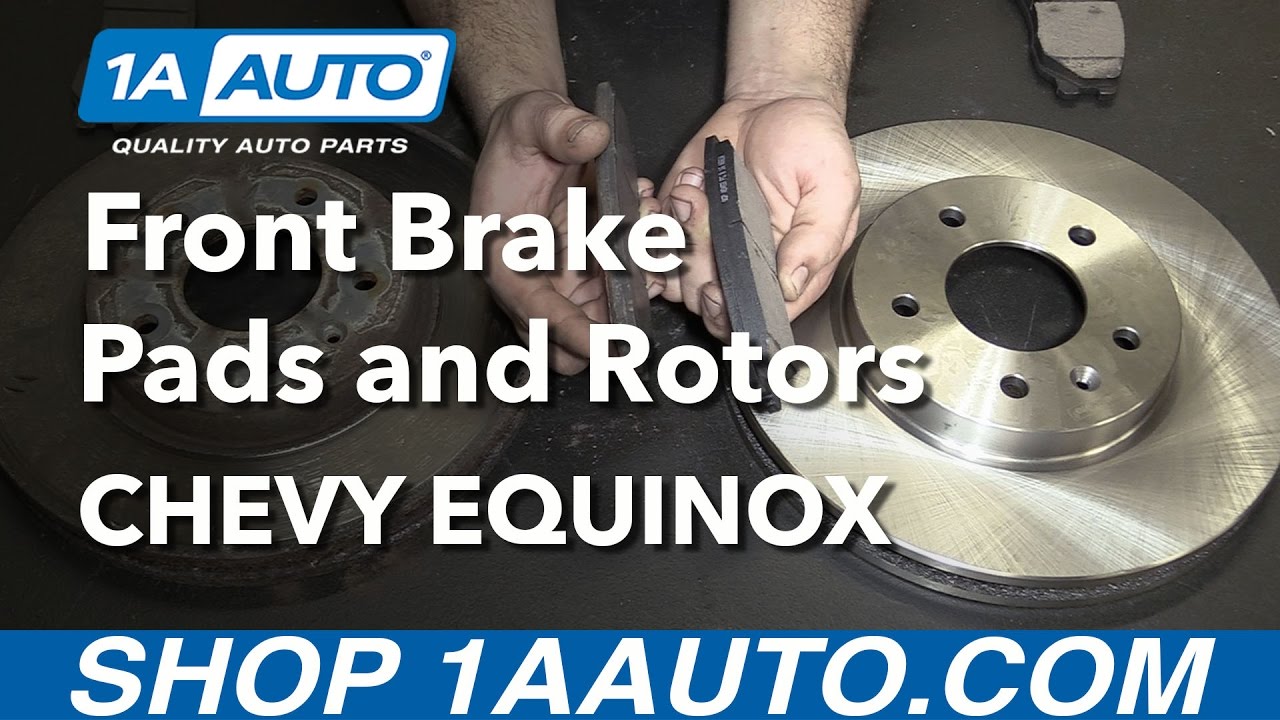
In this video, we're going to be working with our 2008 Chevy Equinox 3.4-liter V6 all-wheel drive. We're going to show you how to remove and replace your vehicle's front brake pads and rotors. We recommend that these always be done together, as well as any pair. So, you do your pads and rotors on both your front left and front right wheel.
If you like this video, please click subscribe. We have a ton more information on this and many other vehicles. If you want these parts for your car, you can follow the link down in the description over to 1AAuto.com.
Here are the items you'll need for this repair: 14-19mm socket, ratchet, socket extensions, breaker bar, T-30 Torx bit, bungee cord, mechanic wire, hammer, wire brush, brake grease, brake cleaner, flat blade screwdriver, groove jaw pliers, torque wrench
Using a 19mm socket and breaker bar, loosen all of your lug nuts about one turn with the weight of the vehicle on the tire. This will make it easier to remove them once we raise and support the vehicle. Raise and support your vehicle.
We're doing this on a lift to make it easier to show you what's going on. However, this job could easily be done in your garage or driveway using a jack and jack stands. Remove the rest of your lug nuts by hand. Remove the wheel and tire from the vehicle. Sometimes they get a little stuck on there, because it's an aluminum wheel on a steel hub. You have to wiggle them a little bit to break them free.
Using the T30 Torx bit and a ratchet, loosen up that bolt. Thought I might've needed that pry bar to counter support it, so it wouldn't turn. However, this one came out nice and easy. Remove the two 14mm caliper bolts, one at the top and one at the bottom, with a 14mm socket and ratchet. Be sure to crack both of these loose before removing either one fully. Remove the caliper. Secure it up and out of the way with a bungee cord, zip ties, or mechanics wire. Remove the pads from the slides. You can use a flat blade screwdriver if you need a little more leverage here.
These are coming out pretty easy. Using an 18mm socket and breaker bar, loosen the caliper bracket bolts. Again, you're going to want to get both of these loose before you remove either one fully. Once you've cracked them loose, you should be able to remove them the rest of the way with a socket and ratchet. Remove the caliper bracket and place off to the side.
Remove the rotor. Ours is frozen on there pretty good. We're not reusing our rotors. We can hit it just about anywhere to make sure it pops off the hub. However, if you plan to reuse yours, hitting it in between the studs can get it off without damaging anything. Your rotors are really stuck on, you're just going to have to knock them off and replace them.
Here we have our old brake pads and rotors that we removed from our vehicle, and our new parts from 1AAuto.com. As you can see, these parts are exactly the same with the same size rotor. They're also vented. They have the same 5-bolt lug pattern, same centerbore. The same bolt location for your rotor screw. Same brake pads. You can see why it was time to change these out. That's almost completely worn away. These probably had a couple thousand miles left on them. It's a lot better to change your brakes just before they need it, rather than after the fact, to make sure that your vehicle is always operating and stopping safely.
Each side also comes with one of these brake squealers. Which is designed to start dragging against the rotor and making some noise to give you an audible alert that it's almost time to do your brakes. You can see we have some rust and corrosion build up. These marks are from removing it with a hammer. They were pretty well frozen on there. We have a nice, smooth, even surface on our new rotor. If your old brakes are squealing, not stopping the way they should be, grinding, or are creating a pulsating brake pedal from a warped rotor. These new parts from 1A Auto are going to go in direct fit just like your original equipment. We fix you up right.
Using a steel wire brush or some Emory cloth sandpaper, or something like that, to remove the rust build up on the face of your hub. Clean that, as well as the centerbore, to make sure that there's no rust build up that'll make our rotors sit unevenly or freeze on prematurely. Once you've removed the bulk of the rust, we're going to apply a thin coat of brake grease to the face of the hub, as well as around the centerbore of the hub. This will make sure that if we ever need to remove our rotor, should it be an axle, a wheel bearing, the spindle, or something else, that we need to take our hub off, that it comes of easily. We don't have to hit it with a hammer, like you saw earlier. Making sure that it's removable and reusable down the road. As well as, making future brake jobs easier.
Install the rotor onto the hub backwards. Spray it down with some brake cleaner. This removes the coating they use to keep these from rusting in storage. Turn it around. Make sure you line up that beveled hole. Put the threads in the hub for your rotor screw. Spray down this side as well. Lay the rotor flat on the hub. Reinstall your T30 Torx screw.
If your brake clips, or shims here, have some heavy corrosion or are cracked or broken in any way you'll need to replace them. Ours looks okay. We'll just pop them off. Go nice and easy to try not to bend them. It may help to use a flat blade screwdriver just to help pop that up, especially in the middle. We'll use this small wire brush to clean all the rust and corrosion out of the places that that shim rides on. Once that's cleaned up, we'll clean up the shim itself. We'll grease the contact surface. Again, just a thin coat of brake grease here. Reinstall the clip. Grease the clip itself. Remove the slide from its rubber boot by holding down the boot. Pulling the slide out, if there's old grease that looks bad on there, wipe that off with a paper towel. Ours is okay. We'll put a little thicker coat of grease on there.
Reinstall it into the slide. Repeat all these steps on the opposite side of the caliper carrier. Reinstall the caliper bracket with your 18mm bolts. Tighten the bolts down with your 18mm socket and ratchet. Torque the bolts to 137 foot-pounds. Install your brake pad. I'm placing the rear one with the squealer at the top. That's how it came off of the vehicle. Sometimes they will interfere with the caliper if you place them in certain ways. I like to just put them back however they came off. We'll apply a thin coat of grease to the back. Do the same thing with the pad on the front. Using a pair of groove jaw pliers, slowly compress each caliper piston. If you go too fast you'll start pushing the other one out. Make sure both are fully seated.
We'll remove our bungee cord, mechanics wire, zip tie, or whatever it is you used to secure your caliper. Place it back on to the caliper bracket and pads. Reinstall the two 14mm brake caliper bolts. These don't get a ton of torque. I'm just going to bring them down as far as I can by hand, go straight to the torque wrench. However, you can use a socket and ratchet if you're having a harder time. Torque the caliper bolts to 20 foot-pounds.
Reinstall your wheel and tire. Get all five of your lug nuts on as tight as you can by hand. Lower your vehicle until the weight is back on the tires. Torque your lug nuts to 100 foot-pounds in a cross-pattern. Match the brakes on the other side using this same procedure. You're good to go.
Thanks for watching. Visit us at 1AAuto.com for quality auto parts, fast and free shipping, and the best customer service in the industry.
Tools used
Hi. I'm Mike from 1A Auto. We've been selling auto parts for over 30 years.
Hi there. This is Sue from 1A Auto. Today we're going to do rear brakes on a 2012 Equinox. We're going to take a 22 millimeter socket and a breaker bar and we're going to break the lug nuts off the wheel. Now with your vehicle up in the air or supported with jack stands, you remove the lug nuts.
Now I'm going to break free the caliper from the caliper bracket by removing these caliper slider bolts. This is a 14 millimeter wrench. Now in this particular 2012 Equinox it has ABS in it. When dealing with ABS on a brake service, you have to push the piston back with the bleeder screw open to avoid any ABS module damage. This is a 10 millimeter wrench. I'm going to put it on the bleeder screw, give it a quick snap. There we go. I like to turn it just about a half a turn. We're all set there. Use a catch basin to catch your brake fluid. Screwdriver or pry bar, slide this caliper right up.
I use a pair of welders clamps that I like to put inside the piston and I just give it a slight squeeze, till that piston bottoms out. This also gives me a chance to do a quick visual on the caliper piston boot. I'm looking for any tears or leakage. If you were to find them, you would have to replace the caliper. And this also is a good way to test the caliper, to make sure that it's not a seized caliper piston. Once closed, I re-tighten the bleeder screw. Release the clamps.
On this Equinox we have no place to hang the caliper to put no strain on the flex hose, so we'll just set it aside, right there on that upper control. Now it's time to remove the caliper bracket from the knuckle. This is a 15 millimeter wrench.
I use a pry bar especially when the bracket is frozen a little on there. Work it back and forth. Now with our caliper bracket on our bench I'm going to hammer out the pads. Noting once again the indicator goes on the inside of the bracket. Set it in a special order. Now I'm going to clean up the caliper bracket and sliders.
Now we're going to remove the rear rotor. This Equinox 2012 has a little mounting bolt. It's a Torx head T30. Make sure you set it aside. It's going to get reused. When removing the rotor from the hub, I like to use a penetrating spray right around where the hub hat meets. Let that sit in for a little bit. Then we'll hammer it off.
Here on this 2012 Equinox we're going to compare the old to the new and what to look for. This is the outer pad and wear right down there, right past three millimeter, so that's probably right around 1/32 in, one millimeter. You can see the rust that forms on the hubs and the inner well on that ring. Here's your new product from 1A Auto, Nakamoto, nice clean fins cooling down, same size hub, same weight distribution. OE fit.
Quick note on these rear brakes. You're going to see a rubber boot on some manufacturers. That is an indicator window for the ebrake shoes, the emergency brake shoes right on the inside of this hat. So we're going to make sure we take the old one out and transfer it over. I use that with a small screwdriver or a pry bar. You pull it right out. I relocate it right away. That way I don't lose it. Just give it a little push down in. There it is.
First thing I like to do is take a wire brush to clean the surface rust off. Use a little brake and parts clean. Then I'm going to clean the caliper tin. You can also buy brand-new caliper tins and caliper slider boots on 1A Auto. That's if you don't feel like cleaning them. If it's not in the budget, let's just do it right. You want to clean all the rust off and any dirt so the pads have a nice sliding surface. Going to do the same thing to the other side.
Now I'm going to take the caliper slider boot out. Just basically you pinch down on the rubber slot boot and pull the slider out. That's old manufacturer grease so I'm going to clean that off. You always want to apply brake caliper grease, nice thin coat to the slider. I like to put caliper grease on the inside of the boot. That keeps it flexible and I also get to check for any holes. You don't want any pin holes or rips on these boots because then water will get into the pin and seize it up from sliding.
Before I put the caliper tin back on, I put a little bit of that caliper grease underneath. This assures it not to get rusty and swell up and push that pad on tight and freeze it on the bracket. You do not want to put any grease on the upside for it will collect road dirt in the pad, dust and stop that pad from sliding back and forth. Now I'm going to do the same thing to the other side.
While I have the brakes off of my 2012 Equinox, I'm going to give it a quick visual on the emergency brake shoes. We're looking for any chips. Sometimes the bonding comes unglued and the shoe actually comes off the metal backing. At that point they'd have to be replaced. But here we get great shape, so I'll just clean them down with some brake parts cleaner, get rid of the old brake dust that stores in there. I'm also going to give ... This hub is nice and clean, but I'm just going to give it a quick, quick wire brush, just to get any surface rust off. I like to apply a thin coat of anti-seize, especially around the hub where it meets the rotor. It'll stop any rust buildup in the future. Just needs a nice thin coat.
I'm going to put the rotor on backwards for a second. So that way I can have it held without bothering anyone and clean off the clear lubricant coat that they put on for packaging. Then I'll just spin it around and do the same on the other side. I'm going to line up the mounting hole with the screw hole.
Here I have my mounting screw, torx T30. Make sure I start it in straight, and then just going to snug it up once it reaches the bottom. Before I mount the caliper bracket on the knuckle, I'm going to clean the old thread lock off the threads and apply a light coat of new thread lock. Just a light little dab and it'll go through all the threads all the way around. Set that aside and do the same to the other.
Now we're going to install the rear caliper bracket on the rear brakes of this 2012 Equinox. Slide it right in there. Grab the mounting bolt. Start it by hand. The head of this bolt is a 15 millimeter. I'm just going to snug it because the torque for these caliper mounting bolts are 92 foot-pounds.
Now we're going to install the pads. The one with the indicator goes on the rear inner edge. Slides right in. Line the ears up. Drop it down in. There you go. Now I'm going to place the caliper down. Once we have already pushed that piston back, let's slide right over. Now we're going to install the caliper bolts on the sliders. The torque on these is 20 foot-pounds.
Now that we have the rear brakes all together, caliper mounted on this 2012 Equinox because we had open the bleeder screw to push the caliper piston back, we're just going to gravity bleed it. No need to touch the brake pedal at all. We're just going to watch, make sure fluid flows out, no air bubbles. See the little air bubbles forming at the top there. We just want those to naturally fall right out. Once it's snug, bottomed out, just give it a nice half a turn. Use brake parts cleaner to clean it up. Put the cap back on and we're ready to go.
Now we're ready to put the wheel back on, the rear of this 2012 Equinox. We're going to lower it down just like you would at home with the floor jack, just letting it touch the ground enough to tighten these to the torque specs, 140 foot-pounds, and then you lower the jack the rest of the way. Now we're going to torque the wheel lug nuts in a star sequence. Once your brake job is completed and you've topped off the brake fluid, it's always a great idea to pump your brake pedal up before you start the vehicle or try to drive it.
Thanks for watching. Visit us at 1aauto.com for quality auto parts, fast and free shipping, and the best customer service in the industry.
Tools used
Hi, I'm Mike from 1A Auto. We've been selling auto parts for over 30 years. We're dedicated to delivering quality auto parts, expert customer service, fast and free shipping, all backed by our 100% satisfaction guarantee. Visit us at 1AAuto.com, your trusted source for quality auto parts.
In this video, we're going to be working with our 2008 Chevy Equinox. We're going to show you how to remove and replace your rear brake pads and rotors. While we are doing this on the driver side, we always recommend you replace your brakes in pairs per axle, meaning that you do the rears together or the fronts together. If you like this video, please click subscribe. We have a ton more information on this and many other vehicles, and if you want these brakes for your car, you can follow the link down in the description over to 1AAuto.com. Here are the items you'll need for this repair.
Using the 19 millimeter socket and breaker bar, loosen all of your lug nuts about one turn. Raise and support your vehicle. We're using a lift to make it easier to show you what's going on, but this job could easily be done in your driveway or garage with a jack and jack stands.
Normally, you would remove all five of your lug nuts and remove the wheel and tire. However, we've been having a hard time getting these wheels off of the car, because they've been on there so long. So, we'll show you a trick to remove a tire when it's stuck on the hub. We'll remove four of the lug nuts and loosen the top one so it's hanging on by just a couple of threads. The best way to do this is using a dead blow hammer; however, a rubber mallet will work. You don't want to use a steel hammer, because you'll risk damaging the wheel. Go ahead and hit the wheel in as many places as you can reach with your hammer. That's why we leave that lug nut on a couple of threads, so when it pops loose, our wheel doesn't just go flying off. Now, you'll just hold your wheel. Remove that last lug nut, and remove your wheel and tire from the vehicle.
Now, you'll remove the T30 rotor screw. I'm doing this with a Torx socket and a little breaker bar. You may need to use a pry bar between two of the wheel studs to keep it from rotating when you break this screw loose. Sometimes they'll come out without, but usually you're going to have to counter-hold. Once you get it broken loose, it should spin right out nice and easy.
Using a 14 millimeter socket and ratchet, remove the two 14 millimeter bolts securing the caliper to the bracket. Now, sometimes these pins will spin when you go to loosen the bolt. If yours is spinning, it takes a really skinny wrench to get on there. If you don't have one, you can use a pair of pliers, or they're usually not under a lot of torque so you can just kind of hold them and remove the bolts by hand.
Remove the caliper. Normally, we would use a bungee cord or something like that to secure it. However, this is on a pretty short hose. You can set just set it on that control on it. If you want to be a little more secure, you can wrap one around there, a zip tie or some mechanics wire will do that just to be safe. Using a flat blade screwdriver, or a small pry bar, remove the pads from the caliper.
Using the 15 millimeter socket and ratchet, remove the two caliper bracket bolts securing it to the spindle. You do have to be careful, because you have your shock here, so you’re not going to be able to back that one all the way out with a socket and ratchet. If you can't get it out by hand at that point, you may have to switch over and use a wrench. It looks like what we can do here is when that bolt is backed all the way out, you can slide the caliper bracket out, and then you can push the bolt in to remove your ratchet. It looks like this 15 is not going to want to come out past that bolt, but we can pull it out far enough that it doesn't interfere here. So, we'll just leave it there.
Now, you're going to need to save this little rubber plug here, because these aren't included with new rotors most of the time. Just pop that out with a flat blade. We're going to check that our e-brake isn't dragging, and it's not. But if it were, you would spin it around and use this access hole to find the adjuster, which we'll show you when the rotor's off. Back that adjuster off, so the e-brake doesn't drag on the rotor.
Now, if you need to save your rotor because, you’re doing a wheel bearing or something else that requires you to remove this without needing to replace it, you'll want to hit this surface with a hammer being careful not to hit the lug studs. However, if you're actually doing a brake job, you can hit the surface of the rotor for some more leverage, knocking this off.
Using a steel wire brush and the proper safety equipment, like safety glasses and a dust mask, go ahead and scrap all this rust and corrosion off of the hub. You'll want to scrap this off of the surface as well as the hub center here, which is why our rotor was so stuck on.
Here we have our old rotor and brake pads that we removed from our vehicle and our new parts from 1AAuto.com. As you can see, our rotors are the exact same size. We have the drum and hat style here where the e-brake is internal, which is what this access hole is for here. We also have the same bolt pattern and the same little bevel there for our rotor screw. The pads are the exact same size and shape. You can see how badly worn our old ones were. They were just about to the point that they were going to be dragging metal. Over here, the backing shim was actually touching the rotor a little bit. You always want to replace your brake pads and rotors together, unless you have the ability to have your rotors machined down, though that isn't very common in most places. The reason that is, is because there's a deep groove in this rotor, which means that we weren't getting a full, smooth, contact patch, and that it was affecting our braking. Also, being down this thin can cause the rotor to warp more easily from heat, which creates a pulsation while braking. These new parts from 1A Auto are going to go in direct fit, just like our original equipment. We'll fix you up right.
Using a small flat blade screwdriver, carefully pry the shims off of your caliper carrier. Now, ours are still pretty smooth. They don't have a lot of rust build-up on them, so we can just clean these off and reuse them. We'll do the same thing on the place they ride here, on the caliper carrier as well. We'll do this using a wire brush. Be sure you have proper safety equipment on, like some safety glasses and a dust mask so you don't inhale all this harmful debris. Now, all of the dirt and debris is off. You don't have to get these perfectly clean. It's not really likely that you'll get them perfectly clean and looking good and new again. However, as long as you've got all the heavy build-up off, it'll allow the shims to ride in there nice and flat, which will allow your brake pads to move smooth and freely which is really all we're after. Once we've cleaned that off, we'll repeat this process on the shim. If these are really heavily rusted and corroded or cracked, breaking, missing pieces, or they aren't springy any more – you can see this is still moving nicely – then you're going to want to replace them. Ours don't look bad so we can just clean them up. Put some fresh grease on there, and they'll be just fine. We'll want to do this on the front and the back to make sure that everything sits and rides smoothly. Again, just like the carrier, as long as you get the bulk of the stuff off, they don't have to be perfect.
Now, we'll apply a thin coat of grease where our shims are going to ride. Make sure you're using brake specific grease for this. Anything else could get onto the pads and rotors and damage them. Brake grease is designed to be on these components, so it's a lot less harmful if something does happen. Re-install your shim. Then, we'll apply a thin coat of grease to that as well. You can go a little bit thicker here since this is where the pad is actually going to move. Nothing moves on this portion out here, but if you lay a little coat of grease on it's not going to get all rusted and corroded.
While we have the grease out, we'll hold back the boot here on our caliper pin. Remove that. Ours is pretty clean, but if you have a bunch of old gunk and grease buildup on there, you'll want to wipe it off with a paper towel. Apply a good thick coat of fresh grease. Re-install it into the boot. Make sure it suctions on there, and it moves nicely. Then, we'll repeat all of these steps on the other end of our carrier. Now, our caliper carrier's ready to go back on our vehicle.
Apply a thin coat of grease to the hub to make sure your rotor doesn't seize to it in the future, because brakes are a wear item. You may have to do them again some day. Install your rotor onto the hub backwards. Spray it down with some brake cleaner. This removes the coating they use when these are in storage, between the factory and being delivered to you. This prevents them from rusting. However, it is very slick and will affect your braking if you leave it on there. Now, we'll install it the correct way with the beveled hole over the threaded hole in our hub. Spray down this side as well.
Re-install the rotor screw with a T30 Torx bit. Now, it's not dangerous if you've lost this or broken it. All it really does is help keep this rotor in place and make it easier to re-assemble everything, but if you do have it, it's good to put back.
Now, we'll align the hole in the rotor with that adjuster wheel for the e-brake that we showed you earlier. We'll adjust it up by moving it a couple of teeth. Just wait to hear and feel that little bit of drag against the brake. Once that's all set, install the cap.
Re-install the caliper bracket and start your two bolts as far in as you can by hand. Then, finish tightening them down with a socket and ratchet. Torque the caliper bolts to 89 foot-pounds.
Install the brake pads. The little squealer was on the back side when we removed it, so, I'll put it back there, going back together. Apply another thin coat of grease to the back here. Remove whatever you used to secure your caliper. Use a pair of groove-job pliers to compress the piston. Be sure to go nice and slow here. Re-install the caliper and the two 14 millimeter caliper bolts. Torque your caliper bolts to 24 foot pounds. There's an example of that hinge spinning, so I'm going to hold it with a pair of pliers.
Re-install your wheel and tire. Get your 19 millimeter lug nuts on as tight as you can by hand. Put the weight of your vehicle back on the tires. Torque your lug nuts to 100 foot pounds in a cross pattern.
Thanks for watching. Visit us at 1AAuto.com for quality auto parts, fast and free shipping, and the best customer service in the industry.
Always have what i need.
The best auto parts store

BFA13031
Yes
