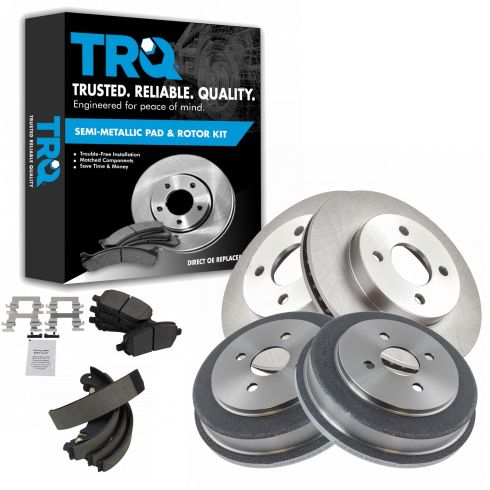
Kit Includes: (1) Rear Brake Shoe Set (2) Rear Brake Drums (2) Front Brake Rotors (1) Front Semi-Metallic Brake Pad Set with Contact Point Grease & Hardware
Brake Pad Bonding Type: Premium Posi
Wheel Lug Count: 4 Lug
Brake Pad Friction Material: Semi-Metallic
Front Brake Rotor Diameter: 10.08 in. (256mm)
Front Brake Rotor Venting Type: Vented
Specification
Trim
LT
Vehicle Wheel Option
with 15 Inch Wheels
Location
Front & Rear
Replacement Brake Kits Features & Benefits
Longer life - Positive molded to ensure even wear and enhanced performance
Less dust - Cleaner, quieter, smoother braking
Reduce vibration and noise - Balanced, finished surface
Cast from premium G3000 alloy for strength and durability
Front Brake Rotor Venting TypeVentedWheel Lug Count4 LugFront Brake Rotor Diameter10.08 in. (256mm)
Item Condition:New
Attention California Customers:
WARNING: This product can expose you to chemicals including Lead and Lead Compounds, which are known to the State of California to cause cancer, and birth defects or other reproductive harm. For more information, go to www.P65Warnings.ca.gov.
Lifetime Warranty
This item is backed by our limited lifetime warranty. In the event that this item should fail due to manufacturing defects during intended use, we will replace the part free of charge. This warranty covers the cost of the part only.
FREE Shipping is standard on orders shipped to the lower 48 States (Contiguous United States). Standard shipping charges apply to Hawaii and Alaska.
Shipping is not available to a P.O. Box, APO/FPO/DPO addresses, US Territories, or Canada for this item.
Expedited is available on checkout to the United States, excluding Alaska, Hawaii.
Final shipping costs are available at checkout.
How to Replace Front Brakes 2005-10 Chevy Cobalt
Created on:
Tools used
Bearing Grease
A Piece of Pipe (for leverage)
Large C-Clamp
Flat Blade Screwdriver
Torque Wrench
14mm Socket
15mm Socket
Pry Bar
19mm Socket
Ratchet
Wire Brush
1/2 Inch Breaker Bar
1. Removing the Wheel
Remove the lug nut covers
Remove the hub cap
Loosen the lug nuts with the vehicle on the ground
Raise the vehicle with a floor jack
Secure the vehicle on jack stands
Remove the lug nuts
Pull off the wheel
2. Inspecting the Brakes
Turn the rotor by hand or turn the steering wheel to turn the rotor
Check for gouges on both sides of the rotor
Check the thickness of the brake pads
Check the brake pad wear indicator
3. Removing the Brake Pads
Use a flat blade screwdriver or pry bar to push the pistons in
Remove two 14mm bolts from the brake caliper
Pull the caliper aside
Pry the brake pads off with a flat blade screwdriver
4. Removing the Brake Rotor
Remove two 15mm bolts from the brake caliper bracket using a ratchet and pipe for leverage
Pull off the brake caliper bracket
Pull the rotor off
5. Installing the New Brake Rotor
Slide the rotor on
Put the bracket back into place
Start the 15mm bolts by hand
Tighten the bolts to 80 foot-pounds of torque
6. Installing the New Brake Pads
Remove the brake pad slides from the bracket
Clean the slides with a wire brush
Push the brake pad slides on
Attach the wear indicator to the top of the inside brake pad
Install the new brake pads into the bracket with the wear indicator on the upper side
Put an old pad in the caliper
Use a large C-clamp and the old pad to push the pistons back
Put the caliper on
Clean the piston slides and apply bearing grease
Insert the piston slides
Thread bolts by hand
Tighten bolts to 20 foot--pounds
7. Reattaching the Wheel
Straighten out the wheel
Slide the wheel into place
Apply penetrating oil to the wheel studs
Start the lug nuts by hand
Tighten the lug nuts preliminarily
Lower the vehicle to the ground
Tighten the lug nuts to 100 foot-pounds in a crossing or star pattern
Reattach the wheel cover
Reattach the lug nut covers
8. Testing the Brakes
Pump your brakes repeatedly until they feel firm
Test your brakes at 5 miles per hour and then 10 miles per hour
Road test the vehicle
Brought to you by 1AAuto.com, your source for quality replacement parts and the best service on the Internet.
Hi, I'm Mike from 1A Auto. I hope this how-to video helps you out, and next time you need parts for your vehicle, think of 1AAuto.com. Thanks.
In this video we're going to show you how to service the front brakes on this 2005 Chevy Cobalt, pretty much the same for any Cobalt as well as the Pontiac G5 and we're going to show you the passenger side front. Obviously you always want to repeat it for the driver's side and do brakes in pairs. Tools you'll need are a jack and jack stands, 14, 15, and 19 mm socket . you could substitute your own tire iron for that 19 mm socket . ratchet and breaker bar or a pipe from some extra leverage, a large flat blade screwdriver or a small pry bar, a large C clamp and some wire brush and grease if you notice that your caliper slides are stuck a little bit as you'll see the top slide in mine is stuck so I had to pull it out, clean it and put it back in.
Start out by removing little caps that hold the wheel cover in place. I'm obviously missing two on this vehicle. Then, if you don't have the benefit of air tools, start with your wheel and tire on the ground, loosen the lug nuts then raise and support your vehicle and remove the lug nuts and the wheel and tire.
Then we can inspect the condition of the breaks but rotors, you want to run the back of your fingernail up along them. You'll feel some small grooves but you want to make sure there are no large grooves. Make sure there's not too much scaling of the rotor and the back side as well. Rotors are in good shape on this vehicle. You can see here that there's basically nothing left of the pad so we'll definitely be changing the pads on this.
What you'll want to do is remove this bolt and this bolt. Before you remove those bolts you can just take a large screwdriver and put it in here and slowly pry out and that you'll actually move the caliper out. It actually forces the piston back in and just helps loosen things up before you take it apart. These bolts are 14 mms and they should come off pretty easily. Just speed up here as I remove those the rest of the way. Caliper comes right off. Put that right up there for now and the pads just pull right out. You can see these are in pretty rough shape; they just fall apart as I take them out. You can use a screwdriver to knock them out. If you wanted to replace your rotor you'd remove two bolts here and here, they're 15 mm. You can use a ratchet; I'm also going to use a piece of pipe which gives me some extra leverage. Speed it up here again. So, I used that pipe for some extra leverage, got the bolts going then used my socket and ratchet and just my fingers the rest of the way. The rotor comes right off, if you're having problems with your brakes pulsating generally replacing the rotors will help. The brakes on this car are pretty smooth they just need new pads so rotor back on, put this in place, start your bolts from the inside of the car to the outside. Torque these caliper bracket bolts to 80 foot pounds. You want to pull these off. Depending on which brakes you order, they may or may not come with new stainless steel slides. If they don't come with new ones just wire brush the old ones. These do come with new ones. Pull the old ones out. Just fast forward here as I just snap in those slides, the new slides into place.
Here are the new pads from 1A Auto. See a lot more life left. Depending on which pads you order you may have to install this wear indicator. You want to put it at the top of the inside pad and it just clips right on. This pad right on the inside top, slide it in place. Put the outer one in place down, squeeze them together. Now we need to reset the piston. As your brakes wear, the way you can adjust them is that this piston works its way out of the caliper. I just stuck an old brake pad in there, the large C-clamp. Slowly tighten the C-clamp and it forces the piston back into the caliper.
Now the caliper goes right on over the pads. There are slides right here in your caliper brackets and lo and behold it looks like these are going to slide nice and easily. I just took and freed up the pistons nice and easy, that should pull this one right out, clean it up, put a little grease on it. I cleaned this one up, put a little bit of bearing grease on it, stuff it in there, get the boot to go back in so the caliper bracket Turn the caliper down and put it on want to probably squeeze the slides in into place. I'll speed it up here as I put those bolts in. Just kind of move the caliper around, push the bolts in and they'll start threading in and then preliminarily tighten them up. These small bolts should be tightened to 20 foot pounds. Fast forward again, straighten out the wheels, put the wheel and tire in place, I put a little penetrating oil on there just to keep the threads clear. Thread on the lug nuts and then preliminarily tighten them up. With the wheel back on the ground, torque the lug nuts to 100 foot pounds then replace your wheel cover and you can just kind of hand put the caps back on, that'll hold it in place. Always pump the brakes up, make sure you get a good firm brake pedal then try stops from 5 and 10 miles an hour before road testing the vehicle.
We hope this helps you out. Brought to you by www.1AAuto.com, your source for quality replacement parts and the best service on the Internet. Please feel free to call us toll-free, 888-844-3393. We're the company that's here for you on the Internet and in person.
BKA11965
In Stock
Product Reviews
Loading reviews
4.90/ 5.020
20 reviews
5 Stars
4 Stars
3 Stars
2 Stars
1 Star
19
0
1
0
0
Just installed
M
April 14, 2018
I bought the brake kit for my Cobalt lt. I thought it was a great deal. I just had them installed on my car without any problems. My car brakes are great. I would definitely recommend this brand to anybody.
Great product great price
HAROLD
May 26, 2018
Everything fit as expected great prices great products thank yall for the products you sell at reasonable great prices!!!!
Will most definitely be making more orders as needed!
Keep up the awesome job!!!!!!!!
Perfect kit
Dylan
September 2, 2018
Everything came packed nicely in the box with everything there to do a complete brake job on the car
Always the right parts! Every time! Quality and super fast shipping .
Jennifer
December 6, 2018
as a single woman I wouldn't think of going anywhere else to get my auto parts they're the right parts every single time no questions asked I take them to mechanic he installs them I've never had a problem and I really appreciate the fact that as a woman I don't have to worry about getting the right parts for my vehicles
T
April 27, 2019
It's was the best.
2008 Cobalt
Joseph
September 5, 2019
Ordered complete front and rear components, recieved exactly as orfered, very quickly shipped, all parts installed and working perfectly. Total price was very reasonable compared to other vendors sellinf exactly same components. Thanks much!
Quality at an Affordable Price
L
September 29, 2019
I recommend this set of front and rear brakes and rotors. This is a quality product and after my install they are very quiet and look great through my rims. Shipping was quick, the only suggestion is that packaging of the exterior box was delivered open and damaged most likely due to the extreme weight of the rotors. After inspection of each individual boxed item all brakes and rotors were in great shape. Would buy this set again!
Everything I needed to get my 2007 Chevy Cobalt brakes changed
Justin
January 2, 2020
This kit had everything I needed to change both the front and back brakes for my Cobalt for less than the price of a pair of rotors from other vendors. Everything fit perfectly on my car. My order was on my doorstep within a few days of the order. The videos from this 1Aauto are always top quality.
Perfect
Glenn
January 26, 2020
No problems with brake parts. All got well and performed well so far. Only one week so far though
Front Rear Brake kit
Carlos
June 22, 2020
Brakes were replaced two weeks ago and look amazing! They fit my cobalt perfectly and the parts can in intact.
BRAKE KIT
R
August 18, 2020
Wonderful product..perfect fit...cheapest i found and great quality...love the site
Best value
V
September 7, 2020
Best value, easy to install.
Great value!
David
December 10, 2020
1aauto is a great alternative to local part stores. Easy online ordering with fast shipping and quality parts cheap makes this a no brainer.
Great product and great price
J
December 30, 2020
All items fit perfectly on my 2007 Chevy Cobalt LS 2.2
Couldnt be better!!!!
N
March 4, 2021
After pricing locally and looking around online this complete set for a complete front to back brake job was hands-down the best deal that could be found!!! Very good high-quality products and once again not disappointed one bit from 1aAuto!!!!
Chevy Cobalt
Nigel
April 24, 2021
the parts are pretty good and very okay to what I see by the description
Breaks
Thomas
July 10, 2021
Easy install but still needs more work. Make sure you have all the right tools it will be more smooth of an install
Jesus
April 5, 2022
Super happy!!
emil
December 15, 2022
Great price and quality
Carlos
July 25, 2023
Great parts and service service online.
Customer Q&A
No questions have been asked about this item.
Customer service
877-844-3393
Monday - Friday 8:00am - 9:30pm ET Saturday - Sunday 8:00am - 4:30pm ET
Chevrolet is a registered trademark of General Motors Company. 1A Auto is not affiliated with or sponsored by Chevrolet or General Motors Company.See all trademarks.
Enter Vehicle Year Make Model
Specify your vehicle's year, make and model to guarantee fit.
Year
Make
Model
Options
Drivetrain
This part doesn’t fit a . Select from parts that fit.