

★★★★★
October 23, 2019
I can turn again!
Replaced a broken unit with this one and works perfectly with no issues

Replaces


About TRQ:
TRQ is a trusted brand dedicated to making every repair a success story by combining premium parts with easy installation. Each TRQ part is engineered by a team of automotive experts to meet or exceed OEM standards, delivering enhanced performance and maximum longevity. With rigorous in-house testing, the brand ensures superior fit and function across every product line. TRQ also provides customers with best-in-class, step-by-step installation videos—so you can complete repairs with confidence, whether you're a first-time DIYer or an industry professional.
Returns: Parts with electrical components cannot be returned once installed.
Attention California Customers:
 WARNING: This product can expose you to chemicals including Lead and Lead Compounds, which are known to the State of California to cause cancer, and birth defects or other reproductive harm. For more information, go to www.P65Warnings.ca.gov.
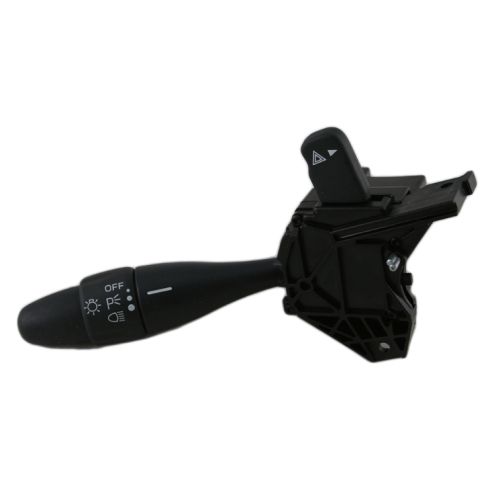
This part fits 4 vehicles spanning 1995-2005.
| Year | Make | Model | Description |
|---|---|---|---|
| 1995-2005 | Chevrolet | Cavalier | Chevrolet Cavalier without Cruise Control Turn Signal Combination Lever TRQ SWA41777 |
| 1996-1998 | Oldsmobile | Achieva | Olds Achieva without Cruise Control Turn Signal Combination Lever TRQ SWA41777 |
| 1996-1998 | Pontiac | Grand Am | Pontiac Grand Am without Cruise Control Turn Signal Combination Lever TRQ SWA41777 |
| 1995-2005 | Pontiac | Sunfire | Pontiac Sunfire without Cruise Control Turn Signal Combination Lever TRQ SWA41777 |
| Brand Label | Part Number |
|---|---|
| Chevrolet | 19209607 |
| Wells | SW824 |
| Standard Motor Products | DS669 |
| Wells | 1S4655 |
| Standard Motor Products | DS669T |
| Standard Motor Products | CBS1110 |
| Standard Ignition | DS-669 |
| Chrysler | 4760437AB |
| Wells | SW988 |
| Airtex Engine Management | 1S4811 |
| Chrysler | 4798484 |
| Chrysler | 4740208 |
| Duralast | SW988 |
| Autopart International | 1802-302338 |
| Chrysler | 4883537AA |
| Shee-Mar | SM139 |
| Chrysler | 4607001 |
| Wells | 53-65185 |
| Chrysler | 4760437 |
| Hollander | 629-00353 |
| General Motors | 22575768 |
| General Motors | 22619955 |
| General Motors | 22655202 |
This item may be interchangeable with parts from other brands with the above part numbers. This information is provided only for reference and does not guarantee that the item you are purchasing is identical to parts with part numbers from the brands listed above. To confirm that this item fits your vehicle, use the above "Check Vehicle Fit" option.
Lifetime Warranty
This item is backed by our limited lifetime warranty. In the event that this item should fail due to manufacturing defects during intended use, we will replace the part free of charge. This warranty covers the cost of the part only.
Returns: Parts with electrical components cannot be returned once installed.
FREE Shipping is standard on Orders shipped to the lower 48 States (Contiguous United States). Standard shipping charges apply to Hawaii, Alaska and US Territories. Shipping is not available to Canada.
Expedited is available on checkout to the United States, excluding Alaska, Hawaii and US Territories as well as P.O. Boxes and APO/FPO/DPO addresses. Final shipping costs are available at checkout.


Created on:
Tools used
Brought to you by 1AAuto.com, your source for quality replacement parts and the best service on the internet.
Hi. I'm Mike Green. I'm one of the owners of 1A Auto. I want to help you save time and money repairing and maintaining your vehicle. I'm going to use my 20 plus years experience restoring and repairing cars and trucks like this to show you the correct way to install parts from 1A Auto.com. The right parts installed correctly. That's going to save you time and money. Thank you and enjoy the video.
In this video we will show you have to replace the turn signal switch on this 1997 Pontiac Sunfire. Same as any 95 to 05 Sunfire or Cavalier. Tools you will need include 7 mm and 10 mm sockets with the ratchet extension, a 21 mm socket and a steering wheel puller.
First you can use an 8 mm or a 5/16th wrench. You want to disconnect the positive battery cable. After your battery has been disconnected you want to disable the supplemental inflatable restraints which is your airbag. You do that by first straightening your wheels. Make sure your steering wheel is nice and straight. Turn the key off. Then you want to go over to your fuse box here and remove this panel. This is an 87 Sunfire so depending on your year and model of vehicle the placement of your fuse could be different. You can see here 15 amp airbag so that's this blue one here. We are going to remove that fuse.
Once your airbag is disabled you can turn your wheel like this and if you feel back here you will feel a whole. There's a 10 mm nut back here. Depending on the year of your vehicle you may have a little bit of a different size fastener or whatever, but you want to remove this one and you want to turn your wheel and then there's another whole back here again 10 mm. Then once those bolts are undone you pull your airbag out. That's your horn button. You need to unhook your airbags so this little green locking tab that pulls out. Then you can press down here and unplug it and this assembly comes off.
Now you need to remove this bolt to remove your steering wheel. This bolt is 21 mm. Now you've got that nut off. This is a steering wheel puller. This is the correct tool for this job. I have seen people get steering wheels off different ways, but nothing I would recommend. I definitely just use the correct tool. With the right tool it comes right off.
Next we're going to use a 7 mm socket and we're going to remove the screws from the bottom here. There are three of them. Once those screws are out then you carefully pull that apart. Once that top cover is off you can allow that to go up and you want to pull this cover out on the side and around your ignition switch and you can just let it hang right there. Then there are two 7 mm bolts that hold the switch on. One on top here and one here.
Once those bolts are off the switch can come up and out. Probably the easiest way is to just use a screwdriver and press these down and pry them out at the same time like that. Then this one press and push. Here's your switch out of the car just to show you. Here's the new switch from 1AAuto. Everything is all the same. All the connections are the same on the back and everything so it's going to go in, fit correctly and it's going to work correctly for you. Now on this car this switch isn't bad so we are just going to put it back in.
Installation is basically just the reverse of the procedures. Connect your harnesses, gray one on top and blue one down below. What you want to do is put this back down in here and you want to start your top one first. Start the top one first. Then I can put this one in. I'm going to do it with a wrench. Now take this trim plate and just kind of push it up and around. The top trim plate is on and now you put it together. I need a bolt in the bottom and they can feel their way in. Take your steering wheel and on the steering wheel there's a little mark here and on your column there's also a mark that that lines up with. Make sure you put your airbag through and line up the marks. I'll make that nut tight. Reconnect your airbags. Make sure this locking pin is back in. Then insert your horn lead and twist it. Then put your airbag module on. Then again this is a 10 mm socket. I'm just going to get the other one in there and make sure it's going before I tighten that one up. There you go. That's how you do it. Now we can put the fuse back in. Reconnect the battery and we will be back on the road.
We hope this helps you out. It was brought to you by www.1AAuto.com your source for quality replacement parts and the best service on the internet. Please feel free to call us toll free 888-844-3393. We are the company with you on the internet and in person.
Replaced a broken unit with this one and works perfectly with no issues

SWA41777
No. Very easy to snap out and snap the new one right in.
