Replaces


Part Details
About TRQ:
TRQ is a trusted brand dedicated to making every repair a success story by combining premium parts with easy installation. Each TRQ part is engineered by a team of automotive experts to meet or exceed OEM standards, delivering enhanced performance and maximum longevity. With rigorous in-house testing, the brand ensures superior fit and function across every product line. TRQ also provides customers with best-in-class, step-by-step installation videos—so you can complete repairs with confidence, whether you're a first-time DIYer or an industry professional.
Product Features
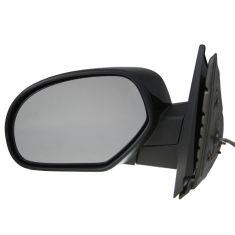
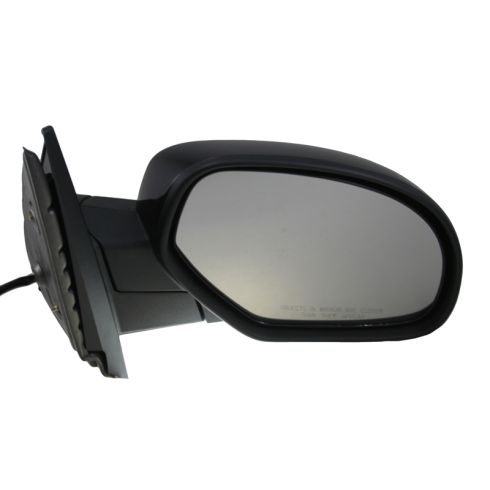
TRQ side mirrors and mirror components are designed to match the function, fixture, and performance of the original version for easy installation. TRQ mirrors are DOT certified, comply with all federal safety standards, and are independently lab tested to ensure our products comply with all government regulations. All products are fit and road-tested in our Massachusetts R&D facility to ensure we deliver on our promise of Trusted Reliable Quality.
Exact fit - To obtain proper fit and function confirm your vehicle has the exact mirror options listed.
Paint To Match Note:
"Paint-to-match finish" refers to a smooth, paintable surface. This item is not painted. Paint offers better coverage and adhesion, but it is not necessary for installation.
Attention California Customers:
 WARNING: This product can expose you to chemicals including Lead and Lead Compounds, which are known to the State of California to cause cancer, and birth defects or other reproductive harm. For more information, go to www.P65Warnings.ca.gov.
Lifetime Warranty
This item is backed by our limited lifetime warranty. In the event that this item should fail due to manufacturing defects during intended use, we will replace the part free of charge. This warranty covers the cost of the part only.
FREE Shipping is standard on orders shipped to the lower 48 States (Contiguous United States). Standard shipping charges apply to Hawaii and Alaska.
Shipping is not available to a P.O. Box, APO/FPO/DPO addresses, US Territories, or Canada for this item.
Expedited is available on checkout to the United States, excluding Alaska, Hawaii.
Final shipping costs are available at checkout.
Created on:
Tools used
Brought to you by 1AAuto.com, your source for quality replacement parts and the best service on the internet.
Hi, I'm Mike Green. I'm one of the owners of 1A Auto. I want to help you save time and money repairing and maintaining your vehicle. I'm going to use my 20+ years experience restoring and repairing cars and trucks like this to show you the correct way to install parts from 1AAuto.com. The right parts, installed correctly. That's going to save you time and money. Thank you and enjoy the video.
In this video, we're going to show you how to replace the front window regulator on this '94 Camry, same as any '92 to '96, and also very similar for the passenger side.
Tools you'll need are a regular screwdriver, a Phillips screwdriver, 10 millimeter wrench or a socket with ratchet and extension, and some painter's tape.
Okay, we're going to start out by removing this trim panel up here. Just kind of put your fingers in behind. If you want, you can use a little screwdriver, and this just pops out. See it has a little pin to go in the grommets there. Now you need to remove this bezel around your door handle, and you do that by inserting a screwdriver at the top, prying up some, and pulling it out.
Okay, now you do the same thing at the bottom. I'm prying up with my screwdriver and pulling out with my fingers here, and that comes out. Close up of where you place your screwdriver in order to pry that bezel.
Now you need to remove four covers that show screws, so basically, you just kind of pry these right off. Now I just keep my hand over them because sometimes they'll go flying a little bit. There's another one right under here. Just going to pry it out and pull it out by hand. And then there's another one right down in here. Same thing.
Now remove five screws: One, two, three, four, and then there's one in there, five. Okay, and then on the end of the door, there's two pins. You actually push the center of the pin in and then you can actually pull it out. Okay, now here's a close up. Push in the pin and then use a screwdriver or your fingernail to pry those two pins out of the end of the door. And now there's four pins along the bottom of the door. I just recommend getting your hand underneath and giving a good quick tug. My screws came out of the armrest there.
Okay and now you just lift the panel up and off. Okay, then the last step is to disconnect this harness, and there's a little button right here underneath. Press and work the connection out. And if you have the up-level stereo with the tweeter in the door pull, you'll need to disconnect those.
Now here, you're going to carefully peel back your water shield. You want to just take care not to tear it, and if that sticky stuff doesn't work when you put it back together, you can use some tape and you'll notice I have the inside door handle off. That's just to clear out the water shield out of the way a little more to film. You don't actually have to take your inside door handle off in order to get to this part.
Okay, so here you can see is my regulator and now you can see mine actually works just fine. I'm just showing you how to do it on this car. But there's two bolts that hold the regulator to the window, and those are 10 millimeters. So what you'll do is undo those bolts and lift your window up. Use some painter's tape to tape it up, and then there's bolts that hold the regulator in: one, two and three.
The connector here you're going to undo and then one, two, three bolts that hold the window on there. What usually happens on these regulators is the cable breaks, and when the cable's broken or your window will fall down to the bottom, so you can usually grab onto the top of it and slide it up, and then you'll want to remove these two 10 millimeter bolts.
Okay, then take your window and slide it right up to the top. I have some painted tape waiting here. And here I'm attaching some painter's tape to hold the window up in the frame while I work on the regulator. And now, you'll want to unplug your window motor by pressing down on a tab right here, pointing that from there and let's see here. Change the screwdriver. Pry that out.
Now you can undo these three: one, two, three. Now remove these three for the window motor. Okay the window motor and the regulator comes back, down and out.
So here's my original regulator and new regulator from 1A Auto. You can see some slight differences actually. Some piece is a little stronger on the 1A Auto motor, but everything's going to install the same. Plug is exactly the same. It's going to plug in fine. Pull up slightly here. So now you put the regulator back up in just like you did, and one thing you want to make sure is once you get the bar straight up and down, you get it inside the window and then pull those studs through.
Start your three nuts that hold the rail, and then get the motor up into place and start those three nuts to hold the motor on. Once you have to bolts started that hold the regulator and motors. Then you can take your tape off, and let your window down onto the regulator. And then what you'll do is line up and start those two bolts, and then once you have those bolts in. Then you can take your 10 millimeter socket with your ratchet and extension, and tighten all of them up.
So there's eight bolts in all that you need to tighten and they need to be firm. They don't have to be super tight or anything like that, just nice and firm. Now that everything's tightened up, just want to route your harness right through here. Hook it together. My switch must have been down. So key's on. Everything's working correctly. Okay, and now you can put your plastic water shield back on and again, if that sticky stuff wore out or whatever, use some masking tape.
If you ripped it, use a little duct tape to mend it up. Okay, we're just going to fast forward through putting the door panel back on. If you took it off, you'll probably be able to get it back on without too much trouble. If you do want to see this in real time for some help to get the door panel back on, just check out our other window for the Camry door panel installation and you can see that in regular motion. We hope this helps you out.
Brought to you by www.1aauto.com, your source for quality replacement parts and the best service on the internet. Please feel free to call us toll free. 888-844-3393. We're the company that's here for you on the internet and in person.
Tools used
Hi, I'm Mike from 1A Auto. We've been selling auto parts for over 30 years. We're dedicated to delivering quality auto parts, expert customer service, fast and free shipping, all backed by our 100% satisfaction guarantee. Visit us at 1AAuto.com, your trusted source for quality auto parts.
We're going to actually hit our dome lamp override, which just turns off the dome lamp. Then we're going to start up here at the corner. You can use a plastic trim tool, but I can just get my fingers behind here, pull straight out and off. You want to avoid pulling it this way, because as you can see this broke off in there. It still has two clips left though, so it'll secure fine. Then we're going to remove three other trim panels. And behind the door handle, put a small screwdriver in here, pry the bottom out and bring that out. You can see a 10mm bolt there. Then behind the door pull, use a small screwdriver to pull that out. Two more 10mm bolts are in there. Then your door lock, you want to kind of pull up a little bit and pry with a small flat blade screwdriver. That comes up and off. Make sure you retrieve that little piece if it flies out. If this comes out, just retrieve it and don't put it all the way in. Just put it like that. Additionally, you need to pull up your trim panel, plastic trim tool available on 1AAuto.com and put it in the back and pull up.
Okay, and then work it in at the front as well. You can see there's two clips at the front and rear. If you don't have a trim tool, but you have strong fingernails, you can get it out, and then just pull straight up on front as well. Then there's four harnesses to disconnect and you might have more. If you have more options, just press the tabs and pull out. Use a 10mm socket with ratchet and extension, and remove those three 10 mm bolts. These ones may stay in there after you get them loosened up. And in that case, they'll just fall down, and you can retrieve them after you take the door panel off.
Now, there's a series of clips around the edge. I usually start at the top, pull straight out, and just work your hand down. Pull firmly. Then the bottom and the side, and then door panel can come up and off. And then you'll want to disconnect your door handle, which is a matter of pressing on the tabs. There's two tabs, so press one, pull through, rotate around. Press on the other one. That allows you to move that back, bring it up and around, and your door panel comes off.
We have to pull this water barrier off. It's got some sticky strip caulk stuff. Just peel it off and then just go back on there. If it's really sticky, you can take a razor blade and just cut it as you're pulling away. Just gently work it off so you don't rip this foam. For the most part, you can reuse this. It will still be sticky, but you may want to get some new strip caulk to put on here when we replace it. So just be aware of that when you take it off.
Okay, we're going to remove the door mirror. We're going to pull out this piece of foam. We have a 10 millimeter nuts. You're going to use a 10 millimeter deep socket. Before I remove those, the wiring hardness for the mirror is snapped into these little body plugs. The easiest thing to do is to take some small side cutters, and just very carefully snip these small zip ties off. You can replace these zip ties afterwards. They just pull out of this little insert. Now that that wiring harness is loose, I'm going to start by loosening these. All right, so now I've got that loose. I'm going to put the window down just so I can reach through and hold the mirror while I take it off. That's good enough. All right, so I'm just going to hold the mirror while I finish loosening it up. Definitely make sure you hold this as you remove the last nut on the three studs because the mirror will fall off.
This truck has a little vent visor on here. It's already a little bit loose, so we're just going to pull it up. As you work this out, there's a small plastic push clip on the top here. It's part of the mirror. I'm going to have to reach up from behind and just sort of help it get pushed out. I'm going to slide this out from behind the vent visor, and feed your wire out. This is the clip I'm talking about. You have to push it out and squeeze it together. It goes up into here, this hole right here. You can feed your wiring harness out for your power mirror.
Before you install your new mirror, now's a good time just to wipe this out. Get some of that dirt out of there. All right, we're going to install the mirror by taking the wiring harness and feeding it through the hole here. Feed it all the way through. We have to go under our vent visor on this truck. Slide it up, and you'll get the studs in there. Push that little push clip in there. That will help hold it on. You can just put your hand here and hold it.
All right, so now we can start putting our nuts back on the studs. Get them caught, use my 10 millimeter deep socket. All right, you don't have to go super tight with these, just until they start getting tight. These are metal studs into the plastic mirror housing, you don't want to pull them out. Just go nice and even all the way around. That feels good. Now we're going to hook these back into these little clips. Take the zip tie and go through the clip like this. It goes all the way through. Now you've got your zip ties tightened, take your side cutters, and clip them off. Now that those are tight you can put the foam back in. Just kind of feed it in there. It's got a little slot for the wires.
All right, now we're ready to install this back on the door panel. Feed our wires through for the door switches and mirror. You can see the little channel that it was in, and you just want to push it down in.
First, you want to just make sure that your bolts come out and you retrieve them. There are two tabs here that just go right in to the door and rest conveniently so that's supported. Then you can put this up. Make sure you have four harnesses that poke up through the opening, here, or more if you have more options on your truck. Then reconnect your cable, slide the ball in, pull out, and push.
Make sure all your harnesses are up and through. Now that your cable's on, this ridge actually needs to go down into this channel here. So, hit the panel up into place. A little higher, you see it slides down. It should go down even. This should come right up through your lock rod. Then, if you look back in, you can actually see this pin here lines right up, and you can just go right around and lock the pins into place. So we want to be able to take these bolts and put them in. They’re a little bit loose, though. So, if you just take a piece of painter's tape, put it on the head of the bolt, stuff your socket on there, and it stays much better. You can guide it right in and start it out. If the painter's tape does stay behind, it's not a big deal, but tighten it by hand first to make sure it's in, and then tighten it up.
This one is pretty easy to get into place. Put the lockdown on. Snap that in place. This one, the round side goes underneath. Put this into place. Switch panel, these all only go in one way. So, like this one won't plug into there. It won't plug into there. It'll only plug into there. Then this one will only plug into there. This one can go in place. The last one, again, it has three tabs. One of ours is broken. Make sure it goes right straight in, kind of look in behind.
Thanks for watching. Visit us at 1AAuto.com for quality auto parts, fast and free shipping, and the best customer service in the industry.

MRA05754