About TRQ: TRQ is a trusted brand dedicated to making every repair a success story by combining premium parts with easy installation. Each TRQ part is engineered by a team of automotive experts to meet or exceed OEM standards, delivering enhanced performance and maximum longevity. With rigorous in-house testing, the brand ensures superior fit and function across every product line. TRQ also provides customers with best-in-class, step-by-step installation videos—so you can complete repairs with confidence, whether you're a first-time DIYer or an industry professional.
Returns: Parts with electrical components cannot be returned once installed.
Attention California Customers:
WARNING: This product can expose you to chemicals including Lead and Lead Compounds, which are known to the State of California to cause cancer, and birth defects or other reproductive harm. For more information, go to www.P65Warnings.ca.gov.
Lifetime Warranty
This item is backed by our limited lifetime warranty. In the event that this item should fail due to manufacturing defects during intended use, we will replace the part free of charge. This warranty covers the cost of the part only.
Returns: Parts with electrical components cannot be returned once installed.
FREE Shipping is standard on Orders shipped to the lower 48 States (Contiguous United States). Standard shipping charges apply to Hawaii, Alaska and US Territories. Shipping is not available to Canada.
Expedited is available on checkout to the United States, excluding Alaska, Hawaii and US Territories as well as P.O. Boxes and APO/FPO/DPO addresses. Final shipping costs are available at checkout.
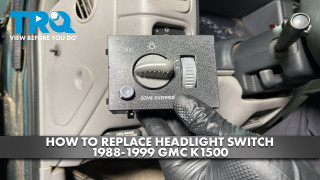
How to Replace Headlight Switch 1995-2000 Chevy Tahoe
How to Replace Headlight Switch 1995-99 GMC K1500
Created on:
Tools used
Flat Blade Screwdriver
8mm Wrench
1. Removing the Dash Panel
Disconnect the negative battery cable with an 8mm wrench
Push the brake
Turn on the vehicle
Pull the shifter all the way down
Pull out on the dash panel
Disconnect the harnesses behind the panel
2. Removing the Headlight Switch
Pry out the tabs on the switch with a flat blade screwdriver on the back of the dash panel
Lift the headlight switch up and out
3. Installing the Headlight Switch
Push the new switch into the panel
4. Installing the Dash Panel
Place the dash panel over the back of the steering wheel
Connect the four wiring harnesses
Push the dash panel into place
Pull the ash tray out to fit the corner of the panel
Pull the shifter up
Turn the vehicle off
Reconnect the negative battery cable with an 8mm wrench
Brought to you by 1AAuto.com, your source for quality replacement parts and the best service on the Internet.
Hi, I'm Mike from 1A Auto. I hope this how-to video helps you out, and next time you need parts for your vehicle, think of 1AAuto.com. Thanks.
In this video, we're going to show you how to replace the headlight switch on this 1996 Chevy Tahoe. The items you'll need for this include a new headlight switch from 1AAuto.com, an 8mm wrench, and a flat blade screwdriver.
The first thing that you're going to want to do is disconnect your negative battery terminal. Using an 8mm wrench, just loosen that up and pull it free. Push the break, turn on the vehicle, and pull the shifter all the way down. Pull out on the dash panel, and you want to do this all the way around it. Then once you have it pulled free, look back behind it, and you want to disconnect the series of harnesses. Just push the tabs and pull them free. Then do the same thing on this one on the other side and then your dash panel is free.
To remove your headlight switch, you want to pry out these four tabs on the back of your dash panel, and it does help if you use two flat blade screwdrivers. You can pry one tab out, leave the screwdriver in there, and use another screwdriver to pry out another tab, and then it lifts up and out.
On the right is the old headlight switch; on the left is the new one from 1A Auto. You can see they're identical, and they'll fit exactly the same. Take your new switch and just push it down into place.
To reinstall your dash panel, you want to just put it back over the steering wheel and then reconnect those four harnesses. Now, push the dash panel back into place. You will need to pull that cup holder ashtray out, put your shifter back up, and turn the vehicle off. Now, push your negative battery cable back into place, tighten up that 8mm bolt, and you're all set.
We hope this video helps you out. Brought to you by www.1AAuto.com, your source for quality replacement parts and the best service on the Internet. Please feel free to call us toll-free, 888-844-3393. We're the company that's here for you on the Internet and in person.
Tools used
Flat Blade Screwdriver
Trim Tool Set
1. Removing the Dash Trim Instrument Cluster
Turn the key to the run position
Press the brake and put the gear selector in the lowest position
Pry out along the edges of the dash trim
Disconnect the wiring harnesses
2. Removing the Headlight Switch
Pry out the tabs behind the headlight switch with a flat blade screwdriver while pulling the headlight switch up
Remove the headlight switch
3. Installing the Headlight Switch
Press the headlight switch into the dash trim
4. Installing the Dash Trim Instrument Cluster
Connect the wiring harnesses
Pull out the cupholder
Press the dash trim into place
Hi, I'm Mike from 1A Auto. We've been selling auto parts for over 30 years. We're dedicated to delivering quality auto parts, expert customer service, fast and free shipping, all backed by a 100% satisfaction guarantee. So visit us at 1AAuto.com, your trusted source for quality auto parts.
In this video, we're going to be working with our 1996 GMC Sierra K1500. We're going to show you how to remove and replace your vehicles headlight switch. If you like this video please click subscribe. We have a ton more information on this truck, as well as many other makes and models, and if you ever need parts for your car you can follow the link down in the description over to 1AAuto.com.
Tilt your steering column to the lowest position, turn the key to the run position and our battery is disconnected--this will work either way. Put your foot on the brake and put the gear selection in the lowest position. You can then simply put your fingers behind the dash panel and carefully go around, open the cup holder a little to get that clip out, and pop all the clips out. You've got to kind of scooch it forward, and then pop that real panel over the instrument cluster up so you can move it around a little.
We'll then disconnect all of the electrical connectors behind our dash. Now this connector is a little tricky. You have this little T here on the top of the push button. That needs to be depressed to just the right level to sneak it under. And it's almost easier to just use a flat blade screwdriver. Pry it down and back. You can then push down and release the connector from the four-wheel drive selector buttons. Flip the panel out and release the headlight switch connector as well. You can now remove the entire dash panel from the vehicle.
To remove your headlight switch from the dash, carefully pry back the plastic tabs holding it in place. There are two on each side. We're just using a small flat blade screwdriver here. You want to keep some upward tension while you do that. Then pop the switch out of the dash.
To install your new switch, simply make sure it's facing the correct direction, and push it back in until the tabs lock into place. Reconnect the electrical connectors. Don't forget to do the headlight switch on the other side. Line the dash back up and pop all of the retainers back into place. Remember to pull the cup holder out because of that lip. And you're good to go.
Thanks for watching. Visit us at 1AAuto.com for quality auto parts, fast and free shipping, and the best customer service in the industry.
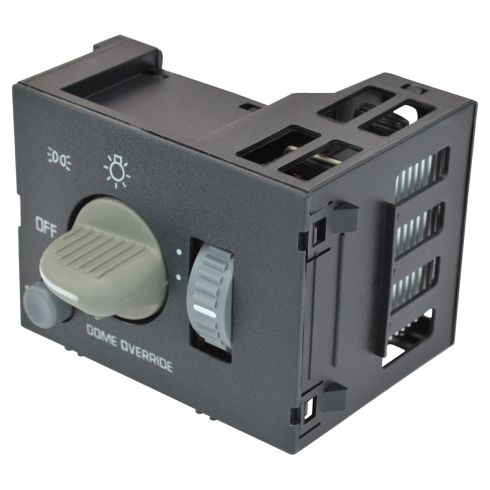
SWA41681
In Stock
Product Reviews
4.7/ 5
★★★★★
47 reviews
5★
40
4★
4
3★
1
2★
0
1★
2
★★★★★May 23, 2026
BD
The headlight switch was a perfect fit and color for my 1998 Chevy Suburban 4x4; easy to install in about 15 minutes after watching 1A's on -line installation video. Price was more than reasonable compared to OEM headlight switch. It arrived in about 5 days after ordering, and was safety packed. This was my first purchase from 1A and recommend them to anyone who needs vehicle parts. Will order again from 1A when in need of other parts.
★★★★★May 13, 2025
Light switch
Was what I ordered. No issues there. The switch ended up not being the problem.
★★★★★January 12, 2025
Headlight switch for '99 Tahoe
Gentlemen; I cannot do an actual review at this time as I have yet to install the unit. It arrived in good time, the controls feel like they properly work. Due to winter weather and personal affairs I have not had opportunity to do the work. I enjoy your short and concise How-To vids. I will keep A-1 in mind for future purchases on whatever vehicle I am in. Thank you, Gordon H.
★★★★★November 19, 2024
Head light switch
Works great fits perfectly.
★★★★★September 5, 2024
Replaced the headlight switch on my 1995 Chevy Silverado
This solved the electrical issue I was having and it looked exactly like the original. Easy change as I didn't have to remove the dash totally; just pulled the instrument cluster trim panel and reached around to pull the headlight switch out. Once removed, I pushed the new switch into place, snapped the instrument cluster trim back in the dash and replaced the negative ground back on the battery. Easy fix.
★★★★★December 2, 2023
Easy
Perfect fit. Love the installation video. Thanks.
★★★★★November 17, 2023
Very amazed
Really great quality and looks like a original part super happy with yalls parts
★★★★★November 12, 2023
Excellent replacement part
Good quality and perfect fit. Super easy install and works great.
★★★★★October 1, 2023
It was a great part
★★★★★September 24, 2023
Excellent service.
Shipped fast and was a high quality part. They included a video on how to setup the headlight switch and mad the whole process very quick.
Showing 1–10 of 47 reviews
Customer Q&A
Got a question about this part? Post it and get answers from our team.
AnthonyMay 11, 2025
I got this part replaced at a shop and the background light looks almost green. Is that the case with this brand as well? I want it to match the original dashboard which is more off-white/yellow. Thanks.
I put this part in a 1998 suburban and the light is still the same off-white/yellow as the original color was.
Jeff · May 11, 2025
AnthonyMay 11, 2025
Is there a specific part number for the white/yellow background light? Or a particular brand perhaps? I cant get over the blue/green light of the one I just installed. I know it sounds picky, but it throws off the rest of the dash at night in my 97.
The light will match what you had from factory, please confirm fitment of this part to your vehicle before placing your order.
Nick · May 12, 2025
JohnJanuary 8, 2024
Is this gray color?
It looks just like the stock OEM part.
Robert · January 8, 2024
JulianJanuary 8, 2024
Is this gray color?
The knob is gray colored on the one I recieved.
Jeff · January 8, 2024
JohnJanuary 8, 2024
Is this switch gray color?
No sir this switch is a piece of shyt
Henderson · January 8, 2024
DanielNovember 14, 2020
Will a 2005 light switch box from a yukon convert to a 1997 gmc SL 2500 pickup?
No, the part out of your 2005 Yukon cannot be installed in your 1997 GMC 2500.
Christa · November 16, 2020
DaveSeptember 29, 2020
Will this dim LED gauge cluster lights?
It did on my 97 Silverado
A · September 29, 2020
JMarch 14, 2018
What color is the interior background light of the switch? Is it blue/green or white?
Yellow/White same as dash lights.
Don · March 14, 2018
Showing 1–8 of 8 questions
Customer service
877-844-3393
Monday - Friday 8:00am - 9:30pm ET Saturday - Sunday 8:00am - 4:30pm ET
Ask a Question
Check Your Email
We sent a verification email to .
Click the Verify Email button in the email to submit your question.
This extra step helps prevent spam.
GMC is a registered trademark of General Motors Company. 1A Auto is not affiliated with or sponsored by GMC or General Motors Company.See all trademarks.
Select Your Vehicle
Specify your vehicle's year, make and model to guarantee fit.


 WARNING: This product can expose you to chemicals including Lead and Lead Compounds, which are known to the State of California to cause cancer, and birth defects or other reproductive harm. For more information, go to www.P65Warnings.ca.gov.