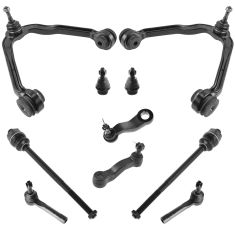
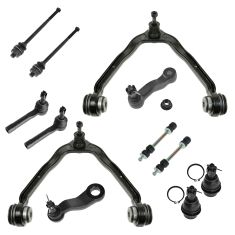
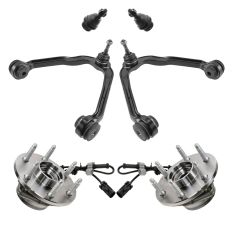
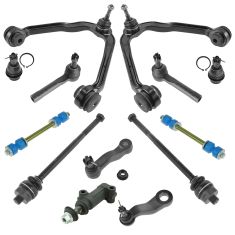
/2005 Chevrolet Suburban 1500 with Cast Iron Lower Control Arms without Aluminum Steering Knuckles Front 10 Piece Steering & Suspension Kit TRQ PSA58784
2005 Chevrolet Suburban 1500 with Cast Iron Lower Control Arms without Aluminum Steering Knuckles Front 10 Piece Steering & Suspension Kit TRQ PSA58784
Application Specific Design: No modifications necessary
Anti-Corrosion Coated: Enhanced surface life
Pre-greased: No additional maintenance required
Kitted for Restored Performance: Improved road-feel and handling
Description
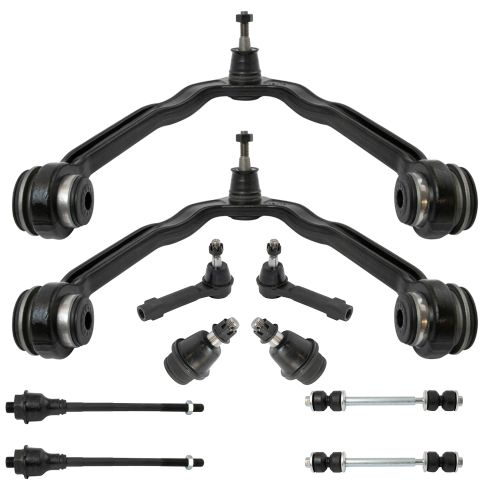
TRQ suspension kits are manufactured using premium raw materials and coatings for extended service life. Each TRQ suspension component is designed to be a direct, maintenance-free replacement to the stock unit. To extend the life of your steering and suspension components, TRQ recommends replacing components in pairs, sets, or kits. All products are fit and road-tested in our Massachusetts R&D facility to ensure we deliver on our promise of Trusted Reliable Quality.
Install Tip: When replacing steering components, have a professional alignment performed afterwards. This ensures proper tracking and even tire wear.
Our steering and suspension components are pre-greased and sealed for long life and do not require the extra maintenance typically required by greaseable versions.
Attention California Customers:
WARNING: This product can expose you to chemicals including Lead and Lead Compounds, which are known to the State of California to cause cancer, and birth defects or other reproductive harm. For more information, go to www.P65Warnings.ca.gov.
Lifetime Warranty
This item is backed by our limited lifetime warranty. In the event that this item should fail due to manufacturing defects during intended use, we will replace the part free of charge. This warranty covers the cost of the part only.
FREE Shipping is standard on orders shipped to the lower 48 States (Contiguous United States). Standard shipping charges apply to Hawaii and Alaska.
Shipping is not available to a P.O. Box, APO/FPO/DPO addresses, US Territories, or Canada for this item.
Expedited is available on checkout to the United States, excluding Alaska, Hawaii.
Final shipping costs are available at checkout.
How to Replace Upper Control Arm 2000-06 Chevy Suburban 1500
How to Replace Outer Tie Rod 1999-2006 Chevy Silverado
How to Replace Tie Rods 2001-10 GMC Sierra 2500 HD Truck
How to Replace Sway Bar Link 2000-06 Chevy Suburban
Created on:
Tools used
10mm Socket
18mm Wrench
21mm Socket
21mm wrench
22mm Socket
Grease Gun
Hammer
Jack Stands
Marker / Writing Utensil
Ratchet
Torque Wrench
1. Removing the Wheel
Loosen the 22mm caps on the hubcap with the vehicle on the ground
Pull the hubcap free
Raise the vehicle with a floor jack
Secure the vehicle on jack stands
Remove the lug nuts
Pull off the wheel
2. Removing the Upper Control Arm
Mark the tab on the adjustment piece with a marker to mark the alignment
Remove the two 10mm bolts holding the brake line and move the brackets
Remove the ball joint nut with an 18mm wrench
Hit the wheel knuckle and control arm to break them free
Remove the 21mm nuts from the upper control arm bracket
Jack up the wheel underneath the wheel knuckle
Remove the upper control arm nut
Remove the bolts and upper control arm bracket
Place a nut back on and use an air hammer to knock the bolt out if it won't budge
Move the control arm up and down while pulling out
3. Installing the Upper Control Arm
Put the upper control arm into place and push the 21mm bolts in to hold it
Put the brackets on either side and realign them up
Angle the control arm down into the wheel knuckle
Replace the 18mm ball joint nut
Replace the 21mm nuts from the upper control arm bracket
Replace and tighten the two 10mm bolts
Put a grease gun into place on the end of the control arm and fill it up
4. Reattaching the Wheel
Slide the wheel into place
Start the lug nuts by hand
Tighten the lug nuts preliminarily
Lower the vehicle to the ground
Tighten the lug nuts to 100 ft/lbs in a crossing or star pattern
Reattach the hubcap and tighten the caps
Brought to you by 1AAuto.com, your source for quality replacement parts and the best service on the Internet.
Hi, I'm Mike from 1A Auto. I hope this how-to video helps you out, and next time you need parts for your vehicle, think of 1AAuto.com. Thanks.
In this video, we're going to show you how to replace an upper control arm on this 2002 Chevy Suburban. We show you on the passenger side, but the driver side has the same procedure. The items you'll need are a new upper control arm from 1AAuto.com, a 10mm, 21mm, and 22mm socket and ratchet, 18mm and 21mm wrench, a marker, a torque wrench, jack and jack stands, a grease gun, a hammer, and an air hammer depending on the condition of your vehicle. After completing this procedure you will need to get a professional alignment done.
Start out by removing the hubcap. You want to remove the lug nuts. If you don't have air powered tools, you'll want to do it while the vehicle is on the ground. Loosen them preliminarily, raise the vehicle, and remove the lug nuts the rest of the way. On these brackets, you'll see a tab coming through from the upper control arm. Mark where that tab is. Remove these two 10mm bolts. Next, remove this 18mm nut, and you can see Mike uses an 18mm wrench and another wrench for some extra leverage to break it free and then removes it the rest of the way with the 18mm wrench. Hit the wheel knuckle and control arm to break them free. Then remove the 21mm nuts on either side.
Jack up your wheel, and you want to do this underneath the wheel knuckle. Remove the upper control arm nut and then remove these bolts and the bracket that's on them. Our first one pulled out no problem, this one's a bit more difficult. We tried using a hammer, that doesn't work. We tried using a wrench to help break it free, but it's in there really good. If you have this same problem, we put a nut back on it and use an air hammer to knock it out. Now that those bolts are out, you want to remove the control arm up and down while pulling out and it'll pull free.
Take your new upper control arm and push it back into place. Then push the bolts in to hold it into place. You want to make sure that you have those brackets on either side and that they're lined up. Now, angle the control arm down into the wheel knuckle. Once it's pressed down into place replace that 18mm nut. We'll fast forward as Mike tightens all of those up. Replace and tighten up those two 10mm bolts. Using a grease gun put it into place on the end of your control arm and fill it up. Put the wheel back into place and then replace each wheel lug nut and tighten them up. You want to tighten them preliminarily, lower the vehicle, and then tighten them the rest of the way. Torque each lug nut in a crossing pattern to 100 foot-pounds. Replace the hubcap and tighten up those lug nut caps.
We hope this video helps you out. Brought to you by www.1AAuto.com, your source for quality replacement parts and the best service on the Internet. Please feel free to call us toll-free, 888-844-3393. We're the company that's here for you on the Internet and in person.
Tools used
Adjustable Wrench
Bearing Grease
Hammer
Flat Blade Screwdriver
Torque Wrench
Ratchet
Needle nose pliers
Grease Gun
1. Removing the Wheel
Loosen the lug nut covers with a 22mm socket
Pry off the center cap by hand
Loosen the lug nuts with the vehicle on the ground
Raise the vehicle with a floor jack
Secure the vehicle on jack stands
Remove the lug nuts
Pull off the wheel
2. Removing the Outer Tie Rod
Measure the distance from the boot of the inner tie rod to the edge of the outer tie rod
Make note of this measurement
Loosen the nut that holds the outer tie rod to the inner tie rod with an adjustable wrench
Remove the 18mm nut from the outer tie rod end
Strike the steering knuckle with a hammer to loosen the outer tie rod
Pull the outer tie rod out of the steering knuckle
Hold the nut that holds the outer tie rod to the inner tie rod with an adjustable wrench
Twist off the outer tie rod by hand
3. Installing the New Outer Tie Rod
Attach the grease fitting to the new outer tie rod
Tighten the grease fitting with a 7mm socket and ratchet
Twist the new outer tie rod onto the inner tie rod
Push the outer tie rod into the steering knuckle
Fasten the 18mm castle nut onto the outer tie rod
Push the cotter pin through the castle nut
Twist the cotter pin into place with needle nose pliers
Fill the tie rod with grease, using a grease gun
Measure the distance from the boot of the inner tie rod to the edge of the outer tie rod
This should be the same as the measurement noted in Step 2
Tighten the nut that holds the outer tie rod to the inner tie rod with an adjustable wrench
4. Reattaching the Wheel
Slide the wheel into place
Start the lug nuts by hand
Tighten the lug nuts preliminarily
Lower the vehicle to the ground
Tighten the lug nuts to 100 foot-pounds in a crossing or star pattern
Reattach the center cap
Tighten the lug nut covers with a 22mm socket
Brought to you by 1AAuto.com, your source for quality replacement parts and the best service on the Internet.
Hi, I'm Don from 1A Auto. I hope this how-to video helps you out, and next time you need parts for your vehicle, think of 1AAuto.com. Thanks.
In this video, we're going to show how to replace an outer tie rod on this 2002 Chevy Suburban, and it's the same part and similar process on these Suburbans from 2001 to 2006. We show you on the passenger side, but the driver side is the same procedure. The items you'll need for this are a new outer tie rod from 1AAuto.com; 7mm, 13mm, 18mm and 22mm socket and ratchet; flat-blade screwdriver; adjustable wrench; tape measure; pliers; hammer; and a grease gun.
You want to just loosen up these 22mm caps, and then pull the hubcap free. Then, you want to loosen these lug nuts while the vehicle is on the ground, then raise the vehicle and remove them the rest of the way, unless you have air-powered tools. Then, you can do it while it's in the air.
Now you want to measure from the boot on your inner tie rod to the edge of your outer tie rod and just remember that measurement. Now, using your adjustable wrench, loosen up this nut right here, and then you want to remove this 18mm nut down here. Now just hit on your knuckle with a hammer and this is going to break up that outer tie rod and make it easier to pull out. Now just hold this nut with the adjustable wrench, pull the outer tie rod off and just twist it until it comes free. We'll fast forward as Don does this. You want to make sure that the inner tie rod doesn't spin while you're removing the outer tie rod.
Now, put the grease fitting into your new outer tie rod and just tighten that 7mm grease fitting up. Then twist the outer tie rod back onto your inner tie rod and push it down into place. Now, replace the castle nut and just tighten that up. Then push the cotter pin through and, using your pliers, just bend the ends of it. Now, using your grease gun, fill the tie rod with grease. Measure, and you should get about the same distance. That's a good preliminary alignment. You should have your car aligned after this. Tighten up the lock nut to hold it in place.
Now replace your wheel and then replace those lug nuts and tighten them preliminarily. Lower the vehicle and tighten them the rest of the way. Now torque the lug nuts in a crossing pattern to 100 foot-pounds. Replace the hubcap and tighten up those caps.
We hope this video helps you out. Brought to you by www.1AAuto.com, your source for quality replacement parts and the best service on the Internet. Please feel free to call us toll-free, 888-844-3393. We're the company that's here for you on the Internet and in person.
Tools used
Adjustable Wrench
35mm Socket
Torque Wrench
Tie Rod Fork
Jack Stands
Grease Gun
Rubber Mallet
Tie Rod Puller
7mm Socket
Lug Wrench
Ratchet
Floor Jack
Needle nose pliers
1. Remove the wheel
Loosen the lug nuts.
Raise and secure the vehicle.
Remove the wheel.
2. Remove the tie rod assembly
Remove the tie rod bolt.
Use a pickle fork and hammer to separate it.
Use an adjustable wrench and a fitted wrench to remove the tie rod assembly.
3. Install the new tie rod assembly
Adjust your new tie rod assembly to match the old one for a preliminary alignment.
Mount the new tie rod assembly and tighten it in with a wrench.
Tighten the nut on the tie rod stud to 65 ft lbs.
Install the cotter pin.
Use a 7 mm wrench to install the grease fitting
With a grease gun, grease the inner and outer joints.
4. Put the wheel back on
Preliminarily tighten the lug nuts.
Lower the car and torque the lug nuts to 120 ft lbs using a star pattern.
Brought to you by 1A Auto.com, your source for quality replacement parts and the best service on the internet. Hi, I'm Mike Green. I'm one of the owners of 1A Auto. I want to help you save time and money repairing and maintaining your vehicle. I'm going to use my 20-something years experience restoring and repairing cars and trucks like this, to show you the correct way to install parts from 1A Auto.com. The right parts, installed correctly, that's going to save you time and money. Thank you, and enjoy the video.
In this video I'm going to show you inner and outer tie rod replacement. This truck actually just needed the inner, but if you're replacing the inner, you might as well replace the outer as well. These tie rods fit this whole generation of GM trucks and SUV's - trucks from 98 - 06 and SUV's from 99 - 07. The tools you'll need are a jack and jack stands, a 22 mm lug wrench or socket and ratchet. You'll need either a 35 mm wrench or a 12 inch adjustable wrench that can go to 35 mm and then you'll need a second adjustable wrench as well, a tie rod removal tool, a grease gun, torque wrench, and pliers. The clunking noise was the inner tie rod. You can see here, when I shake the tire back and forth you'll see the inner tie rod move but that steering arm inside doesn't move, so you know there's play in there and it needs to be replaced.
Start out by raising and securing the vehicle on a jack stand and then remove your cap and wheel. We're going to remove this bolt. We've got a ratchet. If you don't have a breaker bar, use a ratchet and a piece of pipe. The bolt should come off pretty easily. Take the bolts off most of the way. I'm planning on replacing the outer tie rod as well, so I'm going to use a pickle fork to separate it. The best way to go about this is to get the wrench on it from underneath and push. That should break her free. I'm just going to speed up as I pull that out. You want to make sure that your outer tie rod spins with the wrench so the whole assembly spins and you don't shorten or lengthen the tie rod -- the inner and outer tie rod assembly.
There's your whole assembly out. If you can see here, I've got my old assembly, inner tie rod and outer tie rod, and I want to measure right from the edge of this surface here right to the end. I'm taking my new inner tie rod and outer tie rod and I put them together, just to compare. This will give you a good preliminary alignment. We'll put this nut a little closer. We can put it together now. It will be a good preliminary alignment until you can get your vehicle to a shop where you can get a real alignment.
I'm just leaving my nut right there and spinning my outer tie rod off. The nut marks the place where your tie rod was and then taking off that outer tie rod just makes it easier to get the inner one on. That allows me put my inner tie rod on. Speed it up here as I use the wrench to tighten the tie rod up. Then I can put my outer tie rod right back on and go right up to the nut. Then I'll just fast-forward here as I put that outer tie rod back on the inner tie rod. Now I'm just taking the nut or just getting the outer tie rod in place. Take the nut off the new tie rod, and I'm just going to get some of the debris off the steering knuckle there, and then you can push on the stud on the tie rod and get it lined up with the steering knuckle, and then push it up and in, and start your nut back on.
We'll tighten this up to 65 foot-pounds. Pull a little tighter here and we can get this cotter pin through. We'll fast-forward here as we install the cotter pin and bend the end over and then use a 7 mm wrench and install our grease fitting. We'll take a wrench screw up here. The other one holds the outer tie rod and just tighten up the block nut. Now you want to use a grease gun and grease both the joint for the outer tie rod and the inner tie rod.
Use some more fast-forward here. As you put the wheel and tire back on, start all the lug nuts one by one by hand first, then use your wrench to preliminary tighten them, then you can lower the vehicle back down on the ground, torque the lug nuts to 120 foot-pounds. I'm using a crossing pattern and then I do it one more time, go around all eight and make sure they're tight. Then you can put your center cap back on and you should be all set.
We hope this helps you out. Brought to you by www.1AAuto.com, your source for quality replacement parts and the best service on the internet. Please feel free to call us toll-free, 888-844-3393. We're the company that's here for you on the internet and in person.
Tools used
Reciprocating Saw
Hammer
Torque Wrench
14mm Socket
Jack Stands
Ratchet
22mm Socket
1. Removing the Wheel
Remove the hub cap by loosening the lug nuts
Remove the lug nuts and tire
2. Removing the Stabilizer Link
Using locking pliers to clip onto the top of the stabilizer link
Then remove 14mm bolt from bottom of the stabilizer link
Remove the stabilizer link with a hammer or reciprocating saw
3. Replacing the Stabilizer Link
Put the stabilizer piece back into place
Use four washers, four grommets, and a tube
Use a jack stand to help push it through till it appears through the top
Tighten the 14mm bolt on the stabilizer link
4. Replacing the Wheel
Put the tire in place
Replace and tighten each lug nut
Torque each lug nut in a crossing pattern to 100 ft/lbs
Torque the center hub nut to 160 ft/lbs
Replace the hub cap and tighten the lug nut caps
Brought to you by 1AAuto.com, your source for quality replacement parts and the best service on the Internet.
Hi, I'm Don from 1A Auto. I hope this how-to video helps you out, and the next time you need a part for your vehicle, think of 1AAuto.com. Thanks.
In this video, we're going to show you how to replace a sway bar link on this 2002 Chevy Suburban, and it's the same part and similar process on these Suburbans from 2000 and 2006. We show you on the passenger's side, but on the driver's side it's the same procedure. The items you need for this include a new sway bar link from 1AAuto.com, a 14mm and 22mm socket and ratchet, locking pliers, a hammer, and a reciprocating saw depending on the condition of your vehicle.
Remove your hubcap by loosening up these lug nut caps and pulling the hub cap. Now, you want to remove the lug nuts. If you don't have air powered tools, you want to do this while the vehicle is on the ground. You can loosen them preliminarily, raise the vehicle and remove the lug nuts the rest of the way, and pull the wheel out. Using locking pliers, clip on to the top of your stabilizer link, and then remove this 14mm bolt. We'll just fast forward as Mike does this.
Now, you want to just hammer the link through. If the link doesn't move, you may have to use a reciprocating saw and cut it. Up top is the old part; below is the new part from 1A Auto. You can see they're identical, and they'll fit exactly the same. You want to put your stabilizer link back into place, starting with a washer and a grommet, then through the hole, then another grommet, then a washer, then the tube; then, before going through the next hole, another washer and grommet; then, on the top another grommet and another washer, then the nut.
Here, we just put the jack underneath the link. That's just to push it up through and compress the washers a little bit so that you can get the nut on the other end. Once I get another nut on, you'll see I just release the jack. You want to obviously be supporting the vehicle with jack stands, and then use your jack to push the bolt of the link up through. Then, you want to tighten up the sway bar link, and you basically want to tighten it up until the rubber bushings are compressed enough so that they're the same diameter as the washers.
Put the wheel back in place, then replace each of your lug nuts and tighten them up. You want to tighten them preliminarily, lower the vehicle, then tighten them the rest of the way. Torque each lug nut in a crossing pattern to 100 foot-pounds. Replace the hubcap, and just tighten up those lug nut caps.
We hope this video helps you out. Brought to you by www.1AAuto.com, your source for quality replacement parts and the best service on the Internet. Please feel free to call us toll-free, 888-844-3393. We're the company that's here for you on the Internet and in person.
PSA58784
In Stock
Product Reviews
92 Ratings
4.8out of 5 stars
92 Ratings
Rated 5 stars by 85% of reviewers
585%
Rated 4 stars by 10% of reviewers
410%
Rated 3 stars by 4% of reviewers
34%
Rated 2 stars by 0% of reviewers
20%
Rated 1 star by 1% of reviewers
11%
1-10 of 92 Reviews
4.77/ 5.093
93 reviews
5 Stars
4 Stars
3 Stars
2 Stars
1 Star
79
9
4
0
1
AWESOME-AWESOME-AWESOME
Dan
March 18, 2017
Ya'll must be 40+ years of age. It's nice to know there are still some of us out there that really want to help one another out by providing perfect parts, especially in a kit, and show us how to do it ( Great Videos ). I'm sure it saved me thousands. I don't mine paying for a shop to work on my vehicle, if you can find in honest one, and forget about taking it to a stealership. Thanks for looking out for the guy that likes working on his own vehicles.
I will definitely be getting my parts from ya'll.
P.S. You might want to think about doing kits for old tractors, Kubota, Cat 416, etc. Thanks TEXAS DAN
Good for the money!
V
August 4, 2017
Good product for the money! Everything bolted on with no issues.
The vehicle I put it on is a 2005 Tahoe with 220,XXX miles, so I didn't feel like spending a fortune on it. It would be nice if the kit came with the cam bolts and plates that set the caster and camber. At the very least, these should be suggested as something a person might need, especially in the rusty states.
I wish the fittings were all grease-able, but again, for the money, and where I was putting them, I am satisfied.
Thomas
August 25, 2017
The kit is very nice. I haven't installed it yet. The only problem I have with it is that they don't all have grease fittings. The upper balljoints have grease fittings and the rest of the parts do not . That is why I only have it a 3 star. Chances are I will only use the upper ball joints and the stabilizer links unless I decide to drill and put grease fittings in the other ball joints and tie rods.
Awesome product thanks
U
September 29, 2017
Thank you so much for the product that you sold me. Need some shocks now can you help me pick the right ones
2004 Chevy tahoe
Willliam
February 17, 2018
Parts came quick. Installed with no problems on tahoe with 240,000. Hopefully they will last another 100,00 ?? thank you A1 auto for the fantastic price !!!
R
April 5, 2018
Product seems to be good so far no issues came the next day
Starring and suspension kit
Vincent
April 26, 2018
Everything came in a timely manner, completely satisfied with all the parts no issues what so ever.
Good fit, seems to last!
Dustin
June 14, 2018
Installed two of these now. No issues on the first in 2 years. Second went right on and has done well so far. Hardest part is getting old parts off.
Parts fit great
Emmett
July 22, 2018
My initial satisfaction with these parts is great. I didn't change them myself but the mechanic who did told me they worked great. The price was very reasonable and they shipped and arrived quickly. I have bought parts from 1A before and will continue doing so in the future.
Everything you hope it will be
T
July 26, 2018
I am an idiot...
But with 1aauto.com, I mustered the courage to attempt the unthinkable; perform DIY maintenance on my truck.
Shipping: My parts were ordered on Tuesday at 2:58pm, shipping from Kansas to Alabama, and arrived to me on Friday at regular UPS delivery route timing. Though the box came looking like it had survived an old stage coach ambush by outlaws in the old West, the parts were protected and showed no observable damage. The parts came in individual packages with a sticker on each identifying a part number. Also included was an invoice with the part number and part name for ease of correlation between packaging and parts. This was important to me as I'd never held a tie-rod in my hands before and had no idea whether they were destined for left or right side (or if it even mattered).
Compare to OE: Everything I removed from my truck looked identical to the parts from 1AAuto, with the exception of a few minor differences. The OE nuts were "taller" and had more threads
Great company
J
July 27, 2018
Great buying experience, great products. I would recommend to anyone needing parts
Good parts
Angel
July 28, 2018
Good product quality, I am very satisfied with the purchase
Worked great
Clyde
August 23, 2018
I love the service and the parts worked great. Love 1a auto
Just as they said
Jeff
September 4, 2018
Showed up and fit perfect, I'm very happy with the quality.
Fantastic sevice
D
September 22, 2018
Highly recommended for the do it yourselfers out there..parts were spot on..website is easy to use and just about foolproof..shipping was fast..how to videos are priceless.. I will definitely use again! Thanks 1A auto
Happy with purchase.
M
October 3, 2018
Order shipped very quickly, and I received everything I ordered. Quality seems pretty good for not being name brand. Only issue with the whole job was getting the old OEM stuff off. Would buy again.
Martins Elite Cycles
JASON
November 1, 2018
Really was impressed cut my cost of the parts to 1/3 and all the parts fit great and were very good quality. Pleasure to do business with and very quick shipping. Very confident in doing future business.
Thank you
Steering & Suspension Kit
Pedro
November 9, 2018
Everything came the day expected., everything looks good i cant wait to install it tomorrow only reason why i give 4 star is because my package was open and the box was damage im glad nothing broke but everything else is perfect.
Everything you need in one kit.
B
December 20, 2018
Great deal. Installed flawlessly on my 03 Tahoe. It was so nice to get a kit that included everything so I didn't have to get a piece here and there and hope they all work. And with A1 the price plus ship was a great deal. Thank you.
Suspension Stability
T
December 22, 2018
The parts are doing a great job. I travel on mostly rural roads and the vehicle is responding exactly the way I wanted. The only thing I can think of is that there might have been the top bolts to replace old ones to be part of the package for the control arms. I needed to track some down to finish the job. 2 old bolts were sized up. The video was a excellent tool. My Suburban was at 250,000 miles when replaced.
Excellent
Ray
December 31, 2018
All parts installed perfectly. I buy all my parts from 1 aauto!
Perfect fit
Nicholas
February 18, 2019
Bought for a 2000 tahoe 4wd LT. Fit perfectly. Changed all parts out at home and had alignment done drives like new. Items arrived when stated , will definatley use a1 agin. Also they have a ton of really helpful how to videos on YouTube.
Wow!!
Jonathan
March 6, 2019
Excellent pricing!! Loyal customer, I am for a few years now and going...
As Ordered-Recommend
Tom
March 26, 2019
Con- the lower ball joint and the tie-rod do not have grease Jerks. The upper ball joint does. All parts fit my 2001 Suburban 2wd.
Quality products
James
April 19, 2019
So far these parts seem to be working well only have a few hundred miles on them so time will tell
Exact parts needed
Brandon
June 21, 2019
Easy to look up and order the correct parts for your vehicle. Buy individual pieces or kits. I got the kit to replace front steering and ball joints. Havent had a chance to install yet. Cant wait for the smooth ride once I do
Great Parts/Great Price
T
August 19, 2019
This is a great kit for the price, install was super easy and every thing bolted up perfectly, 10/10 would recommend
2003 chevy suburban 1500 LT 4x4 front suspension.
Brent
January 12, 2020
I installed these parts on my 2003 Chevy suburban that has 210,000 miles. I was quoted $2,000 for the repair with an alignment to let a shop do this. Took a day to replace myself and saved around $1,800. The parts fit perfectly and give the Suburban a better quality ride and better handling.
Shipped fast & exactly what I wanted!
Sean
January 22, 2020
I have yet to install all of the parts but this was exactly what I needed. & cheaper than most of the other places. I had the parts within a few days & came exactly as they described. Thank you
Great Service
Chris
March 30, 2020
Parts came individually wrapped with all necessary items. I know that's the way it should be, however anymore companies dont take care of the customer because of the need we have for the product. Here, there is no worry, parts are affordable, good quality and the customer service is spot on.
Quality parts
M
April 3, 2020
Replaced my front end with this kit and my truck is riding smoother then when I first bought it. Not only do they provide parts but if you arent experienced with mechanic work they have videos to give you guidance, very nice added touch.
L
April 11, 2020
Easy to order parts, cheap and i received my parts fast!! Highly recommend!!
Better buy from 1a auto
billy
April 18, 2020
They have a great price and always get it right. I will always buy from 1a auto
Front end steering & suspension kit
A
April 25, 2020
Part arrived on time. Seem like decent quality. Boyfriend just installed them...too soon review how they work out and long they last.
Great products
Timothy
April 28, 2020
overall satisfied with the quality of the parts and how fast i received them!
Perfect Fit
R
June 19, 2020
Bought this kit for a 1999 Chevy Silverado 1500 LS. Fit perfectly... seems as sturdy as I need. Looking forward to see how many miles I get out these parts!
Front end parts
Jerrold
July 27, 2020
All seems to right. Haven't installed in my truck yet. Had to wait on other parts to arrive. Having the 5.3L hybrid in my truck didn't make it easy to find some parts from A1-Auto.
Great service Great part
M
July 31, 2020
I recommend 1aauto because theyre a great team that helps you with any problems. I ordered the wrong part they still sent me the right part and let me keep the one I ordered. Now what company does that and this was in 2016 . Thanks 1aauto
1A Auto is all you need!
S
August 6, 2020
I am a true believer in 1A Auto! The website is very user friendly and shipping/ deliver is always on time. The prices are unbeatable! Thanks and keep it up!
awsome
S
August 7, 2020
Great help more bang for your buck!!!
thanks Al
JAYSON
August 15, 2020
Everything Ive ordered from them has arrived on time in perfect working order condition and fit just as they said it would extremely happy will continue to order from him
Alan
September 8, 2020
Part quality meet spec and easy to install. Shipping also on time.
10pc suspension kit for 2005 Chevy Tahoe
Sofonias
September 14, 2020
Received parts quickly and at a reasonable price than other competitors. Parts are good quality and my truck is riding smooth again. Thanks 1aauto
Pierre
September 24, 2020
My delivery was fast and on time. The parts were right and great quality
Quality parts but amazing shipping!
bradley
October 1, 2020
I ordered my parts on a wed afternoon for a what I wanted to do 3 weeks from that time. I come home from work on Thursday and the parts are already there! Blew me away. I have recommended 1aauto to all of my friends and I recommend them to anyone wanting quality parts fast.
Perfect fit
S
October 2, 2020
Fit perfect. Little different size than the ball joint sockets we had and it sliced the boot in half. Luckily we managed and rigged up one from the other ball joints. Other than that they fit great
Purchased a front end kit
Christopher
October 3, 2020
All the parts that I bought for my front end of my Chevrolet were correct. it was way cheaper than buying them anywhere else or separately. I would suggest anyone that wants to buy stuff to check here first
First time buyer
Luis
October 11, 2020
I'm very satisfied with the parts I order the delivery was on point I will countinue ordering parts in the near future
good
J
October 11, 2020
very good
Misael
November 28, 2020
This suspension kit was the way to go for my application. I would recommend to anyone that need to do there suspension on the GM vehicles that are listed. Very good quality and my truck rides smoother then before. Very satisfied with the quality of parts.
Chevy parts
K
November 29, 2020
Couldnt have been more pleased with the price and quality of these products. Replaced the front end in my 2000 chevy pickup. Rides like a new one! I will definitely be buying more products!!!
1a is A1
Tonya
February 26, 2021
quick delivery and fit perfectly. best online autoparts no need to go anywhere else
GM 2004 steering & suspension kit
Joe
February 27, 2021
I would definitely recommend this product for all DIY mechanics. Product was just as advertised. Everything fit perfect, no issues. Parts were either presealed or came withgrease fittings. Easy to install and matched the old parts. Delivered in a box and packaged with care. Overall great value for this suspension kit. Highly recommend
great service!
H
February 27, 2021
I love using 1Aauto now, they are on time when delivering their products to my door. The prices for the items are very reasonable. I would recommend this site to anyone who needs parts for their autos.
Suspension parts
Gerald
April 28, 2021
Excellent price and great parts has my SUV running very smooth!!
Fits perfectly
Krickett
May 2, 2021
Arrived as expected and an exact fit for my vehicle.
Satisfied customer
Ismael
May 18, 2021
Im very satisfied and happy with my purchase. Everything fit it arrived on time like it was promised. Good quailty. Definitely would recommend to other people. Thank you 1AAuto
Right parts Right price
Roger
May 31, 2021
Installed these over the holiday weekend and everything was an exact fit. Quality parts at a price that made it an easy decision to just get it done!! Bought this truck with 240,000 on it and still had all the original parts on the front suspension. The ride is so much smoother now!!
On Time Delivery Was A Must For This Repair To Happen!
Lydia
June 29, 2021
I was so worried about receiving this expedited shipment in time; so that the selected mechanic could fit us into his busy schedule and get me back on the road. The parts arrived in excellent condition, and at an affordable price. All the mainstream auto parts stores wanted three times the amount for the same parts. I'm never shopping at the Brick and Mordor auto parts stores again! Thank You 1A AUTO!
awesome product
Samuel
June 29, 2021
Everything fit exactly as it should. Did it in my driveway
Dorian
June 29, 2021
Great parts and service
David
August 10, 2021
Everything fit my Tahoe. Parts were good quality. The kit I ordered had all the parts listed. I forgot to let them know I have a 6 suspension lift so I will have to eat the swaybar links and order the correct length. Completely my fault. Parts came on time. Very satisfied!
Sean
September 23, 2021
Everything fit perfectly.
Best of everything
Israel
September 26, 2021
Great parts at great prices and the shipping costs was free you can't beat that.
Steven
September 27, 2021
The parts were delivered quickly and fit like a glove! I'd reccomend 1A to any diy-er.
Ivan
October 17, 2021
Would of came out nice on my truck before I totaled it...service was great and shipping was fast.
Junk
jared
November 26, 2021
Lasted less than a year. Lower ball joint failed on passenger side and upper control arm failed on driver side
Valarie
January 13, 2022
Never installed can I get my money back
Steering and suspension
Darrel
April 8, 2022
Excellent pieces, looks like they will fit perfectly
David
April 21, 2022
Installed. So far so good.
DAnna
April 27, 2022
My mechanic had no problems with them. They fit perfect!
Ryan
May 19, 2022
Everything fits perfectly in my 04 Chevy suburban and it rides like a charm definitely recommend if you're trying to save a little cash
Solid purchase
Rashad
July 3, 2022
Holding up well 1 year later
Pelton
July 6, 2022
worked great for me
Reynaldo
September 30, 2022
Good parts good price
Ball Joints/Suspension
Thomas
October 21, 2022
Perfect fit and best price around! Quick shipping too!
Alan
November 15, 2022
Good quality and good fit.
Exactly as Stated
Chandler
January 25, 2023
Parts fit in perfectly, everything was exactly as stated in the description. Upper control arms did not have zerk fitting to grease the ball joint, but we added the old one and finished the project.
There ok, would of been good if all parts came with grease fittings and also upper Ball joints on both sides kept spinning while I was trying to tighten down the main nut. It'll do for now
Perfect
Frank
April 7, 2023
Excellent product exactly what my Escalade needed for a nice freshen up!
Steve
July 10, 2023
Perfect fit for my suburban
Good fit parts as described.
K
October 19, 2023
Good parts. I have an 03 Yukon XL and they fit perfectly. I can't speak to how long they will hold up as I have only put a couple hundred miles on the new parts.
Happy about all the videos
Miguel
November 8, 2023
Good quality parts also incredible price
Genaro
December 3, 2023
Mad my car drive smoother
GREAT
richard
December 28, 2023
FAST DELIVERY AND QUALITY PRODUCTS !
Elmer
January 27, 2024
Everything was great about the parts!!!
Front end like new
ismael
February 28, 2024
Great price easy install front end feels much tighter..
Worth buying the A1 Auto kits
Zach
April 2, 2024
Great kit and everything replaces perfect. My 04 GMC Sierra is driving like an absolute unit again.
No complaints here
Steven
April 3, 2024
Parts match up perfectly. Even the slots on the control arms to attach ABS and brake lines are spot on.
Sway bar links are about an inch longer than the factory links.
No complaints so far, but we will see how they hold up over time.
Front suspension kit
John
August 22, 2024
Great fit and function
Great product
Emery
October 25, 2024
Fit very well and following the videos make it easier
Everything seemed to be nice quality would highly recommend and at a very reasonable price
Customer Q&A
Have a question? Ask owners.Have a question about this? Ask people who own it.
Start typing and see existing answers.
Instant Answers
Start typing and we'll see if it was already asked and answered.
If there aren't already some matches, submit a new question.
You'll get fast answers from customers who really own the item(s) and from our product experts. (About half the time you'll get an answer in under 2 hours!)
Good Topics To Ask About
Which items will best meet your needs
What customers who own an item think of it
How to use, fix, or take care of an item
Product information
General advice related to the types of products we sell
Our store policies
Customer Support
For questions about an order you have placed, please contact customer support directly.
47 Questions
Most Recent Question
Oldest Question
Most Common
Most Answers
Fewest Answers
Most Recent Answer
Oldest Answer
Customer service
877-844-3393
Monday - Friday 8:00am - 9:30pm ET Saturday - Sunday 8:00am - 4:30pm ET
Chevrolet is a registered trademark of General Motors Company. 1A Auto is not affiliated with or sponsored by Chevrolet or General Motors Company.See all trademarks.
Enter Vehicle Year Make Model
Specify your vehicle's year, make and model to guarantee fit.
Year
Make
Model
Options
Drivetrain
This part doesn’t fit a . Select from parts that fit.