
★★★★★
July 2, 2024
Great value, perfect fit, fixed the service suspension light!

Replaces







About TRQ:
TRQ is a trusted brand dedicated to making every repair a success story by combining premium parts with easy installation. Each TRQ part is engineered by a team of automotive experts to meet or exceed OEM standards, delivering enhanced performance and maximum longevity. With rigorous in-house testing, the brand ensures superior fit and function across every product line. TRQ also provides customers with best-in-class, step-by-step installation videos—so you can complete repairs with confidence, whether you're a first-time DIYer or an industry professional.
Pro Tip: Suspension system air leaks are the leading cause of compressor failure. We recommend inspecting all of your vehicle's air lines and air springs for wear or cracks to avoid premature wear and damage to the new suspension compressor pump.
Returns: Parts with electrical components cannot be returned once installed.
Attention California Customers:
 WARNING: This product can expose you to chemicals including Lead and Lead Compounds, which are known to the State of California to cause cancer, and birth defects or other reproductive harm. For more information, go to www.P65Warnings.ca.gov.
This part fits 10 vehicles spanning 2007-2014.
| Year | Make | Model | Description |
|---|---|---|---|
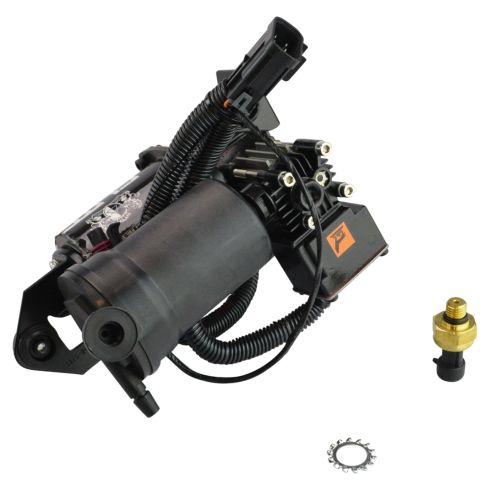
| 2007-2014 | Cadillac | Escalade | Cadillac Escalade Air Ride Suspension Compressor with Dryer TRQ PAA81073 |
| 2007-2014 | Cadillac | Escalade ESV | Cadillac Escalade ESV Air Ride Suspension Compressor with Dryer TRQ PAA81073 |
| 2007-2013 | Cadillac | Escalade EXT | Cadillac Escalade EXT Air Ride Suspension Compressor with Dryer TRQ PAA81073 |
| 2007-2013 | Chevrolet | Avalanche | Chevrolet Avalanche Air Ride Suspension Compressor with Dryer TRQ PAA81073 |
| 2007-2014 | Chevrolet | Suburban 1500 | Chevrolet Suburban 1500 Air Ride Suspension Compressor with Dryer TRQ PAA81073 |
| 2007-2013 | Chevrolet | Suburban 2500 | Chevrolet Suburban 2500 Air Ride Suspension Compressor with Dryer TRQ PAA81073 |
| 2007-2014 | Chevrolet | Tahoe | Chevrolet Tahoe Air Ride Suspension Compressor with Dryer TRQ PAA81073 |
| 2007-2014 | GMC | Yukon | GMC Yukon Air Ride Suspension Compressor with Dryer TRQ PAA81073 |
| 2007-2014 | GMC | Yukon XL 1500 | GMC Yukon XL 1500 Air Ride Suspension Compressor with Dryer TRQ PAA81073 |
| 2007-2013 | GMC | Yukon XL 2500 | GMC Yukon XL 2500 Air Ride Suspension Compressor with Dryer TRQ PAA81073 |
| Brand Label | Part Number |
|---|---|
| DIY Solutions | SHO00003 |
| Unity Automotive | 20-015104 |
| Hollander | 522-01029 |
| General Motors | 22941806 |
| General Motors | 20930288 |
This item may be interchangeable with parts from other brands with the above part numbers. This information is provided only for reference and does not guarantee that the item you are purchasing is identical to parts with part numbers from the brands listed above. To confirm that this item fits your vehicle, use the above "Check Vehicle Fit" option.
Lifetime Warranty
This item is backed by our limited lifetime warranty. In the event that this item should fail due to manufacturing defects during intended use, we will replace the part free of charge. This warranty covers the cost of the part only.
Returns: Parts with electrical components cannot be returned once installed.
FREE Shipping is standard on orders shipped to the lower 48 States (Contiguous United States). Standard shipping charges apply to Hawaii and Alaska.
Shipping is not available to a P.O. Box, APO/FPO/DPO addresses, US Territories, or Canada for this item.
Expedited is available on checkout to the United States, excluding Alaska, Hawaii.
Final shipping costs are available at checkout.
Created on:
Tools used
Brought to you by 1AAuto.com, your source for quality replacement parts and the best service on the Internet.
Hi, I'm Mike from 1A Auto. I hope this how-to video helps you out, and, please, next time you need parts for your vehicle, think of 1AAuto.com.
In this video, we're going to show you how to replace the air compressor on this 2002 Chevy Suburban with the air ride system. It's the same part and similar process on these Suburbans from 2000 to 2013. The items you'll need are a new air compressor from 1AAuto.com, 8 millimeter and 12 millimeter socket and ratchet with an extension, T25 Torx bit, Philips screwdriver, pliers, vise, hammer, wire cutters and wire strippers.
Now, your air compressor is right here and you should probably start off by removing your spare wheel. Okay, as you can see, the compressor on our vehicle is in really poor shape and this video is basically going to show you how to replace just the compressor motor, the electronic part. You're going to reuse the other compressor parts. On this vehicle we find that it just doesn't work because of the poor shape of the rest of the compressor. If your vehicle is rusty, you may want to consider, and I'd highly recommend, spending the extra money on the entire assembly that 1AAuto sells. Then, what you want to do is just pull out the clip on this hose and pull it from the compressor. Then, you want to just reset that clip by just pushing it back in. You want to loosen these two 12 millimeter nuts and the one in through this hole, and we'll just fast forward as Mike does that. Now, lift the air compressor up and then pull it forward. You want to just push the tab on this harness and pull it free and then twist this hose free from up here.
Now, you want to just pull out these clips holding this cover into place, just using a pair of pliers. You just want to hold on to the clip and just pry it out. Do the same to the other two. Then, you want to remove these three T25 Torx bolts. We'll just fast forward as Mike does this. These are some of the parts that if they break . two of mine broke off. So, they were unusable. If I wanted to just use the motor, like I said we ended up going with the whole assembly that 1AAuto sells.
Now, on the left, is the old motor; on the right, is the new one from 1A Auto. You can see they're identical and they're going to fit exactly the same. You do have to transfer a couple of things over from the new motor though as we'll show you right now. First, you want to just pull hose free. Ours is in pretty bad shape and ended up taking half the motor with it. Just empty it out and push it into place in your new motor. Then, just pull up on the tab and disconnect this harness and then pry this connection from here. It helps to use the screwdriver to just kind of pry it out. Then, you just want to just remove this Philips screw right here. It's pretty rusty, but we do the best we can with it. Now, remove the wire ties using some wire cutters. Now, you just want to pull back this cover and pull back this cover. There's a clip right here and then clip right here. Now, you can pull your wires free. Again, just pull back that cover off of each of these wires. Now, you just want to line up your wires and then clip the wire and then use your wire strippers to strip the end of the wires. Now, you're going to want to twist the ends of those wires that you just stripped and then push the matching colors into the splices: the red wire with red wire, white wire with white wire, blue wire with blue, black with black. You can now use your crimping pliers to crimp the splices. We'll fast forward as we repeat that for all four wires.
Now we have the assembly in a vice and we're going to twist the drier free. You're supposed to be able to take these T25 bolts off and remove this bracket and transfer it. Let's see how we can transfer. Transfer it onto there and then you would wrap these wires around and clip them to that bracket. As you can see, from our old motor, there is just no way where you're going to be able to get those things apart. Now, take this air filter and just put it into a vice and twist the top off and you want to do it carefully because there is a spring inside of there. Now the new air compressor comes with a kit to rebuild this so just pull the spring out, pull the gasket off, pull this screen out and this pad. You want to dump out these pebbles and then pull out the pad on the bottom and the screen that's on the bottom as well. Put the filter back into place and put the new screen down in and the pad, then the new beads, then the pad and then another screen. Now, you can take your new spring and push that into place and then take your lid, put the new gasket around the lid and twist that down into place. Now, take the new O-ring and put it on to this end here and then just twist this into your new air compressor. Then you want to just remove this front screw using your 8 millimeter socket and ratchet and just pull that free and you can put your wire from your old compressor on to it and then put the bolt back down into place.
Reconnect this harness and then you can push these pads into their proper holes and we'll show you one of them and you just push it up into place and then repeat the process with the other two and because of the condition of our old bracket, we can't really show you putting the compressor back into the bracket but you would just put it back into place and then replace those three T25 Torx bolts and then just push that harness back into the bracket. You take your harness and connect it to your new compressor. As you can tell, the whole assembly that I'm holding is a brand new unit. Like I said, the compressor in our vehicle was so bad that this was the way we had to go, and I would recommend that, if your compressor is as rusty as ours was or even close, spend the extra money and get the whole assembly. It's a matter of just three bolts and a couple of connections to remove and replace. Push this hose up into place, and then push this hose back into place as well and then you're all set
We hope this video helps you out. Brought to you by www.1AAuto.com, your source for quality replacement parts and the best service on the Internet. Please feel free to call us toll-free, 888-844-3393. We're the company that's here for you on the Internet and in person.
Tools used
Hi, I’m Mike from 1A Auto. We’ve been selling auto parts for over 30 years!
Raise and support the vehicle. The air pump for the air suspension is behind the driver's side rear tire, located on the frame. These two bolts here, you actually don't loosen them. There are little studs that will slide off. There is a bolt up here. You're going to have to go through the frame. It's 13 millimeters. Unbolt it. Once that's unbolted, we'll knock this free. It'll come backwards. We'll pull it down. Unclip from the connectors. But before we do that, we're going to follow this line up and there's actually a little pick up, probably where it picks ups air. It's up here on the filler neck with a clip. I'm going to take a prying tool and pry off the barbed clip that it's on. There it is. There it is. Slink through a couple of other things here. Fish it out of here.
Now I'm going to remove the 13 millimeter bolt that's up and through the frame, and we'll get this pump loose. Bring it down and unhook the connectors on top. Spray some rust penetrant as best I can. It's a hole through the frame. I can feel the nut. I can't see it. Spray some rust penetrant in there. I know it's on a stud, so I'm going to use a 13 millimeter deep socket and an extension in a ratchet. So it actually wasn't that tight. These are studs that go through the frame and hold onto it. I shouldn't really have to loosen them, but maybe to relieve a little bit of pressure with this rust, I'm going to spray some rust penetrant on them. Spray back here, too, to help them slide. Just give them a little loosen. They're 13 millimeter. It's coming loose. I'll grab it with both hands. Try to work it back and forth. There it is up. And up and out their slots that come right out.
It's still connected to the top, so I'm not going to let go of it. This line's actually already been disconnected. Disconnect the electrical connector. Disconnect this line here. This plastic tab off. Get this off. Pull the air pump out.
Here's our old air suspension pump we pulled from the vehicle and our brand new one from 1AAuto.com. As you can see, it doesn't come with a bracket, so we'll have to swap the bracket to our new pump. But, other than that, it is pretty much identical. It's got the same style electrical connector. Adjust it just like that. This electrical connector is the same. It will connect to the sensor up here. It comes with a sensor we will install up here.
We'll swap over this airline. Reconnect the airline that's over here in the back side of the pump. So if your air suspension isn't working, this will fix you up and get you on the road. Let's spray some rust penetrant on the backside of these bolts here. Torque bolt here and then another one in here. Get a better look at them. Have to remove this rubber protector. I'll take a trim prying tool and just pry these Christmas tree clips out of here. Pry them out. Bend the cover back. That should be enough.
So there's actually a bolt here, here, and here. Going to remove those. These are T25 Torx. Remove this first one. Stuck in there with rust. This is the side, it came out with a little bushing part. That's okay.
This airline is attached, so I'm going to slide it out of the clip. And this airline is attached here. Spread the spring clip out that's holding on. Should slide off. The spring clip is removed. The spring clip back where it was so it doesn't get lost. Pump out of here. There's our brackets separated. I need to swap this air hose for the little filter where it sucks in air. This hose here on the new pump goes through this little block right into the pump.
On this original one, it's capped off and then they used a Y fitting so that it ends up being connected from here to here. Basically, the same exact thing except I'm going to remove it from here. Actually, if it's too hard to remove from here, you can cut this off here and then just place it on the new pump. I'm going to use some hose cutters. Just cut this. Place that on the new pump. Take this elastic band off. We don't need it anymore. Place our new pump back into the original bracket. Feed this hose down like this. Fiddle with the bracket a little bit. Put this hose back into the clip. Take this other piece off.
Reinstall this screw. T25 Torx. Just going to get one started. And then line up the other one, so the way the pump is not holding on the screw. This is a rubber bushing, so I'm just going until I feel it get tight and then I will stop. The last one at the bottom. Little trickier with the rubber piece here, which I get started by hand first. Going to pull out this other clip that's in here. Give me a little more space. That's easier. Push our clips back in, our rubber protector. Go ahead and clip on this airline. Put this clamp down over it. These go into the car. Need to add this pressure sensor. It has a lock in washer, just like original, and an O-ring on there. Doesn't matter what direction you install that washer. Get it threaded by hand to get it started.
I installed the pump into the bracket first so it would be easier to hold it while I tighten it. You can use an adjustable wrench or this is 24 millimeter. I'm just going to tighten it down. Don't over tighten it because it is just going into plastic. That O-ring will seal, so as you feel it start to get tight, be able to turn more with the wrench a little bit. That feels good. Install the electrical connector into it. It connectors here. It sits like this in the car.
Now it's ready to go back up into the car. Slide these two studs back in the holes in the frame while lining this one up. I'll reach in from the back side of the frame and put in this 13 millimeter nut and we'll reconnect the lines. Going to be all set. Slides up here. Slide forward to lock it in. Using a 13 millimeter deep socket and extension, reach up into the frame. And tighten it.
Feel like it's tight. I'll stop. Place our air inlet tube back up onto the filler neck where it came from. Clip it back into place. Reconnect the airlines and the electrical connection on top. And the pump is replaced.
Thanks for watching. Visit us at 1AAuto.com for quality auto parts, fast and free shipping, and the best customer service in the industry.
Great value, perfect fit, fixed the service suspension light!
Worked like a charm thank you.
It was easy to install so far its working great and at a reasonable price considering the Oem from the dealer I priced for 700.00 a month ago . Thanks
The prices through 1A Auto were a significant savings in contrast to the repair facility estimate. I have recommended 1A Auto to several of my friends. A real blessing in these difficult economic times. I saved at least fifteen hundred dollars on my last purchase. Thumbs up 1A Auto!!!
Bought this pump at a great price and it works just like new. I would recommend 1aauto.com to all my friends. Before going anywhere else. Thanks 1 aauto

PAA81073
