Replaces
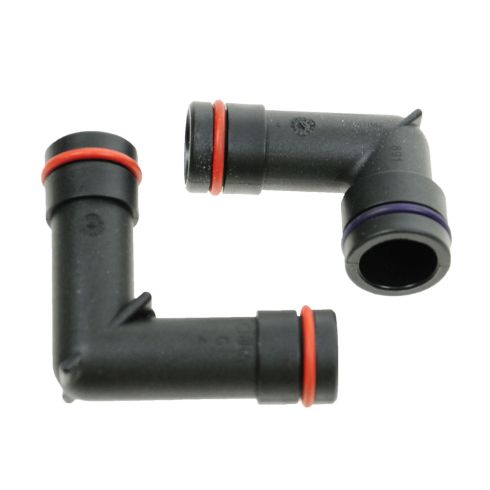
Part Details
Specifications
Attention California Customers:
 WARNING: This product can expose you to chemicals including Lead and Lead Compounds, which are known to the State of California to cause cancer, and birth defects or other reproductive harm. For more information, go to www.P65Warnings.ca.gov.
Lifetime Warranty
This item is backed by our limited lifetime warranty. In the event this item should fail due to manufacturing defects during intended use, we will replace the part free of charge. This warranty covers the cost of the part only.
This item ships directly from supplier.
FREE Shipping is standard on Orders shipped to the lower 48 States (Contiguous United States). Standard shipping charges apply to Hawaii, Alaska and US Territories. Shipping is not available to Canada.
Expedited is available on checkout to the United States, excluding Alaska, Hawaii and US Territories as well as P.O. Boxes and APO/FPO/DPO addresses. Final shipping costs are available at checkout.
Created on:
Tools used
Brought to you by 1AAuto.com your source for quality replacement parts and the best service on the internet.
Hi I'm Mike Green; I'm one of the owners of 1A Auto. I want to help you save time and money repairing and maintaining your vehicle. I'm going to use my 20 plus years experience restoring and repairing cars and trucks like this to show you the correct way to install parts from 1AAuto.com. The right parts installed correctly, that's going to save you time and money. Thank you and enjoy the video.
In this video we're going to show you how to replace the plastic coolant elbows. This is a 2002 Impala, 3.8 liter motor. This is the engine, the 3800 series engine that is in a whole bunch of different GM vehicles and when these things start to crack they just slowly drip coolant onto the engine and it evaporates so you have a leak and you loose coolant but it doesn't ever appear that you're leaking anywhere. Tools you'll need are 8, 10, 13, and 15 mm sockets with a ratchet and extension. You'll need a bent tip awl or a pick and that's to just kind of pull the broken pieces of the elbow out of either the intake manifold or the serpentine belt tensioner and then some extra coolant and a funnel and as well as a catch pan.
The one place you want to check for leaking fluid is this tube right here. It's a little elbow that comes from the intake manifold and goes into the belt tensioner. Disconnect your negative battery cables. Start out by removing the two 13 mm bolts that hold the strut brace on the passenger's side. Now there are two 10 mm nuts that hold the top of your coolant tank and then once you have those out you lift the tank up and you can actually just leave it connected and just lay it on the front of the engine. Just make sure you don't spill any coolant out of it.
Remove the 15 mm nut on top of the alternator. Untwist the oil fill tube, take this off and then loosen a 10 mm bolt right back here just on the other end of the brace. Then down here there are two bolts. You can see one 15 mm bolt right there and then there's one down lower as well. I'm sure I can really get the camera on it. From this angle here you can just see the head right here. Then there's also a bolt right down in here which I can't really film but it's just kind of down below and behind the alternator. Use a 15 mm socket with a ratchet and extension, this little one first.
Just going to fast forward here as we remove the three bolts that hold that tensioner in place. You can see that the whole when we remove ok you've got two connections, you've got that one up here you can see and then there's one down into the block right there. You need to kind of lift this up and out. See then there's our problem. You reach in and pull out the O ring that's in the manifold and this one is kind of broken here that in our tensioner I believe. The top elbow is broken both on the manifold side and the belt tensioner side so carefully you want to use the bent tipped awl and remove all the pieces of the elbow from both of the manifold and the tensioner. Luckily the bottom elbow came right out of both the engine and the tensioner with no problems.
Going to use our new lower elbow and just put a little bit of penetrating oil on it just to make sure that the O ring can go in there without catching. Just put it in, inserting with kind of a twist and it's all right there. Take my elbow and screw it into the intake manifold. I've got penetrating oil on both sides; little twist, goes right in nicely. Make sure both ends and the elbows are coated. Here I have my bolts in the bracket and I've guided it on to the elbows. Basically I'm using that flashlight looking in behind and that way I can see the upper bolt, I can see as it comes through the belt tensioner and look it right into the head and start it with my fingers.
Here I'm just going to fast forward, I'm going to put in my other two bolts and then just kind of snug tighten with the ratchet and socket and then I'll just show you everything as it's put together before we tighten it up. Now I've got that elbow in place, it's a little hard to see but it's the elbow down there in place and I've got my three bolts started. Now I'm just going to use the socket and ratchet to tighten those up and they should be torched up to anywhere between 25 and 30 foot pounds of torch. We're going to follow the serpentine belt diagram so we're going to put a loop down around the crank here and then around the AC pulley. Get it around our power string pump and up and over. The only thing we won't put on at first in the alternator. Take a loop and put it down around the crank pulley, continue it down around the AC pulley; it comes up from the crank pulley, goes around our water pump, around our tensioner and down around our steering pulley. Almost got it preliminarily routed, a little off here on our AC pulley, on the crank pulley directly and now on the power steering pulley correctly; I guess we'll just have to go up onto the alternator. If you don't have a long ratchet, what you can always do, put that 15 mm socket on there, put a nice big pipe right here that gives you a lot of extra leverage. That came off my power steering pulley. Pull that tight.
I do apologize here, you use the pipe and the ratchet to turn the belt tensioner counter clockwise and then put the belt up and around to the alternator. The belt is on my AC compressor correctly, down and around the crank correctly, power steering pump up and around. Just going to kind of speed through here, one of the last steps which is putting that coolant bottle back in place and then using the 13 mm nuts to hold down the brace and the 10 mm nuts to fasten the coolant bottle on. Now you want to fill the radiator directly on this Impala. It originally uses the Red Dex cool but it's already been changed over to the green so I'm just using the regular green antifreeze. You want to fill the radiator directly and then start it up, run it and check the fluid and just fill it the rest of the way through the overfill bottle. For the first few times you drive it just pay attention to it and make sure you keep the right amount of fluid in it.
Reconnect your negative battery cable. You can see engine is running, nothing dripping from there, I do see a little steam, that's just kind of the stuff burning off that spilled on the engine and stuff. No drips underneath, couple little residue in one spot, again from what spilled on the body and whatnot.
We hope this helps you out, brought to you by www.1AAuto.com your source for quality replacement parts and the best service on the internet. Please feel free to call us toll free 888-844-3393. We're the company that's here for you on the internet and in person.
Tools used
Brought to you by 1AAuto.com, your source for quality replacement parts and the best service on the Internet.
Hi, I'm Don from 1A Auto. I hope this how-to video helps you out, and next time you need parts for your vehicle, think of 1AAuto.com. Thanks.
In this video we're going to show you how to replace the coolant elbow that comes out of the serpentine belt tensioner and goes into the cylinder head. It's going to be basically the same operation for a 97-99 LeSabre with a 3.8 liter engine. The items you're going to need are a new belt tensioner coolant elbow from 1A Auto, 10, 13 and 15mm sockets and socket wrench, pry bar, 8 mm wrench, a hook tool and a coolant drain pain.
I'm using an 8mm wrench to remove the negative terminal on the battery, pushing it off to the side. The belt tensioner pulley is right below the alternator. The alternator being here, here being the belt tensioner. I'm going to use a 15mm socket and socket wrench to loosen up the tension on the belt. Once I've got that, slide it off the alternator pulley and the rest of the pulleys. Here I'm pointing out the nuts and bolts that hold in the alternator that we're going to remove. Those are 13 mm. There are three of them and then on the back side of the alternator there's a 10 mm bolt that holds there the bracket to the alternator.
I'm removing the 13 mm nuts that hold the alternator to the engine. I'm going to fast forward the video while I remove those three nuts and bolts that hold the alternator in. Underneath the coils there's another nut that holds this bracket into place and we need to remove that nut so that we can access the nut and stud right here. Once you get that nut loose you can either let the bar hang, kind of keep it out of your way or you can completely remove it. On the back side of the alternator I'm going to remove this 13mm nut. The harness that goes to it, I'm just going to rest it out of the way. Remove the 13mm nut here. Now we're going to remove the 10mm nut on the back side. We can go ahead and lift out your alternator and on the back side you'll see a clip with the wire harness. Disconnect that. Pull your alternator out.
Under the front spoiler you're going to find the splash pan and several 10mm bolts that hold the splash pan in and remove a few of those, like three or four of them to get access to the underside of the radiator where the coolant drain is. I'm going to fast forward as I remove those. Once you have the 10mm bolts down and you can gain access. If you feel like you need further access there's a couple 7 mm screws that are held here and just by removing these and getting it totally out of the way it might benefit you in that the coolant doesn't get splashed against the pan before it gets into your container. Here I'm feeling around for the plastic drain plug. You're going to want to turn it. You can use a pair of pliers if you need too. When the coolant comes out it's going to come out that hole at the bottom of the radiator where we're looking and you're going to want a coolant catch pan or something to catch the coolant as it's coming out. I'm going to go ahead and fast forward while I drain the coolant out. With our coolant drained out we can go ahead and put the splash pan back in place and secure it with the 10 and 7 mm screws we took out.
On the tensioner, there are two 8mm screws that hold the coolant pipes in. We're going to remove those two 8mm screws. Wiggle your pipe back and forth, pulling it up at the same time and pull it out and set it aside. Do the same for the bottom and the other hose. I need to use something for leverage to kind of free it up. Once you get the pipe free and out go ahead and rest it to the side and make sure that you've got a drain pain underneath to catch any leftover coolant. The two 13 mm bolts, one is down here and the other is back behind here. Here I'm pointing out the coolant pipe that goes into the block. This is actually part of the casting of the tensioner so we've got to work that free. Using a screwdriver in between the tensioner and the block, just work it free. As you pull the tensioner out you'll see how the coolant flows through the tensioner casting through the elbow on the right hand side and down through the bottom. In this case you can see that the elbow is cracked and still a portion of it is inside the head so we're going to have to get that out with a hook tool.
It's tough to see but down inside of here you can see where the elbow broke inside. I'm going to use a small hook tool to pull it out. There's the O ring. The hook tool wasn't enough to get the broken piece from coming out. It's kind of seized in there, seated. I'm going to use a small flat blade screwdriver and a little hammer and give it a little tap to try and free it up. Then we go back in with the pick tool and pull that out. This was just an FYI, you may or may not experience this issue with the elbow.
If you find that your tensioner is fine but it's just your elbow that you need to replace; because, the seals have gone bad or it's cracked we can do that. 1A Auto stocks a new elbow. It's just as simple as pulling it out and putting a new piece in. Here's the old part and the new part from 1A Auto. The new part comes with a new elbow and for the sake of this video we're going to show you the installation with the new part, but if you're just doing the elbow by itself it's the same.
I want to make sure that the surfaces where my seals are going to be sitting is clean, so run your finger inside and make sure that that's okay as well as in here with this elbow. On your new tensioner you're going to want to make sure that your gasket is on and you've got your elbow with the two gaskets. You can go ahead and put in one side of the elbow, seat that and go ahead and put the tensioner back inside, in place. Line everything up and press in. In here, I'm going to reinstall the first of the two 13mm bolts that hold the tensioner in place. I'm going to go ahead and fast forward while I reinstall and tighten up those 13mm bolts.I 'm going to reinstall the other 13mm that goes on the bottom right underneath the tensioner here. Now I'm going to replace the seal on the end of the top hose and on the bottom hose. I'm just going to use a pick tool to pick them out. Here, I'm using a small pocket flathead screwdriver to run it through the groove on the pipe so that the seal sits nice and flush. Fit your new seal on the other side. Press it in. Reinstall the 8mm bolts that hold the coolant pipes to the tensioner. I'm going to go ahead and fast forward while I reinstall those bolts. I'm reinstalling the alternator. Go ahead and start your bolts. I'm going to put the cable on the back, secure that. Reinstall the 10mm on the back side of the alternator. Reinstall your bracket. We took it off and secure it. We left it hanging. Then plug your harness back in back on the back side of the alternator.
Before you get to putting the belt back on here's just a quick look at the belt diagram. If your belt has fallen off the pulleys, this will just help you get it back on their correctly. Line your belt back up on the pulleys, put it over the alternator. Leave it off of the idler pulley and then proceed to pull up and snake the belt back onto the idler pulley. Here you see the belt up over the alternator, tensioner pulley, water pump, crank, AC compressor and power steering pump. Remove your radiator cap. Refill your coolant. Reconnect the battery.
We hope this helps you out. Brought to you by www.1AAuto.com, your source for quality replacement parts and the best service on the Internet. Please feel free to call us toll-free, 888-844-3393. We're the company that's here for you on the Internet and in person.

47065