About TRQ: TRQ is a trusted brand dedicated to making every repair a success story by combining premium parts with easy installation. Each TRQ part is engineered by a team of automotive experts to meet or exceed OEM standards, delivering enhanced performance and maximum longevity. With rigorous in-house testing, the brand ensures superior fit and function across every product line. TRQ also provides customers with best-in-class, step-by-step installation videos—so you can complete repairs with confidence, whether you're a first-time DIYer or an industry professional.
Product Features
100% New: Manufactured to tighter tolerances for extended service life
Upgraded Elastomer: Premium seals to extended service life
Moly Greased: Specifically-designed grease shield to reduce premature wear
Restored Performance: Refreshed steering system for improved road-feel
Description
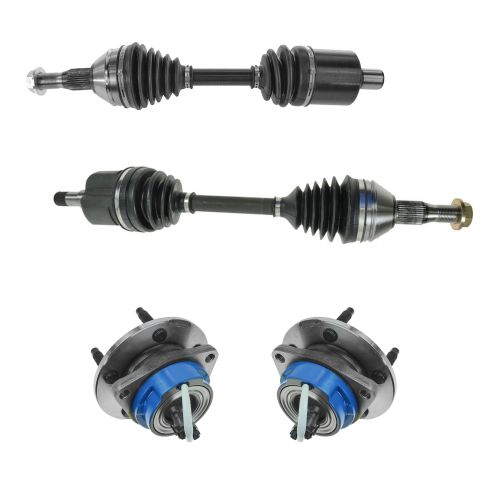
TRQ drivetrain kits are manufactured using premium raw materials to restore original performance. Each TRQ drivetrain component is designed to be a direct, maintenance-free replacement to the stock unit. To extend the service life of your drivetrain, TRQ recommends replacing wheel hubs, bearings, and constant velocity (CV) drive axles at the same time to ensure even wear of components and improved ride comfort. All products are fit and road-tested in our Massachusetts R&D facility to ensure we deliver on our promise of Trusted Reliable Quality.
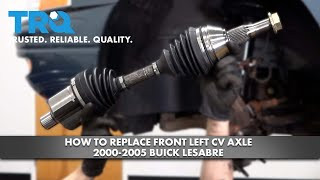
CV axles are designed to transmit the power from your vehicle's drivetrain to the wheels while being able to flex and pivot to the demands of the steering and suspension systems. If your vehicle is making clicking noises at lower speeds or when making turns, it may be time to replace your CV axles with our 100% brand new assemblies.
Our steering and suspension components are pre-greased and sealed for long life and do not require the extra maintenance typically required by greaseable versions.
Attention California Customers:
WARNING: This product can expose you to chemicals including Lead and Lead Compounds, which are known to the State of California to cause cancer, and birth defects or other reproductive harm. For more information, go to www.P65Warnings.ca.gov.
This part fits
9 vehicles spanning 1997-2008.
Fits these Makes
Select vehicle
Year
Make
Model
Description
2000-2005
Buick
LeSabre
Buick LeSabre Front 4 Piece Drivetrain Kit TRQ CSA78361
Pontiac Bonneville SE Front 4 Piece Drivetrain Kit TRQ CSA78361
2000-2005
Pontiac
Bonneville
Pontiac Bonneville SLE Front 4 Piece Drivetrain Kit TRQ CSA78361
Part Interchange
Brand Label
Part Number
MOOG Hub Assemblies
513179
Timken
513179
ACDelco
FW128
ACDelco
FW116
Delphi
12413068
ACDelco
FW293
ACDelco
FW293MX
Delphi
7467564
General Motors
20859674
General Motors
26054579
General Motors
26073371
Buick
26063202
Pontiac
26073384
General Motors
26073390
Buick
88965659
General Motors
12429203
General Motors
26073384
General Motors
26073395
Buick
20859674
SKF
BR930149
General Motors
26073387
Buick
10399690
Pontiac
26054579
Buick
26054529
Chevrolet
88965659
Oldsmobile
26073386
General Motors
26073399
General Motors
26063202
Buick
26063203
Oldsmobile
26054707
Chicago Rawhide
BR930548K
General Motors
10399690
Buick
10399689
General Motors
10399689
Oldsmobile
26073399
General Motors
26054529
Pontiac
26073395
Raybestos Brakes
713199
Buick
26073391
General Motors
88964168
Pontiac
26054707
SKF
BAR-5124
Buick
26073386
Oldsmobile
26073802
SKF
BR854
Buick
26073399
General Motors
26073802
General Motors
26054566
SKF
BR930548K
General Motors
26063203
General Motors
26073386
General Motors
12413035
General Motors
26073398
General Motors
26073391
General Motors
12429205
Buick
26073395
Pontiac
26073399
Chevrolet
20859642
Chevrolet
26073386
Buick
26073390
Oldsmobile
26073371
Pontiac
26073387
Buick
26054707
Buick
88965657
Chicago Rawhide
BR930149
Buick
26073387
General Motors
26054707
Buick
26073398
General Motors
88965657
Buick
20859673
General Motors
20859673
GMB
730-0055
Pontiac
26073386
Buick
26073384
General Motors
26063207
Chevrolet
26054579
Pontiac
88965657
Mevotech
H513179
Drive Tech America
NT513179
GSP
NCV10028
Raybestos Brakes
713179
General Motors
88965659
GSP
NCV10235
Buick
26054566
Pontiac
88965659
Chevrolet
26073399
General Motors
88964968
Buick
26054579
Oldsmobile
26054579
Buick
26063207
Pontiac
26073398
MOOG Hub Assemblies
513187
General Motors
10434253
GMB
725-0216
Mevotech
H513187
Timken
513187
ACDelco
FW157
General Motors
89047684
ACDelco
89047684
General Motors
10305030
Delphi
12411320
General Motors
89047802
Delphi
7467657
Drive Tech America
NT513187
Raybestos Brakes
713187
General Motors
88955477
Autopart International
1411-259919
Timken
513121
CARDONE
661335
CARDONE New
66-1255
CARDONE New
66-1335
CARDONE
66-1255
CARDONE
661255
Hollander
447-02512L
Hollander
538-01680B
Hollander
538-01663
Hollander
538-01569
ODM
GC-8-8661
ODM
GC-8-8674
OEM Part Number
20859642
TrakMotive
GM8045
Mevotech Supreme
H513179
Mevotech Supreme
H513187
This item may be interchangeable with parts from other brands with the above part numbers.
This information is provided only for reference and does not guarantee that the item you are
purchasing is identical to parts with part numbers from the brands listed above.
To confirm that this item fits your vehicle, use the above "Check Vehicle Fit" option.
Lifetime Warranty
This item is backed by our limited lifetime warranty. In the event that this item should fail due to manufacturing defects during intended use, we will replace the part free of charge. This warranty covers the cost of the part only.
FREE Shipping is standard on orders shipped to the lower 48 States (Contiguous United States). Standard shipping charges apply to Hawaii and Alaska.
Shipping is not available to a P.O. Box, APO/FPO/DPO addresses, US Territories, or Canada for this item.
Expedited is available on checkout to the United States, excluding Alaska, Hawaii.
Final shipping costs are available at checkout.
How to Replace CV Axle Shaft 2000-07 Chevy Monte Carlo
Created on:
Tools used
21mm Socket
35mm Socket
A Piece of Pipe (for leverage)
Hammer
Torque Wrench
Pry Bar
Jack Stands
19mm Socket
Drain Pan
Transmission Fluid
Ratchet
Floor Jack
1. Removing the Wheel
Loosen the lug nut covers with a 19mm socket
Pry off the center cap with a flat blade screwdriver
Loosen the 35mm nut but don't remove it
Loosen the lug nuts with the vehicle on the ground
Raise the vehicle with a floor jack
Secure the vehicle on jack stands
Remove the lug nuts
Pull off the wheel
2. Removing the Axle
Remove the hub nut
Hit the axle with a hammer
Remove the two 21mm bolts at the bottom of the strut with a piece of pipe for leverage
Hammer the bolts out
Place a drip pan underneath the axle
Pry from the back of the axle with a pry bar and hammer
Hammer the axle again to loosen it
Pull the wheel knuckle forward
Pull the axle free and move it to the side
Hit the axle out of the wheel knuckle with a hammer
Pull the axle up and out
3. Installing the Axle
Push the axle into place
Push the wheel knuckle onto the axle and push the axle into place
Place the wheel knuckle into the strut and replace the two 21mm bolts
Torque the 21mm strut bolts to 130 foot-pounds
Replace the hub nut
4. Reattaching the Wheel
Slide the wheel into place
Start the lug nuts by hand
Tighten the lug nuts preliminarily
Lower the vehicle to the ground
Tighten the hub nut
Torque the hub nut to 159 foot-pounds
Torque the lug nuts to 100 foot-pounds in a crossing or star pattern
Reattach the center cap
Tighten the lug nut covers with a 19mm socket
5. Checking the Oil
Start the car to warm up the transmission
Pull out the dipstick
Wipe the dipstick clean
Recheck the dipstick
Replace the amount of oil you need
Check the dipstick again
Brought to you by 1AAuto.com, your source for quality replacement parts and the best service on the Internet.
Hi, I'm Mike from 1A Auto. I hope this how-to video helps you out, and next time you need parts for your vehicle, think of 1AAuto.com. Thanks.
In this video, we're going to show you how to replace a front axle on this 2003 Chevy Monte Carlo. We show you on the passenger side, but the driver's side is the same procedure. The items you'll need for this is a new front axle from 1AAuto.com, a 19mm, 21mm, and 35mm socket and ratchet, a pry bar, a drip pan, a torque wrench, jack and jack stands, and a hammer.
Start off by just loosening up these lug nut caps. Then just pull your hubcap free. Now, you want to loosen up this 35mm hub nut. You can see we use a piece of pipe for some extra leverage to help break it free. You want to do this while the vehicle's on the ground. Then we're just going to use air-powered tools to get it off the rest of the way. You don't want to remove it entirely, though. You want to just keep it just a few threads on still. Just like that. Now you can remove your lug nuts. If you don't have air-powered tools, you want to loosen these up while the vehicle's on the ground, then raise the vehicle, and remove them the rest of the way. If you do have air-powered tools, you can just remove them right here. Now you can just pull your wheel off.
Remove that hub nut, and then just hit in the axle with a hammer. Then remove these two 21mm bolts at the bottom of your strut. You can see he's using a piece of pipe for some extra leverage here. We'll just fast-forward as he removes those the rest of the way. Now just hammer the bolts out. Then pry from the back of the axle using a pry bar and your hammer. You do want to make sure you have a drip pan underneath it, because it will leak. Then hammer again on the axle to loosen it up. Then pull the wheel knuckle forward, pull your axle free, and then tuck it off to the side.
After you do that, just start hitting the axle out of the wheel knuckle with a hammer. Now you can angle the axle up and out. Up front is the old axle; behind it is the new one from 1A Auto. You can see they're identical, and they'll fit exactly the same.
Put your new axle into place and tuck the back end of it back into that corner, so that you can angle the front down into the wheel knuckle. Then just push the wheel knuckle back onto the axle, and then feed the other end of the axle back into place. You kind of shake the axle up and down and turn it a little bit until it goes into the transmission.
Now push your wheel knuckle back into the strut and replace those two bolts. Twist the nuts back into place, and then tighten them up. Then torque both of these bolts to 130 foot-pounds. Replace your hub nut. Then replace your wheel and each of the lug nuts. You want to just tighten them preliminarily, and then lower the vehicle and tighten them the rest of the way. Then tighten up the hub nut. Now torque the hub nut to 159 foot pounds. Then torque these lug nuts to 100 foot-pounds in a crossing pattern. Replace your hubcap and tighten up those lug nut caps. Then you're all set.
Now start your car to warm up the transmission. Pull out the dip stick, wipe it clean, replace it, and pull it out again to check it. You can see we're a little low, so we're just going to replace the amount we need, and then replace our dip stick. It's a good idea to check it one more time.
We hope this video helps you out. Brought to you by www.1AAuto.com, your source for quality replacement parts and the best service on the Internet. Please feel free to call us toll-free, 888-844-3393. We're the company that's here for you on the Internet and in person.
Product Reviews
4.7/ 5
★★★★★★★★★★
6 reviews
5★
83%
4★
0%
3★
17%
2★
0%
1★
0%
★★★★★February 29, 2024
2004 Lesabre cv axle/hub replacement
Quality parts, quick service, FREE shipping, excellent videos, easy installation, what's not to love? Car drives like new. 1A is a "go to" for me!
★★★★★July 10, 2023
Everything fit great
★★★★★June 29, 2023
hub
Had 1 of the hub sensor went bad. an required new hub
★★★★★July 15, 2021
????????????????????????????????
Love the parts and customer service wish they had one where I live, I love how helpful they are and willing to go the extra mile, I have nothing bad to say about A1 auto parts
★★★★★June 9, 2021
Great Parts
Everything looks and fits exactly like they said.Very Fast Delivery I recommend anybody who needs parts there car to check out 1AAuto
★★★★★January 22, 2020
Fit perfectly, works great
Great fit, good price. Cant ask for much more than that.
Showing 1–6 of 6 reviews
CSA78361
In Stock
Customer Q&A
Got a question about this part? Post it and get answers from our team.
No questions have been answered for this product yet.
Customer service
877-844-3393
Monday - Friday 8:00am - 9:30pm ET Saturday - Sunday 8:00am - 4:30pm ET
Ask a Question
Check Your Email
We sent a verification email to .
Click the Verify Email button in the email to submit your question.
This extra step helps prevent spam.
Select Your Vehicle
Specify your vehicle's year, make and model to guarantee fit.










 WARNING: This product can expose you to chemicals including Lead and Lead Compounds, which are known to the State of California to cause cancer, and birth defects or other reproductive harm. For more information, go to www.P65Warnings.ca.gov.