

★★★★★
October 26, 2023
Ok for the price but not perfect
The bend was not quite right but I made it work.

Replaces



About TRQ:
TRQ is a trusted brand dedicated to making every repair a success story by combining premium parts with easy installation. Each TRQ part is engineered by a team of automotive experts to meet or exceed OEM standards, delivering enhanced performance and maximum longevity. With rigorous in-house testing, the brand ensures superior fit and function across every product line. TRQ also provides customers with best-in-class, step-by-step installation videos—so you can complete repairs with confidence, whether you're a first-time DIYer or an industry professional.
Attention California Customers:
 WARNING: This product can expose you to chemicals including Chromium (Hexavalent Compounds), which is known to the State of California to cause cancer, and birth defects or other reproductive harm. For more information, go to www.P65Warnings.ca.gov
This part fits 10 vehicles spanning 1985-1997.
| Year | Make | Model | Description |
|---|---|---|---|
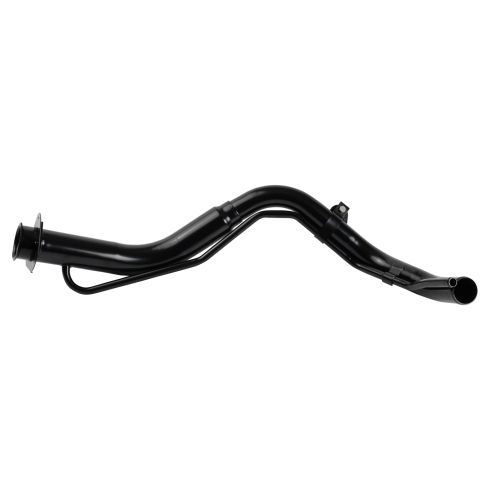
| 1985-1990 | Buick | Electra | Buick Electra Front Wheel Drive with Screw Type Gas Cap Fuel Tank Filler Neck TRQ FNA69469 |
| 1986-1989 | Buick | LeSabre | Buick LeSabre Front Wheel Drive with Screw Type Gas Cap Fuel Tank Filler Neck TRQ FNA69469 |
| 1990-1997 | Buick | LeSabre | Buick LeSabre with Screw Type Gas Cap Fuel Tank Filler Neck TRQ FNA69469 |
| 1991-1996 | Buick | Park Avenue | Buick Park Avenue with Screw Type Gas Cap Fuel Tank Filler Neck TRQ FNA69469 |
| 1986-1993 | Cadillac | Deville | Cadillac Deville Front Wheel Drive with Screw Type Gas Cap Fuel Tank Filler Neck TRQ FNA69469 |
| 1987-1992 | Cadillac | Fleetwood | Cadillac Fleetwood Front Wheel Drive with Screw Type Gas Cap Fuel Tank Filler Neck TRQ FNA69469 |
| 1992-1995 | Oldsmobile | 88 | Olds 88 with Screw Type Gas Cap Fuel Tank Filler Neck TRQ FNA69469 |
| 1985-1996 | Oldsmobile | 98 | Olds 98 Front Wheel Drive with Screw Type Gas Cap Fuel Tank Filler Neck TRQ FNA69469 |
| 1987-1995 | Pontiac | Bonneville | Pontiac Bonneville with Screw Type Gas Cap Fuel Tank Filler Neck TRQ FNA69469 |
| 1996-1997 | Pontiac | Bonneville | Pontiac Bonneville V6 3.8L Supercharged with Screw Type Gas Cap Fuel Tank Filler Neck TRQ FNA69469 |
| Brand Label | Part Number |
|---|---|
| Dorman - OE Solutions | 577-916 |
| Spectra Premium | FN601 |
| DIY Solutions | TAN00430 |
| General Motors | 25619420 |
| General Motors | 22519390 |
This item may be interchangeable with parts from other brands with the above part numbers. This information is provided only for reference and does not guarantee that the item you are purchasing is identical to parts with part numbers from the brands listed above. To confirm that this item fits your vehicle, use the above "Check Vehicle Fit" option.
Lifetime Warranty
This item is backed by our limited lifetime warranty. In the event that this item should fail due to manufacturing defects during intended use, we will replace the part free of charge. This warranty covers the cost of the part only.
FREE Shipping is standard on orders shipped to the lower 48 States (Contiguous United States). Standard shipping charges apply to Hawaii and Alaska.
Shipping is not available to a P.O. Box, APO/FPO/DPO addresses, US Territories, or Canada for this item.
Expedited is available on checkout to the United States, excluding Alaska, Hawaii.
Final shipping costs are available at checkout.


Created on:
Tools used
Brought to you by 1AAuto.com, your source for quality replacement parts and the best service on the Internet.
Hi, I'm Don from 1A Auto. I hope this how-to video helps you out, and the next time you need a part for your vehicle, think of 1AAuto.com. Thanks.
In this video, we are going to show you how to replace a fuel filler neck on this '97 Buick Lesabre. This filler neck tends to rot out. It happens in a whole lot of cars. They start getting pin holes and you start getting a check engine light that is throwing a code that says there is a leak in your emission system. Again, we are doing this in the Lesabre. This procedure is the same for many GM cars: Lesabre, Bonneville, Olds 88, Cadillac, and a whole bunch of different cars. You'll need a new filler neck from 1AAuto.com. There are two types, there is one where the cap screws in probably 2 or 3 turns, and then there is a style where the cap kind of just inserts and screws in a quarter turn. Just make sure you order the correct style. Then you'll need jack and jack stands, a lug wrench or 19mm socket with a ratchet to remove your lug nuts, 5/16, 7mm and 11mm sockets and ratchet with extension, penetrating oil, large flat blade screwdriver, and then since we had issues with one of the bolts, we also have to use a cold chisel and we also need an extra large bolt, nut and washer.
Start by raising up the vehicle. Remove the driver's wheel by removing the center cap. If you don't have air tools, you want to loosen the lug nuts while the vehicle is on the ground, then raise and support the vehicle, remove the lug nuts, wheel, and tire.
Up underneath the vehicle kind of behind the rear tire, you might want to put some penetrating oil in this screw here that can be pretty rusty. There is a bolt that holds the bracket, you want to spray penetrating fluid on it and then specially in the little hole or crack at the behind to try and get the back of the bolt. Open fuel door and remove the gas cap. You see three 7mm screws that need to be taken out. Here we'll use a 7mm socket with a ratchet and extension to remove those bolts, as well as you pull if your gas cap still has the little lanyard, pull that free, and this loosens up the top of the filler neck. Okay, up underneath you'll find a bolt that holds the bracket that is on the filler neck to the vehicle. Ours is way too rusted and will not come out. Hopefully you won't have that problem, and if you do run to that problem, you can do what we did, which is grab hold of the filler neck and the bracket that was so badly rusted and pull the filler neck down and around and break it, basically just break the whole bracket.
Using a 5/16 socket, you can either use that or a flat head screwdriver, remove your clamps, and we'll just fast-forward as we remove those clamps. This may have been replaced on our car, they came off really easily. If yours are bad, you can always cut them with wire cutters or some type of grinding wheel or something like that, and then just replace them with regular stainless steel clamps. I'm using a long flat head screwdriver to separate the hose from the filler neck.
Okay, this is probably the most difficult part of the whole process getting the hoses separated from the filler neck. You basically work the screwdriver in there and try and get some separation. What you want to work towards is to be able to twist the hoses. Once you are able to kind of twist the hoses, you can pull them off the filler neck, and you can see we, actually, two of us get in there, one pulls on the filler neck while the other pulls on the hose. Generally it is easier to get the smaller hose off first and then work on the large hose. Remove the 7mm screw, and this one here, and we'll just fast-forward here as we take those two screws out that hold the fender trimming. Fender wheel out; twist it out. Here, like I said, that bolt that held the bracket for the filler neck didn't come out, we are just using a cold chisel and a hammer and sheering it off. Doing a little bit of damage to the body but we'll show you how we'll overcome that a little bit later.
Old part, new part from 1AAuto is exactly the same. Put your new pipe up and get that kind of situated in there. Get your hoses started. Just make sure you have the clamps on the hoses, and then just work the new neck into the hoses. It usually works and fairly easy to do. Okay, so you remember that the mounting bracket and the body was pretty rusted or the clip and the bolt were really rusted. What we did is we took a large washer and a carriage bolt, and we are going to put those up into the hole so that they can't pull straight down and out. Then put the filler neck up in there and start a washer and nut on. You want to use a bolt that is long enough that you can kind of hold it with your thumb as you are putting the washer and nut on. Then just kind of hold it to the side and thread the nut on and as it gets in further, we actually use the carriage bolt.
It kind of bit down into the washer, and it was able to hold its place as we tighten it up. Retighten the hose clamps, and we'll fast-forward again as we do that. Just make sure the hoses are on there all the way. Push them on there, and make sure the clamps are tightening the hose to the filler neck securely. Place your gas cap over your filler neck, and then align the bottom which the screw goes through the bottom screw hole. As you can see for those three screws, you just kind of use your socket ratchet and extension to get the screw going. Reach in behind, move it around a little bit, the screw goes into the hole, and then tighten those up. When you put your splash shield back in place, notice that you got a little cap here that goes up inside and it clips in. Again, we'll fast-forward here, start those screws in, and then tighten them up. Sometimes the one in the rear is a little difficult. You just kind of have to put the screw through the liner, look in the back, make sure it is going in the correct spot, and tighten.
Reinstall your wheel and tire, lug nuts. Put them on preliminary, then lower the tire of the vehicle back down on the ground and tighten the lug nuts to a 100 foot-pounds. Replace your center cap.
We hope this video helps you out. Brought to you by www.1AAuto.com, your source for quality replacement parts and the best service on the Internet. Please feel free to call us toll-free, 888-844-3393. We're the company that's here for you on the Internet and in person.
The bend was not quite right but I made it work.
The part fit in the car but not exactly. The bends in the filler neck where off so the pipes hit in several places. Also the trim to cover the filler tube would not fit back on , so it worked but not without fabrication

FNA69469
