About TRQ: TRQ is a trusted brand dedicated to making every repair a success story by combining premium parts with easy installation. Each TRQ part is engineered by a team of automotive experts to meet or exceed OEM standards, delivering enhanced performance and maximum longevity. With rigorous in-house testing, the brand ensures superior fit and function across every product line. TRQ also provides customers with best-in-class, step-by-step installation videos—so you can complete repairs with confidence, whether you're a first-time DIYer or an industry professional.
Attention California Customers:
WARNING: This product can expose you to chemicals including Lead and Lead Compounds, which are known to the State of California to cause cancer, and birth defects or other reproductive harm. For more information, go to www.P65Warnings.ca.gov.
This part fits
4 vehicles spanning 2002-2008.
Fits these Makes
Select vehicle
Year
Make
Model
Description
2002-2005
Audi
A4
Audi A4 L4 1.8L Turbo Accessory Drive Belt Tensioner Assembly TRQ BPA06042
2005-2008
Audi
A4
Audi A4 L4 2.0L Turbo Accessory Drive Belt Tensioner Assembly TRQ BPA06042
2002-2005
Audi
A4 Quattro
Audi A4 Quattro L4 1.8L Turbo Accessory Drive Belt Tensioner Assembly TRQ BPA06042
2005-2008
Audi
A4 Quattro
Audi A4 Quattro L4 2.0L Turbo Accessory Drive Belt Tensioner Assembly TRQ BPA06042
Part Interchange
Brand Label
Part Number
DIY Solutions
BEP00077
NAPA Belts/Hose
38207
Tendeco
999074
Volkswagen
06B903133A
Dayco
305332
Goodyear
49340
Carquest
38207
Dayco
89332FN
Volkswagen
06B903133D
Volkswagen
06B903133
Dayco
89332
Litens
999074A
Gates
38207
ACDelco
38207
Volkswagen
06B903133E
This item may be interchangeable with parts from other brands with the above part numbers.
This information is provided only for reference and does not guarantee that the item you are
purchasing is identical to parts with part numbers from the brands listed above.
To confirm that this item fits your vehicle, use the above "Check Vehicle Fit" option.
Lifetime Warranty
This item is backed by our limited lifetime warranty. In the event that this item should fail due to manufacturing defects during intended use, we will replace the part free of charge. This warranty covers the cost of the part only.
FREE Shipping is standard on orders shipped to the lower 48 States (Contiguous United States). Standard shipping charges apply to Hawaii and Alaska.
Shipping is not available to a P.O. Box, APO/FPO/DPO addresses, US Territories, or Canada for this item.
Expedited is available on checkout to the United States, excluding Alaska, Hawaii.
Final shipping costs are available at checkout.
How to Replace Serpentine Belt Tensioner 2002-08 Audi A4
How to Replace Serpentine Belt Tensioner 2002-08 Audi A4
Created on:
Tools used
Torque Wrench
18mm Wrench
13mm Wrench
1. Removing the Serpentine Belt
Insert the 18mm wrench into the tensioner
Turn the tensioner clockwise to loosen the belt
Pull the belt off the alternator
Release the tensioner
2. Installing the Tensioner
Remove the three 13mm bolts from the tensioner
Lift the tensioner up and out
3. Installing the Tensioner
Tap the pin down with an 18mm wrench
Insert the lifting hook into place
Insert the top bolt into place
Slide the tensioner into place
Thread the top bolt in
Insert the other two 13mm bolts
Hand tighten the three bolts
Torque the bolts to 30 ft/lbs
4. Reinstalling the Serpentine Belt
Pull the belt up onto the alternator
Pull clockwise on the tensioner with an 18mm wrench
Remove the pin
Slowly release the tensioner
Brought to you by 1AAuto.com, your source for quality replacement parts and the best service on the Internet.
Hi, I'm Mike from 1A Auto. I hope this how-to video helps you out, and next time you need parts for your vehicle, think of 1AAuto.com. Thanks.
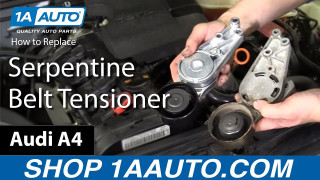
In this video, we're going to show you how to replace the serpentine belt tensioner. This is a 2007 Audi A4, which has the 2.0-liter turbo motor, and this procedure should be about the same for 2002 to 2008s with either the 1.8-liter turbo or the 2.0-liter turbo. Items you'll need include a new serpentine belt tensioner from 1AAuto.com, 18mm wrench, and a 13mm wrench.
The belt tensioner is right here at the front of the engine. Your 18mm wrench, put it right onto that big tab right there, pull on the tensioner, slip the belt off, and release the tensioner slowly.
The tensioner is held in by three 13mm bolts. You can remove the engine cover, just set it aside. Remove them with the 13mm wrench. I've removed two of them, just taking the third one out and lifting up the tensioner at the same time, and pull it up and out.
Here's the original part from the car and the new part from 1A Auto. You can see it's going to be an exact replacement, all the mounting points are the same, it does have this pin here, we're just going to push that out so it's flush, and then once it's installed we can move the tensioner, get the belt all set, pull that pin out and then it'll tension for us.
This pin right here is holding the tensioner itself in position, I'm just going to tap it, this is the side that's going to mount onto the engine, so I want this pin flush. Just use my 18mm wrench, tap it down so it doesn't interfere while I'm installing it, and then the lifting hook for your vehicle, put that in, and slide the tensioner down into place, and I have that bolt for the top already in. Put it in place and start threading that first bolt in, and as I'm putting them in, I notice that the belt has kind of worked its way up a little bit. I'll just push it down that way this is hanging nice and free, then I'll work the other two bolts in now.
Technical specs for these bolts is 30 ft-lbs of torque, I'm just using a regular wrench and getting them tight. You don't want to over tighten them because it is going into aluminum, and you don't want to strip the aluminum threads, but generally a good amount of force on just a regular wrench like this will work. The new tensioner has a lock in place holding it so you should be able to pull your belt up and put it on the alternator. Use an 18mm wrench to pull up, pull the pin out, and then slowly release and let the tensioner tension the belt. Then reinstall your top engine cover.
Thanks for tuning in. We hope this video helped you out. Next time you need parts for your car, please visit 1AAuto.com. Also check out our other helpful how-to and diagnosis videos.
Product Reviews
4.7/ 5
★★★★★★★★★★
16 reviews
5★
88%
4★
6%
3★
0%
2★
0%
1★
6%
★★★★★March 8, 2022
I installed it as soon as I got my package it didnt take 15 mins and I was back up and running again thank you guys so much I recommend anyone and everyone to you guys thanks again
★★★★★May 11, 2021
Great part comes as detailed
Slapped the bad boy in the next day I got it and my car is running smooth thanks 1a Auto.
★★★★★May 9, 2021
Tensor
Great service fast and professional. Thank you for the good service
★★★★★May 2, 2021
Part exploded
I bought this part on August 3rd 2020 and it exploded almost 8 months to the day, 1a says they have a limited lifetime warranty and will replace it but lets be honest, do I really want to put the same part that just failed me back on? Terrible quality obviously!!!
★★★★★October 5, 2020
No more noise
The part worked just like the YouTube said it would. Took me a total of 20 minutes to replace the tensioner and belt.
★★★★★October 1, 2020
Perfect fit
Great price easy transaction
★★★★★April 23, 2020
Good quality
The part was great.
★★★★★August 27, 2019
Two thumbs up!!
Tensioner worked just as planned. Two thumbs up!!
★★★★★July 3, 2019
Works great
Been about a month now and my belt tensioner hasnt been giving me any problems, you guys also include a video tutorial that has helped me out as well!
★★★★★April 30, 2019
Good stuff
It fit perfectly, and was easy to put in and its like half the price from everybody else. Would go back if i need something else :)
Showing 1–10 of 16 reviews
BPA06042
In Stock
Customer Q&A
Got a question about this part? Post it and get answers from our team.
CARLOSJune 24, 2016
It fit on audi a4 2004 1.8 turbo?
Vehicle Fit
2002-2005 Audi A4 Serpentine Belt Tensioner with Pulley for L4 1.8L Turbo
Brian · June 27, 2016
Showing 1–1 of 1 question
Customer service
877-844-3393
Monday - Friday 8:00am - 9:30pm ET Saturday - Sunday 8:00am - 4:30pm ET
Ask a Question
Check Your Email
We sent a verification email to .
Click the Verify Email button in the email to submit your question.
This extra step helps prevent spam.
Select Your Vehicle
Specify your vehicle's year, make and model to guarantee fit.









 WARNING: This product can expose you to chemicals including Lead and Lead Compounds, which are known to the State of California to cause cancer, and birth defects or other reproductive harm. For more information, go to www.P65Warnings.ca.gov.

