Replaces





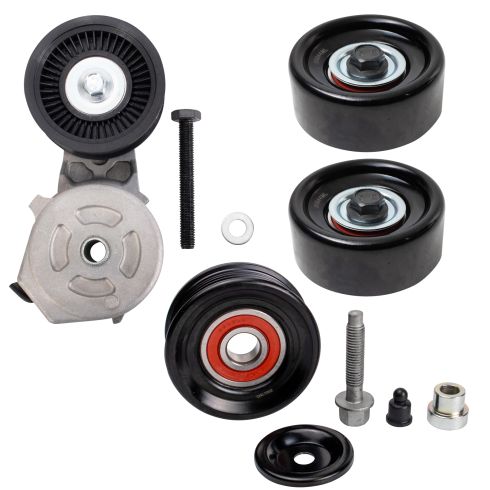
Part Details
About TRQ:
TRQ is a trusted brand dedicated to making every repair a success story by combining premium parts with easy installation. Each TRQ part is engineered by a team of automotive experts to meet or exceed OEM standards, delivering enhanced performance and maximum longevity. With rigorous in-house testing, the brand ensures superior fit and function across every product line. TRQ also provides customers with best-in-class, step-by-step installation videos—so you can complete repairs with confidence, whether you're a first-time DIYer or an industry professional.
Attention California Customers:
 WARNING: This product can expose you to chemicals including Lead and Lead Compounds, which are known to the State of California to cause cancer, and birth defects or other reproductive harm. For more information, go to www.P65Warnings.ca.gov.
This part fits 23 vehicles spanning 2001-2009.
| Year | Make | Model | Description |
|---|---|---|---|
| 2002-2003 | Buick | Rendezvous | Buick Rendezvous 4 Piece Serpentine Drive Belt Component Kit TRQ BPA18185 |
| 2004-2005 | Buick | Rendezvous | Buick Rendezvous V6 3.4L 4 Piece Serpentine Drive Belt Component Kit TRQ BPA18185 |
| 2005 | Buick | Terraza | Buick Terraza 4 Piece Serpentine Drive Belt Component Kit TRQ BPA18185 |
| 2006 | Buick | Terraza | Buick Terraza V6 3.5L 4 Piece Serpentine Drive Belt Component Kit TRQ BPA18185 |
| 2005-2007 | Chevrolet | Equinox | Chevrolet Equinox 4 Piece Serpentine Drive Belt Component Kit TRQ BPA18185 |
| 2008-2009 | Chevrolet | Equinox | Chevrolet Equinox V6 3.4L 4 Piece Serpentine Drive Belt Component Kit TRQ BPA18185 |
| 2001-2003 | Chevrolet | Malibu | Chevrolet Malibu 4 Piece Serpentine Drive Belt Component Kit TRQ BPA18185 |
| 2004-2006 | Chevrolet | Malibu | Chevrolet Malibu V6 3.5L 4 Piece Serpentine Drive Belt Component Kit TRQ BPA18185 |
| 2005 | Chevrolet | Uplander | Chevrolet Uplander 4 Piece Serpentine Drive Belt Component Kit TRQ BPA18185 |
| 2006 | Chevrolet | Uplander | Chevrolet Uplander V6 3.5L 4 Piece Serpentine Drive Belt Component Kit TRQ BPA18185 |
| 2002-2005 | Chevrolet | Venture | Chevrolet Venture 4 Piece Serpentine Drive Belt Component Kit TRQ BPA18185 |
| 2003-2004 | Oldsmobile | Alero | Olds Alero V6 3.4L 4 Piece Serpentine Drive Belt Component Kit TRQ BPA18185 |
| 2003-2004 | Oldsmobile | Silhouette | Olds Silhouette 4 Piece Serpentine Drive Belt Component Kit TRQ BPA18185 |
| 2001-2005 | Pontiac | Aztek | Pontiac Aztek 4 Piece Serpentine Drive Belt Component Kit TRQ BPA18185 |
| 2005 | Pontiac | G6 | Pontiac G6 4 Piece Serpentine Drive Belt Component Kit TRQ BPA18185 |
| 2006 | Pontiac | G6 | Pontiac G6 V6 3.5L 4 Piece Serpentine Drive Belt Component Kit TRQ BPA18185 |
| 2002-2005 | Pontiac | Grand Am | Pontiac Grand Am V6 3.4L 4 Piece Serpentine Drive Belt Component Kit TRQ BPA18185 |
| 2003-2005 | Pontiac | Montana | Pontiac Montana 4 Piece Serpentine Drive Belt Component Kit TRQ BPA18185 |
| 2006 | Pontiac | Montana | Pontiac Montana V6 3.5L 4 Piece Serpentine Drive Belt Component Kit TRQ BPA18185 |
| 2006-2007 | Pontiac | Torrent | Pontiac Torrent 4 Piece Serpentine Drive Belt Component Kit TRQ BPA18185 |
| 2008-2009 | Pontiac | Torrent | Pontiac Torrent V6 3.4L 4 Piece Serpentine Drive Belt Component Kit TRQ BPA18185 |
| 2005 | Saturn | Relay | Saturn Relay 4 Piece Serpentine Drive Belt Component Kit TRQ BPA18185 |
| 2006 | Saturn | Relay | Saturn Relay V6 3.5L 4 Piece Serpentine Drive Belt Component Kit TRQ BPA18185 |
| Brand Label | Part Number |
|---|---|
| ACDelco | 38106 |
| Dayco | 89323 |
| Litens | 999022A |
| Saturn | 09202550 |
| GM Genuine Parts | 24503851 |
| Gates | 38106 |
| Motorcraft | YS167 |
| Saturn | 90528760 |
| ACDelco | 12581701 |
| Litens | 999553A |
| Litens | 999007A |
| Gates | 38009 |
| NAPA | 38127 |
| Dayco | 89247 |
| ACDelco | 38351 |
| Saturn | 9202550 |
| Gates | 38398 |
| Freshstart | 49206 |
| Gates | 38253 |
| ACDelco | 38127 |
| ACDelco | 36347 |
| OMNIPARTS | 11020065 |
| Gates | 34149 |
| Goodyear | 49436 |
| Dayco | 89009 |
| ACDelco | 38139 |
| ACDelco | 9202550 |
| NAPA | 38106 |
| Automotive Tensioners Inc | B10005 |
| Gates | 38104 |
| Gates | 38351 |
| Four Seasons | 45056 |
| ACDelco | 38420 |
| Freshstart | 49391 |
| Dorman - TECHoice | 419-208 |
| Continental | 49436 |
| VAICO | V40-0826 |
| SKP | SK89241 |
| Goodyear | 49275 |
| GM Genuine Parts | 12563083 |
| Continental | 49247 |
| ACDelco | 39083 |
| ACDelco | 38253 |
| ACDelco | 12552360 |
| Saab | 4750220 |
| ACDelco | 09202550 |
| Continental | 49391 |
| Bando | 580255 |
| NAPA | 38420 |
| Dayco | 89241 |
| Motorcraft | YS169 |
| Goodyear | 57102 |
| Honda | RE537861 |
| ACDelco | 12563083 |
| Saab | 9202550 |
| Dorman - HD Solutions | 419-5001 |
| Goodyear | 49391 |
| Gates | 38139 |
| Pronto | 835971 |
| NAPA | 38253 |
| GM Genuine Parts | 24507684 |
| Autopart International | 2008-90954 |
| Goodyear | 49245 |
| Gates | 36347 |
| ALT Tensioner | ALT04004 |
| Freshstart | 49368 |
| Continental | 49246 |
| Cooling Depot | 45971 |
| Gates | 38167 |
| Goodyear | 49227 |
| Continental | 49003 |
| Dorman | 419104 |
| Continental | 49381 |
| ACDelco | 38260 |
| Freshstart | 49275 |
| Autopart International | 2008-203436 |
| Litens | 999100A |
| Litens | 999011A |
| Honda | 12581701 |
| NAPA | 38179 |
| ACDelco | 12580828 |
| Dorman | 419-681 |
| Gates | 39083 |
| Dayco | 89143 |
| Pronto | 35009 |
| General Motors | 12563097 |
| Gates | 38158 |
| Continental | 49323 |
| Goodyear | 49381 |
| Goodyear | 49330 |
| NAPA | 39083 |
| Freshstart | 49227 |
| SKP | SKAPV3038 |
| Litens | 999012A |
| NAPA | 38167 |
| Freshstart | 49003 |
| Continental | 49206 |
| Continental | 49227 |
| GM Genuine Parts | 20577684 |
| ACDelco | 38179 |
| INA US | 534009410 |
| NAPA | 38139 |
| Honda | 12611936 |
| Factory Air | 45971 |
| Carquest | 36347 |
| Goodyear | 49323 |
| Gates | 38260 |
| SKP | SK89286 |
| ACDelco | 38167 |
| Dayco | 89227 |
| Autopart International | 90954 |
| Goodyear | 49003 |
| Goodyear | 49368 |
| NAPA | 38104 |
| Freshstart | 49247 |
| Freshstart | 49323 |
| Four Seasons | 45971 |
| Continental | 49275 |
| SKP | SK89253 |
| Saab | 4237020 |
| Gates | 38420 |
| Freshstart | 49246 |
| Litens | 999151A |
| Litens | 999555A |
| ACDelco | 12603527 |
| Litens | 900554A |
| Goodyear | 49404 |
| Continental | 49368 |
| Freshstart | 49330 |
| Dorman - TECHoice | 419-603 |
| ACDelco | 38009 |
| Goodyear | 49247 |
| Autopart International | 203436 |
| Goodyear | 49206 |
| Freshstart | 49404 |
| Continental | 49330 |
| NAPA | 38260 |
| ACDelco | 38398 |
| Hayden | 5971 |
| NAPA | 38463 |
| Dayco | 89217 |
| Litens | 900027A |
| Dayco | 89171 |
| Litens | 999033A |
| WORLDPAC | G6020314893GAT |
| Torqflo | 835971 |
| Dayco | 89254 |
| Dayco | 89299 |
| Dorman - TECHoice | 419-104 |
| Dayco | 89253 |
| Litens | 950236A |
| Gates | 38127 |
| Goodyear | 49263 |
| Litens | 999129A |
| Gates | 38463 |
| Litens | 999775A |
| Autotecnica | GM1414486 |
| GM Genuine Parts | 88909594 |
| Duralast | 231086 |
| GM Genuine Parts | 1AEBT00014 |
| Freshstart | 49381 |
| Continental | 49263 |
| Goodyear | 49246 |
| Litens | 999150A |
| ACDelco | 38104 |
| Compressor Works | 835971 |
| ACDelco | 12609719 |
| ATI | B10005 |
| Autopart International | GTS38009 |
| NAPA | 38158 |
| Litens | 999110A |
| Gates | 38179 |
| Freshstart | 49245 |
| NAPA | 614190 |
| Litens | 999366A |
| Freshstart | 49263 |
| SKP | SK89247 |
| ACDelco | 12564509 |
| Tendeco | 900554 |
| DIY Solutions | BEP00017 |
| NAPA | 38351 |
| GM Genuine Parts | 24507667 |
| Dayco | 89286 |
| Dorman - TECHoice | 419-112 |
| SKP | SK89009 |
| ACDelco | 38158 |
| Dayco | 231086 |
| NAPA | 38398 |
| Dorman - TECHoice | 419-202 |
| Dayco | 89397 |
| Continental | 49404 |
| Continental | 49245 |
| Goodyear | 50017 |
| NAPA Belts/Hose | 36347 |
| GM Genuine Parts | 12580828 |
This item may be interchangeable with parts from other brands with the above part numbers. This information is provided only for reference and does not guarantee that the item you are purchasing is identical to parts with part numbers from the brands listed above. To confirm that this item fits your vehicle, use the above "Check Vehicle Fit" option.
Lifetime Warranty
This item is backed by our limited lifetime warranty. In the event that this item should fail due to manufacturing defects during intended use, we will replace the part free of charge. This warranty covers the cost of the part only.
FREE Shipping is standard on orders shipped to the lower 48 States (Contiguous United States). Standard shipping charges apply to Hawaii and Alaska.
Shipping is not available to a P.O. Box, APO/FPO/DPO addresses, US Territories, or Canada for this item.
Expedited is available on checkout to the United States, excluding Alaska, Hawaii.
Final shipping costs are available at checkout.

Created on:
Tools used
Brought to you by 1AAuto.com, your source for quality replacement parts and the best service on the Internet.
In this video, we will show you how to change your serpentine belt tensioner. If your belt is squeaking, sometimes it can be because this tensioner has gone bad. It's not holding enough tension against your belt. This is on a 2001 Malibu. It should be the same as any '97 to '03 Malibu with the 3.1 liter engine. Tools you'll need are a jack or engine hoist, 15mm and 18mm sockets with ratchets and extension, and then you need a 3/8 drive. You either need a flexible bar or the ratchet handle.
Your serpentine belt is obviously right here on the passenger side of your engine. What you actually need to do, is remove this engine mount which involves removing two 18mm bolts here, and then two 15mm nuts, one there and one down there. That is the engine mount, so you either need to support here with an engine crane, or you need to use a jack and support underneath the oil pan here. Do not jack the car up yet. You actually just want to support the weight of the engine. Spray some penetrating oil on those studs down lower. I cheat a little bit and use a 15mm socket, with an impact wrench. There's no reason you can't reach everything pretty easily with just a regular ratchet and extension. Now, I've got my 18mm socket on here. I'm going to loosen up one of these bolts. I'm going to start loosening the other bolt. You're going to see the engine falling which is actually more the car rising. What you want to do now is take your jack. Jack the engine up. Now, it's supporting the engine. You can remove these bolts the rest of the way. This mount, slide it back right out.
I'm just going to remove these two lines just to make it easier for you to see. What you want to do, is take your jack. Jack the engine up a little bit extra. Right down in here is your tensioner. What I have is a little flex arm. What you want to do with this flex arm is put it down. Here is a 3/8 inch hole at the bottom of the tensioner. You want to put it in just like that. You see right here is my bar. I'm going to reach in, and pull the bar up which pulls on the tensioner and releases the tension on the belt. You can pull the belt off, and slowly release your bar back down. Be careful not to pinch your fingers. Take the bar out, and then just take your belt off above with this.
Here's your alternator. Your tensioner is right down here, 15mm socket. It just comes up and out. I'm going to take that bolt out.
Here's the original tensioner, and a new tensioner from 1A Auto. You see it's all the same. It has the little marking to hold it in the right spot. Put the bolt through. Put it down in. Start the bolt first. Make sure that that detent holds it. Tighten up the bolt.
Here is your belt routing diagram. This is key. Make sure you have this before you take the belt off. If you don't have this, make sure you draw yourself a diagram similar, so you can get the belt on again. It's hard to film this, so you just have to take my word that I'm doing what I say I'm doing. Take your belt. You want to put a loop down underneath the crankshaft which is the lowest largest pulley, and in the A/C compressor which is the pulley that's lowest and closest to the front of the vehicle. It comes up under this power steering pulley right up over here. I'm going to reach down, and pull it, and point it back to this idler pulley here, and then around under the tensioner pulley. I can pull it up on top of my alternator right here. Now, I'm all routed except for the idler pulley. I'm going take my 3/8 bar, put it down in to my tensioner. I need both hands. Pull the bar up. Grab on my belt here, and slip it under that idler pulley, then let my tensioner go. I got a couple off a little bit here. Just check, make sure your belt is on correctly everywhere. It doesn't look like it's quite on my crank pulley correctly. Pull up again on the tensioner. Reach down. Flip it a little bit. Now, it's on there correctly. It appears to be on everywhere correctly.
We're just going to speed through putting this stuff back in. Put the mount back down in there. You can let your engine down just a little bit. Start the two top bolts on the mount. Preliminarily tighten them up. You can let the engine all the way down. Take the jack out. Start your 15mm nuts on top. Preliminarily tighten them as well. Here, I'm just reconnecting those hoses that I moved out of your way. Now, use a wrench. Make sure that the mount bolts are tight, but not too tight.
We hope this video helps you out. Brought to you by www.1AAuto.com, your source for quality replacement parts and the best service on the Internet. Please feel free to call us toll-free, 888-844-3393. We're the company that's here for you on the Internet and in person.
Tools used
Brought to you by 1AAuto.com, your source for quality replacement parts and the best service on the Internet.
Hi, I'm Mike from 1A Auto. I hope this how-to video helps you out, and next time you need parts for your vehicle, think of 1AAuto.com. Thanks.
In this video, we're going to show you how to replace the serpentine belt tensioner on this 2008 Chevy Equinox. The process is basically the same for any Equinox or Torrent of this vintage with the 3.4-liter V6. If your tensioner is going bad, you'll notice some squeaking when you turn on accessories such as your air conditioning. Mostly when your air conditioning compressor comes on you'll hear some squeaking because the belt is not tight enough. The tools you'll need are a flat blade screwdriver; 10mm, 15mm and 18mm sockets with ratchets and extensions; a 3/8 drive ratchet or flex handle.
To get to it you do have remove the intake tube, not too difficult. There's a plug here. You just take a little tab move it to the side, pull that off, and then there are two clamps to loosen. Okay, I'm going to speed this up a little bit. What I found actually is you only need to loosen up the clamp that's on the engine side, or closer to the engine, and then you pull the tube off the engine.
Now there are a couple of clips you just pull off with your thumbs. You can lift this up to get your air box up and off. There's a little safety clamp here that you'll want to remove carefully, and then you can disconnect this harness, pull this right out, and your 10mm bolt right back here, remove that. Probably take your air cleaner out, now your air box will come right up. Pull it back. There is a harness right here, just pull that. Now take your air box out.
You'll want to put a jack right underneath the engine. Now with the air box out of the way, you want to basically unbolt your engine mount, and it's 18mm bolts on the outside and then the inner ones are 15mm. Before you undo the inner ones, you want to just jack up your engine a little bit enough so that you see that mount start moving up, and then you can remove the three 15mm bolts.
In this next part it's a little difficult to see what I'm doing, so I kind of drew an arrow. The arrow points to your belt tensioner, and you can see down at the bottom if you're looking at it in good enough resolution that the tensioner has a small 3/8 square hole in it, so you take a 3/8 drive flex handle. If you jack up the engine enough you can probably get a regular ratchet handle on there and you put it into that square hole and you'll see what you do with it.
Okay, now here's your tensioner, and you're going to need kind of some flexible handle like this. Basically you just want to put the handle in, flex that into the tensioner, and then push it in. Then you're going to pull up on your handle. Okay, let the tension off the belt to get the belt off. Slowly let your handle back down. In the next shot you may notice that the belt is gone, that you do not have to remove your belt to replace the belt tensioner. If you do remove your belt, I have a belt tensioner diagram that you'll see later in the video. Let's remove the belt tensioner with a 15mm socket and ratchet which will remove the bolt here.
Okay, we're going down here and looking at that surface where it mounts. You can see there's a little hole right here. I'm going to make sure with our new tensioner that this little tab goes right into that hole. Bolt it in, and you kind of look down into that tab go in and start our bolt in. Okay, just fast-forward as I put the bolt in, and then use my 15mm ratchet and socket, tighten it up. Tighten it to about 25 to 30 foot-pounds. You don't want to go too tight because it is going into aluminum and you could strip the threads.
Next up we're going to put the belt back on. I am going to pick it up just from having the belt preliminarily routed. Here is a diagram to help you route it if you either took your belt off or if it fell off a couple pulleys and you weren't sure how to get it back on. Put your bar in and pull up on your tensioner. Put your bolt down onto this idler pulley. Make sure your alternator won't off. Let your tensioner go. With your engine jacked up high enough you can get that right out.
Put your belt back on and start the bolts. Okay, you can let your engine down some. Make sure you get the bolts started first. Okay, speed it up here some. I'll start those bolts in. Just make sure the jack is positioned so that the engine is just barely lifting up on that mount and preliminarily tighten those bolts and those are 15mm bolts. Then let the engine down some, put on the 18mm nuts, and then preliminarily tighten them. Then I'm going to tighten the 18mm nuts to 85 foot-pounds and then I'm going to tighten the 15mm bolts to 45 foot-pounds.
Now I'll put my air box down in and my wiring harnesses go up above. Now there's two kind of rubber plugs that go in the holes in the front. Slide them in place and push them forward. Tighten up that bolt nice and firm, and then make sure you put the pin for the wiring harness back in place. Put the air cleaner back in. Make sure it's seated correctly and it does have a little tab here so it goes in the right way. I'm going to put the outside of the air box in first and make sure the harnesses don't get in your way. Down in place, pop that one back on, pop that one back on, make sure that's all back. Tighten up. Be sure to reconnect that hose and that right here and this little lock inserts from the back.
We hope this video helps you out. Brought to you by www.1AAuto.com, your source for quality replacement parts and the best service on the Internet. Please feel free to call us toll-free, 888-844-3393. We're the company that's here for you on the Internet and in person.
Tools used
Brought to you by 1AAuto.com, your source for quality replacement parts and the best service on the Internet.
Hi, I'm Mike from 1A Auto. I hope this how-to video helps you out, and next time you need parts for your vehicle, think of 1AAuto.com. Thanks.
In this video, we're going to show you how to replace the upper idler pulley on this 2008 Chevy Equinox. It's the same as any Equinox with a 3.4-liter, and it's also the same on the Torrent. It's pretty easy once you get the parts out of the way such as the air box and the engine mount. Tools you'll need are a flat blade screwdriver, 10mm, 15mm, and 18mm socket with ratchets and extensions, and a 3/8"� drive ratchet or flex handle.
To get to it, you have to remove the intake tube, which is not too difficult. There's a plug here. You just take a little tab, move it to the side, pull that off, and then there's two clamps to loosen. I'm going to speed this up a little bit. What I found actually is you only need to loosen up the clamp that's on the engine side or closer to the engine, and then you pull the tube off the engine. That's actually good enough.
Now there are a couple of clips you just pull off with your thumbs. You can lift this up. To get your air box up and off, there's a little safety clamp here that you'll want to remove carefully. Then you can disconnect this harness and pull this right out. There's a 10mm bolt right back here, and you can remove that. Probably take your air cleaner out, and now your air box will come right up. Pull it back and out. There is a harness right here, you just pull that and out. Take your air box out.
You want to put a jack right underneath the engine. With your air box out of the way, you want to remove your engine mount, and that's why you're supporting the vehicle with the jack. It's 18mm nuts on the outside and then 15mm bolts on the engine side; remove those two nuts. Then jack the engine up a little bit, remove the 15mm bolts, and then you can remove the mount.
In this next part, it's a little difficult to see what I'm doing, so I kind of drew an arrow. The arrow points to your belt tensioner. You can see down at the bottom, if you're looking at it in good enough resolution, that the tensioner has a small 3/8"� square hole in it. So you take a 3/8"� drive flex handle. If you jack up the engine enough, you could probably get a regular ratchet handle on there, and you put it into that square hole. You'll see what you do with it.
Now here's your tensioner, and you're going to need a flexible handle like this. Basically, you just want to stick the handle in, flex that into the tensioner, and then push it in. Then you can pull up on your handle and let the tension off the belt, pull the belt off, and slowly let your handle back down and out.
In this shot, you'll notice the belt is gone. To replace any of the idler pulleys, you really don't have to remove your belt all the way, you can just loosen it and then take the idler pulleys off and back on. If you do remove it, I have a diagram later in the video that shows you how to get it back on.
To change this idler, generally you can feel and see if there's any play in them. They are pretty easy to change; it's just a 15mm bolt. Then you pull this apart and use any of the appropriate parts on your new pulley. This one is in fine shape, so I'm just going to put it back in. We'll speed up here as I just thread that bolt in, then use my 15mm socket and ratchet to tighten it up. You tighten them to 30 to 35 foot-pounds, tight but not over tight.
Next up, we're going to put the belt back on. I am going to pick it up just from having the belt preliminarily routed. Here's a diagram to help you route it if you either took your belt off or if it fell off a couple of pulleys and you weren't sure how to get it back on. You're going to put your bar in, pull up on your tensioner, put your belt down onto this idler pulley, and make sure it's on the alternator well enough. Let your tensioner go.
With your engine check, you can probably get that right out. Now put your mount back on and start the bolts. You can let your engine down some. Make sure you get the bolts started first. Speed it up here some. I'll start those bolts in, just make sure the jack is positioned so that the engine is just barely lifting up on that mount, and preliminarily tighten those bolts, which are 15mm bolts. Then let the engine down some, put on the 18mm nuts, and then preliminarily tighten them. Then I'm going to tighten the 18mm nuts to 85 foot-pounds, and then I'm going to tighten the 15mm bolts to 45 foot-pounds.
Now I'll put my air box back down in, and make sure my wiring harnesses go up above. Now there are two rubber plugs that go into the holes in the front; guide them in place, and push them forward. Tighten up that bolt nice and firm, and then make sure you put the pin for the wiring harness back in place. Put the air cleaner back in, and make sure it's seated correctly, and it does have a little tab here, so it goes in the right way. Put the outside air box in first, make sure the harnesses don't get in your way, put it down in place, and put the clip back on. Clamp that one back on, and make sure that's all good and tighten up the clips. Be sure to reconnect that hose, and that right there. Then this little lock inserts from the back like that.
We hope this video helps you out. Brought to you by www.1AAuto.com, your source for quality replacement parts and the best service on the Internet. Please feel free to call us toll-free, 888-844-3393. We're the company that's here for you on the Internet and in person.

BPA18185