Replaces


Recommended for your 2014 Toyota Camry
Part Details
Specifications
About TRQ:
TRQ is a trusted brand dedicated to making every repair a success story by combining premium parts with easy installation. Each TRQ part is engineered by a team of automotive experts to meet or exceed OEM standards, delivering enhanced performance and maximum longevity. With rigorous in-house testing, the brand ensures superior fit and function across every product line. TRQ also provides customers with best-in-class, step-by-step installation videos—so you can complete repairs with confidence, whether you're a first-time DIYer or an industry professional.
Product Features
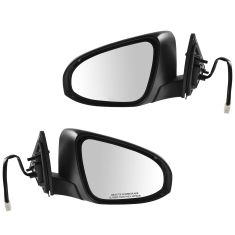
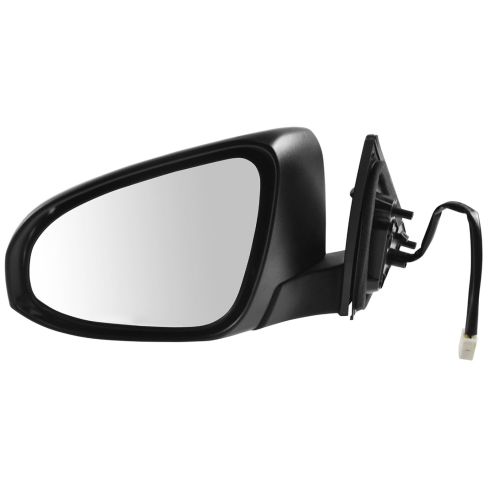
TRQ side mirrors and mirror components are designed to match the function, fixture, and performance of the original version for easy installation. TRQ mirrors are DOT certified, comply with all federal safety standards, and are independently lab tested to ensure our products comply with all government regulations. All products are fit and road-tested in our Massachusetts R&D facility to ensure we deliver on our promise of Trusted Reliable Quality.
Exact fit - To obtain proper fit and function confirm your vehicle has the exact mirror options listed.
Paint To Match Note:
"Paint-to-match finish" refers to a smooth, paintable surface. This item is not painted. Paint offers better coverage and adhesion, but it is not necessary for installation.
Attention California Customers:
 WARNING: This product can expose you to chemicals including Chromium (Hexavalent Compounds), which is known to the State of California to cause cancer, and birth defects or other reproductive harm. For more information, go to www.P65Warnings.ca.gov
Lifetime Warranty
This item is backed by our limited lifetime warranty. In the event that this item should fail due to manufacturing defects during intended use, we will replace the part free of charge. This warranty covers the cost of the part only.
FREE Shipping is standard on orders shipped to the lower 48 States (Contiguous United States). Standard shipping charges apply to Hawaii and Alaska.
Shipping is not available to a P.O. Box, APO/FPO/DPO addresses, US Territories, or Canada for this item.
Expedited is available on checkout to the United States, excluding Alaska, Hawaii.
Final shipping costs are available at checkout.

Created on:
Tools used
Hi, I'm Mike from 1A Auto. We've been selling auto parts for over 30 years.
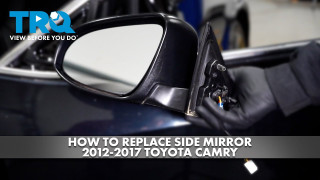
Hey, everyone. Sue here from 1A Auto. And today we have our 2013 Camry in the shop. And I'm going to show you how to replace the driver's side outside mirror. If you need this part or any other part for your car, click the link below and head on over to 1aauto.com.
To access the side mirror, we're going to take the door panel off. We're going to take the main switch bezel off. Just going to pry up on the connectors. Disconnect the two connectors here. We've got the little one for the mirrors, and this switch right here is kind of tricky, so you've got to push in on that and lift up on the outer part of the housing, like that. And the switch comes off.
Now we have a Phillips screw right here. And we've got to take the plastic bezel right in here off with a little screwdriver. Another Phillips screw is here. And I think I have to take this handle off. You've got plastic clips: one, two, three. Well, that one's broken. And then a Phillips screwdriver. And now we should be able to grab the door panel and just pry on it wherever the plastic door pieces are. This one piece. And then you've got the door marker right there that just automatically came out. Someone's been in this door.Whoever prior owned it and they broke every clip I could find. Disconnect it. Push on that little tab.
If one of the door pieces, these little prongs come off, they're real easy to attach. Just bring it right back on there and snap it in place. Once you have the door panel off, you're going to disconnect the electrical connector right here. There's a tab. Push in on it and lift up. Then you have three mounting bolts and a 10mm socket. And with our 10mm socket, you've got to undo all three bolts. Those mirrors come with mounting bolts. These are actually plastic screw into plastic screws. We're going to hold onto that mirror and undo this last one. There's a clip right here--look at that. Bend that down and slide it out. There we have our driver's side outside mirror.
Now we have our new mirror. I'm going to bring right on the outside. Fish the wire through that opening hole. Line up the three guide pins. Apparently I can't guide it in there. There we go. And push until that clip snaps on. It's kind of tough with the actual new foam insulation. I'm just going to hold it until I tighten this one up. And the other two up. This being plastic and screw-type mounting, I strongly recommend doing this by hand. Electric drills have more power. If you go too fast too soon, you can actually crack all the housing, so this is definitely a by hand application.
Now just even out the mounting. Take your plug and reconnect it. And now put our panel back on. Make sure you put that door, marker door harness through that slot. And we're going to bring it up. I'm going to bring this through the actual door panel like that. Make sure your harness here, main switch, is out. And start lining up all the top, the window. Make sure that wire's still on the bottom. Just get a look at this. There's a real small little tight lip on this. Here we go. Push down. Once you get it over that lip on the top of the door panel, make sure this wire hasn't fallen back out. Push it right through there. That's clear, and then you can guide your pins on the side. Snap them in all the way around.
I like to make sure it's snapped all the way in before I start bolting things down. You've got three mounting screws: two long chrome and a little small black one. The black one goes on the handle, so we'll go right there first. Then you have the two silver ones. Go right here. Put our main switch back on. Make sure that outside housing that slides locks in. The mirror switch.
Before we guide that on, we'll put this one on. This is the actual arm rest. You've got these prongs back here that have to line up. There we go. I'm going to put our plastic trim back in. You've got to line up all those little body clips. And then the last thing, we have our marker light. Turn it on and hook it in.
Hi. Didn't see you there. Now our last step is to make sure that the mirror works and confirm it's all together. The key is in the on position, and it works in all positions motivated left and right. Adjust it to your liking, and you're ready to go down the road.
Thanks for watching. Visit us at 1aauto.com for quality auto parts, fast and free shipping, and the best customer service in the industry.
Tools used
Hi, I'm Mike from 1A Auto. We've been selling auto parts for over 30 years.
Hey, everyone. Sue here from 1A Auto. Today we have a 2013 Toyota Camry in the shop, and I'm going to show you how to R&R the drivers side door panel. If you need any parts for your car, click on the link below and head on over to 1aauto.com.
We're going to take the main switch bezel off. I'm just going to pry up on the connectors. Disconnect the two connectors here. We've got the little one for the mirrors, and this switch right here is kind of tricky, so you got to push in on that and lift up on the outer part of the housing like that and the switch comes off.
Now we have a Phillips screw right here, and we got to take the plastic bezel right in here off with a little screwdriver. Another Phillips screw is here. I think I have to take this handle up. You've got plastic clips: one, two, three. Well that one's broken and then a Phillips screwdriver. Now we should be able to grab the door panel, and just pry on it wherever the plastic door pieces are. Get this one piece. Then you've got the door marker light, which just automatically came out.
Someone's been in this door. Whoever owned it prior, and they broke every clip I could find. Disconnect it and push down that little tab. If one of the door pieces, these little prongs come off, they're real easy to attach. Just bring it right back on there and snap it in place.
Make sure you put that marker door harness through that slot, and we're going to bring it up and make sure that that mounting screw is there. We're going to bring this through the actual door panel like that. Make the main switch is out on your harness here, and start lining up all the clips. Bring it up over the top of the window. It's a real small little tight lip on this. Here we go. Push down so that once you get it over that lip at the of the door panel, make sure this wire hasn't fallen back out. Push it right through there. That's clear, now you can guide your pins on the side. Snap them in all the way around. I like to make sure it's snapped all the way around before I start bolting things down.
Now you've got three mounting screws. Two long chrome and a little small black one. The black one goes on the handle so we'll go right there first. Then you have the two silver ones go right here. Put our main switch back on. Make sure that outside housing that slides locks in. The mirror switch. Before we guide that on we'll put this one on. This is the actual armrest. You've got these prongs back here that have to line up. There we go. We're going to put our plastic trim back in. So you're going to line up all those little body clips. Then the last thing we have our marker light. Turn it on and click it in.
Thanks for watching. Visit us at 1aauto.com for quality auto parts, fast and free shipping, and the best customer service in the industry.

MRA06184