Replaces


Assemblies may include halogen or incandescent test bulbs that should be replaced before installation.
Attention California Customers:
 WARNING: This product can expose you to chemicals including Chromium (Hexavalent Compounds), which is known to the State of California to cause cancer, and birth defects or other reproductive harm. For more information, go to www.P65Warnings.ca.gov
This item is backed by our limited lifetime warranty. In the event this item should fail due to manufacturing defects during intended use, we will replace the part free of charge. This warranty covers the cost of the part only.
The bulbs are for testing and not covered under our warranty. Our warranty applies to the light assembly only.
FREE Shipping is standard on orders shipped to the lower 48 States (Contiguous United States). Standard shipping charges apply to Hawaii and Alaska.
Shipping is not available to a P.O. Box, APO/FPO/DPO addresses, US Territories, or Canada for this item.
Expedited is available on checkout to the United States, excluding Alaska, Hawaii.
Final shipping costs are available at checkout.
Created on:
Tools used
Hey, friends. It's Len down at 1A Auto. Today I'm going to show you how to replace a headlight assembly on a 2010 Nissan Altima. It's going to be a very simple job. I want to be the guy who shows you how to do it. If you need this, or any other part, you can always come down to 1aauto.com and we'll be sure to take care of you. Thanks for checking in.
All right. We're going to start removing this bumper cover. It's going to be very simple. I'm going to guide you through it. We're going to start at the top since we're already still on the ground. We're going to remove a couple of these pins, right here, here, here, here, here, and here. Then we'll continue onto the next steps. You'll need a couple basic tools. You might need all or any of these tools. Here we go.
Start with the little fork-y looking one. Stick it under here. Pry it up. We'll put it someplace safe where we won't lose it. Continue on along the line. Sometimes these might break. It happens. You can replace it if you want. We'll find that later. Move along here. I'm just going to pry up on this a little bit. Then I can use my fork again. I'm just going to pop it up. These right here are called push clips. What happens is the center pulls up and it disengages the lock. When you go to put this back in, push the bottom part in first. Plug the hole and then you shove this in and it spreads this and locks it in. Put that aside so we don't lose it.
We're going to continue down the line. Just get it started. Use our little fork device here. Lift up on that push pin. We're going to continue along, see if we can get under it. On to the next. Just give it a little tug. Make sure that we got them all out. It's possible to miss one. It happens. It's human nature to make mistakes. I think we're good to move onto the next step, which will be raising the vehicle up a little bit so we can get a look at what's underneath and see what else is holding it on. One thing that I did want to mention, even though we just finished taking all these out, we'll just put one more in real quick. We'll leave it in there until we've got everything else unattached, so when we're underneath the vehicle we don't have to worry about it coming down and hurting us.
I'd like to take note that there is a mounting bolt for the bumper cover right under here. It's a simple 10 millimeter head. You can use a ratchet and socket if you want, or a ratchet wrench, whatever you're into. 10 millimeter, and go ahead and turn that counterclockwise to reverse it out. Once we get this completely out we'll go over to the other side of the vehicle and we'll remove that one the same way. Here's what it looks like. We'll put that safely aside so we don't lose it. Off we go.
Next we're going to go ahead and remove our seven millimeter head bolts right here. They come across and they'll come across here if the rest of the splash shield was here. Use a ratchet, or if you happen to have a little electric gun that would work as well. Once we get all of these off, we can go ahead and remove the push clips, get this right out of the way. We can get going on removing the rest of this bumper. Put a little downward force on it if you want, making sure we're wearing safety glasses in case anything comes falling down. Here we are. Something fell down. Now we're clear to start removing these push clips. Same at the top. Just pull out the top end of it and then the bottom should come out as well. Use our screwdrivers that we were using before. Want to find the little divot. Just want to get it pried up a little bit so we can grab it with our other tool there.
We can continue with our little hook tool if we want, or we can go ahead and use some cutters. Might find it easier to just grab onto it with some cutters and pull it out. Grab on. You don't need to squeeze too hard. We're not trying to cut it, just break it free, making sure you hold the splash shield so it doesn't fall down and hit you in the face. We're going to do the same for the other one. Come over and grab it with our cutters nice and light. Break it free. It separated. That's okay. Just going to pull down. Now we're clear to put these back together and we'll set them aside so we don't lose them.
Now we're going to take our Phillips-head screwdriver, or whatever you might have. It's Phillips-head on this. We're going to reverse all these bolts out ... or screws. Just going to come right along here. We don't need to worry about those, but right here, right here, right here. Then it should come free. Then we'll go back up top and we'll dislodge it. It should come right off. Last one. These removed. We're just going to give it a little shake. Okay. We don't want to take it completely off. All right. Now we're clear to get back up to the top. We'll take out that one last pin that I showed you leaving in, and this should come right off.
We're back up top to our last pin that we pressed in there. We're going to do just like we did before and break it free, like that. At this point, once we get this out, the bumper cover might come lose, so you want to make sure you have it secured. Just lift this up and out. We'll put it over here. Grab onto it. Should come free. Now we've successfully removed our bumper cover. Now we're going to go ahead and spray down these bolts. We got one over here, here, and right down here. You can see where the assembly meets on with the body. If you can get a little bit of spray, that would work. This one, I'm probably going to have to come in from the backside. Let's see if I can even find it. Doesn't get on there, well, it is what it is. Give a little bit to each of them. All right.
Now we're going to use our 10 millimeter socket and start anywhere you want. I'm just going to come down here. I'm going to finish taking this one out, then we'll move on to the other two. Now we got this one almost all the way out. We're going to make sure we're holding onto to our headlight assembly so it doesn't come loose, put our tool and our bolt aside so we don't lose it. We're going to grasp it. Try to break it free. Now we're going to see if we can see behind here. There's going to be wiring that we're going to have to disconnect. We're going to go ahead and squeeze these tabs, or you can just take the whole bulb right out. For this assembly, our quality 1A Auto part comes with new bulbs, so we don't have to worry about damaging these. Just pull them right out. If you were keeping them, you'd want to be very careful not to touch any of the glass.
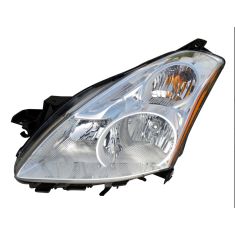
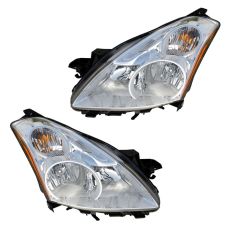
There's a whole bunch of them in here, isn't there? He we have our assembly. Just want to show you the similarities between the two parts here. We have our old part that I just removed from a 2010 Nissan Altima. It was a very simple removal process. I wanted to show you the backside. You can see that there's five holes we removed sockets from. Let's see if we can find them. One, two, three, four, and five. Very simple. Has a little leveler there so you can level out your headlight if you want to and need to really. Turn this around. Here we are. As you can tell, it came with all brand new sockets and brand new bulbs. That's wonderful. It's got all five. It comes with the adjustment. It also has all the same mounting areas, so you can go ahead and mount this in the same way that this came out, except opposite obviously. This is a quality part. I don't see any reason why this wouldn't fit perfectly. I'm going to go ahead and install this. If you need this part, or any other part, you can always come down to 1A Auto.
We've got our new assembly. I'm just going to leave the plastic on for now 'cause I'm going to be touching it a lot. We're going to come from the backside and take a look at our plan of attack. What I'm going to do is I'm going to start the closest and then I'm going to work my way towards the end, that way they're ... as I go, as the tension gets more on the wiring harness, I don't have to be trying to work. I'm going to end with this. I'm going to take a look. We've got this small one. I'm going to take that right off. Should be ready to come off. Perfect. You can set that aside.
You'll notice that there's the locking. The lock goes on that side. You can see the little clip. It's going to go right here. Very simple. Each one of these wiring harnesses, it doesn't hurt to take a look inside as you're going, make sure there's no green or blue or any real rainbow colors. This is the one with the lock. You want to make sure, once you press it in, you're going to press this red in. There we are. Give it a little tug. Feels good to me. We're going to move down the line. This one's separate, so this one goes right here. You can remove that bolt, put it aside. Taking a look. No green funny colors. Looks good. Feels good. Last two. Coming to the finish line. Remove this. Should just slide off. Other side. Looking for the locking clip. Goes on the backside there. It's hard to see, but we can do it. There it is.
Now we're going to find our last one. Separate that. Take a look. Looks great. Set up the lock so it's matching up with the ear on the bulb. Click it in. There we are. Get this little piece right here. This just secures the wires. We can go ahead and push that in. Now we're going to very carefully ... get this out of the way first. Sorry. Very carefully get this lined up with the way that it came off before. Slides in beautifully. We're going to find our three mounting bolts. We're going to go ahead and mount those in. It should be secured and it should be good to go.
We got our three bolts. They're all the same, so you can't mix them up. It's very simple. We're going to line them up with our three holes. Put one up here, one over here, and one over on the side. You could pick whichever one that you want to start at, making sure that you hold this semi-secures so it can't move around too much. You never want to tighten any of these up til you have everything lined up. You might need to move it around a little bit. That's okay. Just get that so it's a little snug. We'll move on to the second and then the third. We're on to our third bolt. This one I'm going to tighten right up and then I'll go ahead and go on to the other two, make sure those are snug. Then we should be all set.
Down here. Grab the right one, Len! Doesn't need to be too tight. There we are. Now we're clear to remove our plastic. We should be all set. See if I can grab it with gloves. Practically impossible. I'm not Mary Poppins. Something I wanted to point out is there's another mounting hole for the headlights down here. The original equipment didn't come with a bracket here. The new equipment did come with a little bracket. If you want, you can install that. What you'll need is a bolt that's just the same as the bolts that you used to mount the other three. If you need to take that down to the hardware store, or to your own little extra parts bucket, you can do that. You're going to go ahead and set this into the slot. Line it up. Start it in there. We'll do the same thing for the top. Get it in. Use your ratchet, whatever you might have. I like to tighten up the bottom one first. I'm going to push it up at the same time.
Once this is completely snugged up, we'll go ahead and tighten up the other one. Feels pretty good. Moving on. This is screwing right into plastic, so you don't need a whole bunch of power. It feels good. That just gives a little bit of extra support. It's going nowhere. Like I said, you can use one of the bolts that matches the same as the other three up there. That's just an addition for what we've got going on.
All right. Now it's time to install our bumper cover. We're going to be careful not to rub up against our fenders with it, unless you don't care about your paint. I'm going to try hard though. See if we can get it settled in nice and easy. Just get that down along there. I'll worry about pressing it in in a minute. Just going to get it lined up along the top here. We're going to get this lined up. We're going to try to get this hole lined up under there, this one with there, this one there, and so on. If you need to, you can use a little bit of your body force. We have two different types of clips here. We have regular push clips and then the locking push clips. You can count them. There's two that are locking, four that are regular. They're different sizes. This right here is much wider than the other ones. They go in the bigger holes.
I'm going to put the two, one right here, and the second one right here. These are the two bigger holes. If you wanted to, you could latch them down. I'm not going to worry about it yet. I'm going to try to get these lined up. Just give it a little push. That locked in. Come on over. The next one. Should just press in hopefully. Sometimes it's hard getting things lined up. There it is. Come along. We got two more. Two more holes. That's nice. See if I can get it in. If you needed to, you could use maybe a small hammer or whatever you got if you don't have the thumb strength for it. That's okay.
All right. We got all these, now I can go ahead and lock these down simply by pushing in the centers. We can line up the bumper along the headlights. Might do a little bit of finagling here. Going to try to get it right along the seam of the fender. There's a little lip under there where it's black. See if we can get it popped in. Looks like we need to give it a little bit of tug to pull it. Here we go. Some brute force. We'll do the same thing for the other side. Then we'll be clear to lift this up and we can put in our two screws and then go along the bottom and fill those in as well. Let's see.
All right. We have our little hidden screw holes here. Let's see if I can get it off. Get our screw. 10 millimeter bolt head, in case we don't remember. That's okay. I'm just going to try to get it lined up. We are only screwing into plastic. Anytime you hear that, just remember you don't have to go super tight. It's just to secure it in. That feels pretty good. We can go ahead and push this up in here. Then we're just going to go on to the other side and finish up with the bumper skirt and be all set.
Here we go. We're going to grab this plastic. It's going to go underneath the plastic of your bumper ... or bumper cover I guess. Your bumper would be the metal part. I'll get that lined up. If these things look like they're misaligned with the holes, they just move fairly easily. Then we can line them up. Take a peek. Of course the first one I put in moved a little bit. That's okay. Like I said, they move fairly easily. That looks good now. Okay. Take our three Phillips-heads on our screwdriver. We're just screwing into plastic, so you don't have to go hard like I keep saying. Just get these in. Down the line. Here we are. Now we'll do the same on the other side and we can move on.
We have our splash shield. Let's say, for some reason, maybe you lost the clips that go up here. You lost the push pins, or even you just didn't have any and you just need to replace them. You don't have any replacements. What we could do is use a couple zip ties. The way we're going to do that, if you have access to something like this, you can go ahead and make a hole, something like that. You can use a drill bit if you wanted to do that. You could use a ... anything that you wanted to use to make a hole, really. Very carefully use a pocketknife. For me, I'm just going to go ahead and use this. I got it nice and hot. I'm going to go like this, just rest it on there. Melt myself a nice little hole. There's one. You don't want to breathe in these fumes. I'm sure it's known to the state of California to cause cancer. Here we are. Now we've got holes.
Go ahead and turn this off. Let it finish doing what it's doing, making smoke clouds. Now we can go ahead and match this up. Bring it up here. Looks fairly good. We can use our zip ties. It's going to be hard getting the first one started. It's going to be flopping around. What I'm going to do is I'm just going to get it started down here and go through and I'm going to bring it back through. If you wanted to, you could use bigger zip ties. Something a little stronger might be better.
For what I'm doing, I'm just going to do this. Let's see. Let's go this way. That makes more sense, doesn't it? Bring it through. Just get it started. We don't need to tighten it up yet. Now we can just let this hang down. We can grab our other zip ties, continue on. Leave them loose until we get in our push pins. Get it lined up with the hole. Push it right in. Get our last one. See if we can get it up in there. Take our center push pin, lock it up in. There we go. Now we can go ahead and tighten these down. We'll just go down the line. You can leave them down if you like that. Trim them off if you don't. Kind of looks like a neat little thing, but there we go.
This is a basic tutorial on how to aim the headlights on your vehicle. Find the axis of your headlights. This is usually indicated with a small dot or the headlight bulb size on the lens. If not, it's the actual center point of your headlight bulb. Transfer this mark to a vertical wall with a preferably dark color that will allow you to back up 25 feet. Pull up and find the center line of your vehicle, as well as the center line of your headlight axis. Mark the wall with the height of the headlights in a straight line going across at that axis height. Back your vehicle up 25 feet from the wall to the front edge of your vehicle's headlights. Turn your headlights on and locate the adjusting screw, usually on the backside of your headlights.
You'll want to rotate this until the passenger hotspot, or focus of the beam, is approximately two inches below the line and the driver's side is four inches below the line. We change the heights on each side so you can still get a good beam to the offside of the road on the passenger's side and have the driver's side low enough to not blind oncoming traffic.
Thanks for watching. Visit 1aauto.com, your place for DIY auto repairs, for great parts, great service, and more content.