Hi, I’m Mike from 1A Auto. We’ve been selling auto parts for over 30 years!
Hi everyone. Today, we're going to be working on this 07 Mazda 6. We're going to be installing quite a few parts that we stock at 1AAuto.com. If any of these parts or any other parts you need, come on over to 1AAuto.com.
We're going to be removing the front bumper, which also involves disconnecting electrical connectors for the marker assembly. First, practice on anything you're dealing with electrical on a car is smart is to disconnect the negative cable. I just take a 10 millimeter wrench. For this model, it's a 10 millimeter bolt on it. I take that negative and I set it aside. I don't want it to touch anything. I'm going to cover up that positive. It should've been covered.
Now, we're pretty much safe to disconnect anything electrical and not cause any surging going back. We're going to start by removing these to upper screws on each side. That's a Phillips. One is metal, and the other one is a plastic body clip, and it still has a Phillips drive on it.
I find the best way to do these is let the weight of the screwdriver. If you push down like that, you're never going to... See how it skips itself. Just pop it up. You can use a body tool or you can use your fingers to lift it up. We'll do the same two on the other side. Plastic likes to break easy, so gentle. Once these four top screws are taken out, you're going to need to raise and support the vehicle.
I have a two post lift, so I'm going to raise mine up to go to the other carriage. You, at home, can jack it up and put jack stands underneath on a secure spot. Once you've raised the vehicle and supported it, we're going to remove these four little bolts, screws. It's an 8 millimeter head for the socket. There's four on each side. Then, there's going to be two bolts in the middle that are a 10 millimeter head socket. This one with the clip is broken on it. The plastic is broken off, so obviously, I can't show you removing that one.
I'm going to move over to the passenger side. Take the same four off on this side. Doing pretty good, I'm not dropping them. Must've had a good breakfast. All right, so now I'm going to switch over to a 10 millimeter socket, so I can get the two center bolts. Once these two bolts are down, we have to lower the vehicle to midway, because you're going to have to get into the fender well to remove the inner fender well bolt. Those two are out of the way. We're going to bring your vehicle down.
Once I've got the vehicle to a comfortable height, I can remove these two plastic body clips. There are Phillips heads on them. You've got to gently unscrew the plastic, and you might have to hold the base. It spins sometimes, so just use your finger, and put pressure on it. It's a plastic clip, so this top one's the same exact way. See how the whole thing spins, so I have to hold it at the outer edge and just slightly unscrew. If it doesn't work, don't get discouraged, because we're going to use a flathead screwdriver to pry it out, just like this one is not cooperating. Because it didn't want to work with me, I've got a little pocket screwdriver, and I'm going to wedge it in here. You can try a trim tool. See if I can get it to lift up a little bit, if I can get in there. Sometimes road dirt get in there and it jams the threads up. Let's see if I can get it to come out just a smidge. No. I'm just going use this.
Now, we get enough of this pulled out, we can get our body tool, pry in there. Once the fender well is out of the way, there is one more mounting bolt up in here we have to disconnect. Now, you're going to have to do undo this last little screw in here. It's a Phillips head on it. Let's hope the weather treated us kindly and it will come right out. Let's see if I can guide it out. There we go. Now, we have to do the same thing to the other side. We remove those two clips, and that one Phillips head screw.
Now that we've removed all of our mounting on both fender wells, top and bottom, right in here is a nice little couple of clips. We need to grab that bumper and just hold it securely, because it might fall out. I'm just going to pop that side out of there. We're going to go over to the passenger side and do the same. Now, we have marker lights that are still attached. When I go to lift this off, we know that we have a harness that's still attached. Luckily, it's working with me.
If you want to see the marker light assembly, it's right there. I'm just going to pinch the tab if I can see it. In this case, I can't, so I can just turn it out, and let that lamp sit. Move my way to the other side holding on to the bumper, and going to remove this marker lamp the same way. See what else we have in here.
I disconnected the factory harness to where a fog lamp would be. This car is wired for fog lights but doesn't have them. They just put this grille in and clip that in so the dirt and grime doesn't get into it. In the future, if you wish to install fog lights, you can. Now, with the bumper disconnected, I'm ready to remove it and walk away.
When replacing the lower grille, in the bumper, you have to remove the license plate cover. I have two 10 millimeter head screws, here. I'm just going to use my 10 millimeter socket. Get these out of our way. Now, with that out of our way, we can go around the backside of the bumper just getting the clips out. When removing the lower grille part of this bumper, first thing you take is that nice flathead screwdriver. I'm going to start up in this corner, pull this tab, and pry with my finger on the plastic grille piece towards me. I'll just work myself around here.
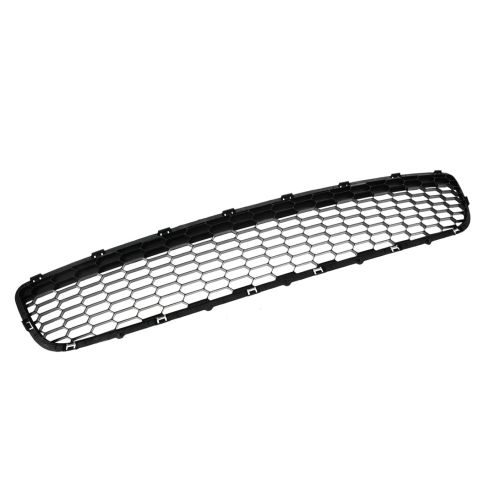
This is our lower piece grille for this bumper from 1AAuto.com. You can see it matches up to the original equipment and looks identical. All the clips are there, all the markings. If you need this part or any other part for your vehicle, click on the link below, and come on over and see us at 1AAuto.com.
To install the new one, it's basically a reverse procedure. I'm going to start from the same side. I'm going to line up my spots. Give it a push. I'm going to use this hard surface so that I can actually push those clips down. You can do this, like I said, on the ground with a towel or a blanket. You just want to sure you line these parts up with all the clips. Now, it's all in place.
Let's see what it looks like from the front. Ah, nice. Nice and clean, black, not faded. Let's install the front bumper. We start by picking it up and lining up the fender. Try not to scratch the body. Just pick it up. You'll see the pins where it goes. We can go to the side. You want to put it on top of the lip there. Get it right in. Push it in. Follow yourself around to the other side. Cut that. Edit that out.
I'm going to put my body clip in first on one side and then the other. Push it down. I'm going to put my bod clip in on one side and then the other. If you need to put a small screwdriver in there to help line up the other hole, this is what I would do, just to push that body piece over. Maybe we're going to put the bolt in first. See how it won't line up over there? It's not uncommon for once you've taken a body piece apart for it not to line up 100% until you get it in there. I'm going to grab the mounting screw, see if I can force it in there.
Now, it seems like I have more of a chance of exposing this down there. There we go. I'm going to tighten this up. Move to my other side. Put this one in. This is where I'm going to raise up the vehicle and start putting my fender well back together. We're going to put the two screws that go up into the sheet metal into the body.
Now I'm going to put my sheet metal screw with the Phillips head back up on the end of the bumper flare here. I'll repeat the process on the other side before I put the plastic pins in. Before I snug it up, I just want to make sure that that body is not sticking out or in too far. I'd like to try to get it to line up just right. Now, I'm going to move to the other side. Now, I'm just going to pay attention to that body trim again, where the bumper where it meets the fender.
Now, I'm going to start installing my plastic clips on the inside fender flare on both sides. Move to the other side. Now, I'm going to raise the vehicle all the way up to put my 10 screws on the bottom half. Before I attach the under the bumper splash shield, I'm reconnecting my connectors. This is the fog light connector to the fake fog lens cover. Then, both markers, I'm going to reattach both markers up on top—one there on the driver side, and then one on the passenger side. Now, I can attach, once I've attached my electrical connectors on the marker lenses, I put up the driver side splash shield, and put my little screws in with 8 millimeter head socket.
There's four on each side, passenger side and then driver side. Then, I have the two center bolts. Now, I'm going to do the same on the driver side, passenger side. Now, I'm going to do the same on the passenger side. I get that. Now, we have two in the center. That's it, and we'll be done installing the front bumper.
These are the 10 millimeter head bolts. They have a spacer on them, because they pick up the gap for the front thickness of the bumper. At one time, this car had a splash shield on it. It seems to be missing. That would also pick up the gap in the plastic that is supposed to go here. That is it. We are done. Check your lights. Make sure they operate properly before you head down the road. Now that my bumper and headlights have been installed and all electrical connectors are reattached, I can safely put my negative cable back on my battery. Use a 10 millimeter wrench.
Thanks for watching. Visit us at 1AAuto.com for quality auto parts, fast and free shipping, and the best customer service in the industry.
