About TRQ: TRQ is a trusted brand dedicated to making every repair a success story by combining premium parts with easy installation. Each TRQ part is engineered by a team of automotive experts to meet or exceed OEM standards, delivering enhanced performance and maximum longevity. With rigorous in-house testing, the brand ensures superior fit and function across every product line. TRQ also provides customers with best-in-class, step-by-step installation videos—so you can complete repairs with confidence, whether you're a first-time DIYer or an industry professional.
Product Features
Application Specific Design: No modifications necessary
Anti-Corrosion Coated: Enhanced surface life
Pre-greased: No additional maintenance required
Kitted for Restored Performance: Improved road-feel and handling
Description
TRQ suspension kits are manufactured using premium raw materials and coatings for extended service life. Each TRQ suspension component is designed to be a direct, maintenance-free replacement to the stock unit. To extend the life of your steering and suspension components, TRQ recommends replacing components in pairs, sets, or kits. All products are fit and road-tested in our Massachusetts R&D facility to ensure we deliver on our promise of Trusted Reliable Quality.
Install Tip: When replacing steering components, have a professional alignment performed afterwards. This ensures proper tracking and even tire wear.
Our steering and suspension components are pre-greased and sealed for long life and do not require the extra maintenance typically required by greaseable versions.
Attention California Customers:
WARNING: This product can expose you to chemicals including Lead and Lead Compounds, which are known to the State of California to cause cancer, and birth defects or other reproductive harm. For more information, go to www.P65Warnings.ca.gov.
This part fits
3 vehicles spanning 2005-2007.
Fits these Makes
Select vehicle
Year
Make
Model
Description
2005-2007
Chrysler
Town & Country
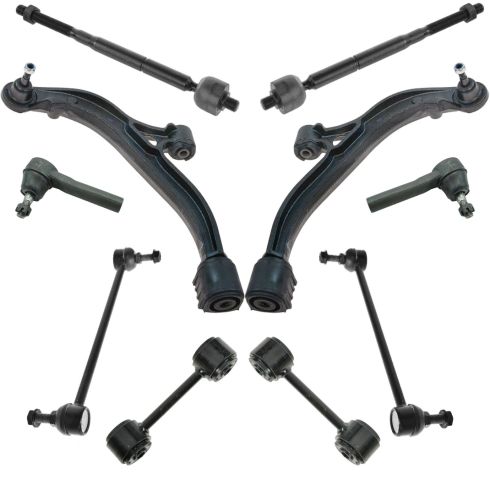
Chrysler Town & Country Front & Rear 10 Piece Steering & Suspension Kit TRQ PSA59233
Dodge Grand Caravan Front & Rear 10 Piece Steering & Suspension Kit TRQ PSA59233
Part Interchange
Brand Label
Part Number
ACDelco
CB81023
ACDelco
45D3158
Dorman
520-341
ACDelco
45D3157
Delphi
TC2219
ACDelco
CB81024
Dorman
520-342
Delphi
TC2218
Mcquay-Norris
FA4250
SYD
1506013
MOOG Chassis Products
K7258
Ingalls Engineering
CAK620171
Mcquay-Norris
FA4208
Dorman - OE Solutions
520-342
Mevotech
MS25140
MOOG Chassis Products
RK620170
Precision Driveline
CB25071
Chrysler
4766623AA
Mevotech
CMS25140
Mevotech
CMS20368
MOOG Chassis Products
RK620004
Dorman - OE Solutions
520-341
MOOG Chassis Products
CK620005
SYD
1506012
Ingalls Engineering
CAK620170
Chrysler
4743835AA
Mevotech
MS20367
MOOG Chassis Products
CK80717
Mcquay-Norris
FA4251
MAS Industries
CB81023PR
Mevotech
MS25139
NAPA Premium
2605336
Falcon Steering Systems
FK620005
NAPA
260-5335
MOOG Chassis Products
CK620171
MOOG Chassis Products
K620171
Chrysler
4743834AA
Falcon Steering Systems
FK620004
NAPA
260-5336
Centric Parts
623.67009
MOOG Chassis Products
EV80645
Mevotech
GS25140
Centric Parts
623.67002
MOOG Chassis Products
RK620171
Mevotech
CMS20367
Mevotech
CMS25139
MOOG Chassis Products
K7301
NAPA Premium
2605335
Mevotech
MS20368
Raybestos Chassis
507-1158
Mcquay-Norris
FA4209
Chrysler
4766622AA
MOOG Chassis Products
ES3614
MAS Industries
CB81024
NAPA Premium
2605378
MOOG Chassis Products
RK620005
MOOG Chassis Products
CK620170
MOOG Chassis Products
CK80716
Precision Driveline
CB25070
NAPA Premium
2605377
Raybestos Chassis
507-1157
MAS Industries
CB81023
MAS Industries
CB81024PR
Mevotech
GS25139
MOOG Chassis Products
K620170
DIY Solutions
SUS06610
DIY Solutions
SUS05393
DIY Solutions
SUS05394
DIY Solutions
SUS07523
DIY Solutions
SUS06683
DIY Solutions
SUS07378
Chrysler
5272190
Chrysler
4743454AA
Chrysler
4743377AC
Chrysler
4743021AA
Chrysler
4743669AA
Chrysler
4743376AC
Chrysler
5103320AA
Chrysler
5103320AB
Falcon Automotive
CA656
Mevotech
MES3614
Mevotech
MK7258
Mevotech
MEV80645
Mevotech
MK7301
Carquest
CA768B
Carquest
CA769B
Dorman - Premium
SL82315XL
Dorman - Premium
CB81023PR
Dorman - Premium
CB81024PR
Hollander
512-01265L
Hollander
512-01264R
Mevotech Supreme
GS25140
Mevotech Supreme
CMS25139
Mevotech Supreme
MS20367
Mevotech Supreme
MEV80645
Mevotech Supreme
MS25140
Mevotech Supreme
MK7301
Mevotech Supreme
MS25139
Mevotech Supreme
GS25139
Mevotech Supreme
CMS25140
Mevotech Supreme
CMS20368
Mevotech Supreme
MK7258
Mevotech Supreme
MES3614
Mevotech Supreme
MS20368
Mevotech Supreme
CMS20367
This item may be interchangeable with parts from other brands with the above part numbers.
This information is provided only for reference and does not guarantee that the item you are
purchasing is identical to parts with part numbers from the brands listed above.
To confirm that this item fits your vehicle, use the above "Check Vehicle Fit" option.
Lifetime Warranty
This item is backed by our limited lifetime warranty. In the event that this item should fail due to manufacturing defects during intended use, we will replace the part free of charge. This warranty covers the cost of the part only.
FREE Shipping is standard on orders shipped to the lower 48 States (Contiguous United States). Standard shipping charges apply to Hawaii and Alaska.
Shipping is not available to a P.O. Box, APO/FPO/DPO addresses, US Territories, or Canada for this item.
Expedited is available on checkout to the United States, excluding Alaska, Hawaii.
Final shipping costs are available at checkout.
How To Replace Sway Bar Link 1996-2007 Chrysler Voyager
Created on:
Tools used
Rust Penetrant
Lug Wrench
5/16 Inch Hex Wrench
3/4 Inch Wrench
1. Remove the wheel
Loosen the lug nuts with your lug wrench.
Raise and secure the car.
Remove the lug nuts and remove the wheel.
2. Remove the stabilizer link
Spray the bolts with penetrating oil
Use a 5mm Allen wrench and an 18 mm wrench to remove the nut and bolt on the stabilizer link.
Repeat on the bottom.
Use a Sawzall to remove the stabilizer link if it is rusted on there.
You can rent a Sawzall at a home improvement supply store.
3. install the new stabilizer links
Put the stabilizer link in place and use your wrench to bolt the locking lug nuts on.
4. Put the wheel back on
Hand-tighten the lug nuts and then lower the car.
Refer to the owner’s manual to torque the lug nuts to the correct ft lbs.
Use a star pattern.
Brought to you by 1AAuto.com, your source of quality replacement parts and the best service on the internet.
Hi, I am Mike Green. I am one of the owners of 1A Auto. I want to help you save time and money repairing and maintaining your vehicle. I am going to use my 20 plus years experience restoring and repairing cars and trucks like this to show you the correct way to install parts from 1aauto.com. The right parts installed correctly that's going to save you time and money. Thank you and enjoy the video.
In this video we will be replacing the stabilizer link on this 2003 Chrysler Voyager. This is the same as any 1996 to 09 Caravan, Voyager and Town and Country. The tools you will need for this are a set of Allen wrenches 1/4 to 5/16, 3/4 or 18 mm wrench and a socket wrench or lug wrench to remove your wheel. Depending on the year and whether or not your stabilizing links have already been replaced you may have slightly different sizes so we didn't specify each size for the wrenches.
Ok, first you need to raise your car and secure it. Always follow the safety instructions on the jack and the jack stem or the lift and I am going to remove the front wheel. Our problem is actually right here. Now that you have the wheel off, there is two bolts that hold this stabilizer link on right here. I am going to spray it with a good amount of penetrant. Here is the bottom of the link and I am going to bring it around to the side here. You can see the bolt I have actually already spread that one with some stuff. Once you have the bolts sprayed down. You are going to use an Allen wrench and this is a five mm wrench. That is the right one. I believe that's about the right one.
Probably from about 1/4 inch to 5/16 or five mm and then the wrench is anywhere from 18 mm this is actually, this car may have had this replaced before. Then if you are lucky enough, the top comes off pretty easy. You have to hold the Allen wrench while you twisting it off. You see there, it spins if you don't hold it. Now the bottom- you actually put your Allen wrench right up through this little hole in the control arm and then first you got to put your wrench on. Again this one is 3/4 but it may be a 18 mm and then put it up through there. One of the first turns is that you turn it goes by itself and once that other starts spinning you got to work that Allen wrench in there and hold on to it.
Then in my experience, if you are doing this on Northeastern rustbelt car what you are going to want to have ready is a Sawzall. You can easily enough saw right here and right through. As long as you have a new blade on here probably take about 30 - 35 seconds just to get right down through and saw that off. Because most of the time what happens is this is so rusty it won't come apart. If it was necessary up here at the top you can do the same thing, run your saw blade right through here, or if you are lucky enough you may have torch or something. A Sawzall can be rented at a place like a Home Depot or a Lowes. What I would do is when you are ready to do this project try just getting it apart with the wrenches first, but have a plan. Call your Home Depot make sure they have one of these available to rent. If you can't get it apart with the wrenches, hop over to the Home Depot, rent the saw for a couple of hours and make sure you put a new blade on it and you will go right through and get it right out.
Now I am going to remove the old one and get ready to put the new one back in. As you can see I got this hooked off and of course the locking nuts it is kind of can be a pain to the last. It's actually gotten more difficult to remove it. There is the link and what happens is there is a nylon inside and it ends up wearing out and going bad and then they start knocking, if you start hearing a clunk or vibration when you go over a pot hole. That is probably what it is. One way to really tell is if you are turning and you go over bumps and you don't hear the sound as much that is a good indicator that these are the problem. Because when you are turning you are actually putting pressure on these and you eliminate their ability to vibrate and clunk. Basically if you are driving straight and you hear clunking when you go over bumps try listening for that clunking when you are taking a slight curve. If you don't hear it as much, then it is your stabilizer links.
Take your new link from 1A Auto then it goes right there where the old one is and then all you have to do is the same drill. Just use your Allen wrench and your wrench and tighten them up. When we get them on, we will tighten them up. Same thing is to put your wrench on, use your Allen wrench. Go ahead and tighten them on. Get them on pretty tight. You can actually once it is in there tight you can use your wrench really tighten them up. Tighten up the bottom one really good. Put the wheel back on and it is ready to go.
Brought to you by www.1AAuto.com, your source for quality replacement parts and the best service on the internet. Feel free to call us toll free at 888-844-3393. The company that is here for you on the internet and in person. Thank you.
Product Reviews
4.8/ 5
★★★★★★★★★★
9 reviews
5★
89%
4★
0%
3★
11%
2★
0%
1★
0%
Customer photos
★★★★★October 20, 2023
Great kit for the price
Glade that I came across this kit, with this kit it ended up being cheaper then having to order one piece at a time.
★★★★★July 9, 2023
Great
Great and perfect fit
★★★★★October 19, 2020
As expected
All parts fit correctly as expected.
★★★★★September 19, 2020
Okay
fell great in hand
★★★★★March 10, 2020
Great kit
Go have all of these parts are great didnt need them all but still with this great price for these parts itself worth it to just get this and the other parts I'll have for future repairs great kit excellent value
★★★★★June 26, 2019
My Parts Review
I'm Really pleased with the Price and Service that I recieved, I would Highly recommend this company to Anyone who would be Interested in Purchasing part online threw you guys. You Guys Make It Happen! The only thing that I Disliked was the fact that it came in a flimsy box that was all beat down during the Shipping Process. The parts were to heavy for such a box, it should have been in a thicker stroner box. Other wise I'm Happy to have picked up parts from you guys. I'm looking forward to continuing business with 1aauto. Thanks Again for the opportunity. Aloha from Hawaii
★★★★★November 19, 2018
No problem fitting well like its close to
The portal is the Reib bar and I appreciate your business and I will be doing business with you again love van is running will thank you appreciate it and you all have a happy Thanksgiving
★★★★★November 13, 2018
Perfect fit.
Used on my 07 Dodge Grand Caravan SXT. Works like new thank you 1AAuto always a pleasure doing business with you. :)
★★★★★September 30, 2018
Awesome to have exact parts that fit properly...thank you A1 <3
Real nice to receive parts that actually fit properly...A1 has great service for getting what you need...ordered parts and recieved same day they qouted...will be ordering again in near future
Showing 1–9 of 9 reviews
PSA59233
In Stock
Customer Q&A
Got a question about this part? Post it and get answers from our team.
No questions have been answered for this product yet.
Customer service
877-844-3393
Monday - Friday 8:00am - 9:30pm ET Saturday - Sunday 8:00am - 4:30pm ET
Ask a Question
Check Your Email
We sent a verification email to .
Click the Verify Email button in the email to submit your question.
This extra step helps prevent spam.
Select Your Vehicle
Specify your vehicle's year, make and model to guarantee fit.










 WARNING: This product can expose you to chemicals including Lead and Lead Compounds, which are known to the State of California to cause cancer, and birth defects or other reproductive harm. For more information, go to www.P65Warnings.ca.gov.


