





★★★★★
August 6, 2020
Mirrors
The shipping was fast, and parts were perfect. Thank you for installation tutorial video.

Replaces
About TRQ:
TRQ is a trusted brand dedicated to making every repair a success story by combining premium parts with easy installation. Each TRQ part is engineered by a team of automotive experts to meet or exceed OEM standards, delivering enhanced performance and maximum longevity. With rigorous in-house testing, the brand ensures superior fit and function across every product line. TRQ also provides customers with best-in-class, step-by-step installation videos—so you can complete repairs with confidence, whether you're a first-time DIYer or an industry professional.
Product Features
TRQ side mirrors and mirror components are designed to match the function, fixture, and performance of the original version for easy installation. TRQ mirrors are DOT certified, comply with all federal safety standards, and are independently lab tested to ensure our products comply with all government regulations. All products are fit and road-tested in our Massachusetts R&D facility to ensure we deliver on our promise of Trusted Reliable Quality.
Exact fit - To obtain proper fit and function confirm your vehicle has the exact mirror options listed.
Paint To Match Note:
"Paint-to-match finish" refers to a smooth, paintable surface. This item is not painted. Paint offers better coverage and adhesion, but it is not necessary for installation.
Attention California Customers:
 WARNING: This product can expose you to chemicals including Chromium (Hexavalent Compounds), which is known to the State of California to cause cancer, and birth defects or other reproductive harm. For more information, go to www.P65Warnings.ca.gov
This part fits 1 vehicle spanning 2003-2008.
| Year | Make | Model | Description |
|---|---|---|---|
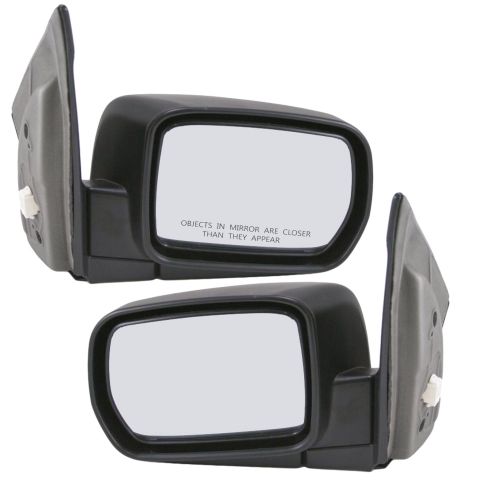
| 2003-2008 | Honda | Pilot | Honda Pilot Driver & Passenger Side 2 Piece Power Without Memory Paint to Match Mirror Set without Heat TRQ MRA04930 |
| Brand Label | Part Number |
|---|---|
| DIY Solutions | MIR03853 |
| DIY Solutions | MIR01072 |
| DIY Solutions | MIR01071 |
| Honda | 76200S9VA01 |
| Honda | 76200-S9V-A01 |
| Honda | 76250S9VA01 |
| Honda | 76250-S9V-A01 |
| TYC | 4790031 |
| TYC | 4790032 |
| Partslink Numbering System | HO1320154 |
| Partslink Numbering System | HO1321154 |
| Hollander | 128-53175CL |
| Hollander | 128-53174CR |
This item may be interchangeable with parts from other brands with the above part numbers. This information is provided only for reference and does not guarantee that the item you are purchasing is identical to parts with part numbers from the brands listed above. To confirm that this item fits your vehicle, use the above "Check Vehicle Fit" option.
Lifetime Warranty
This item is backed by our limited lifetime warranty. In the event that this item should fail due to manufacturing defects during intended use, we will replace the part free of charge. This warranty covers the cost of the part only.
FREE Shipping is standard on orders shipped to the lower 48 States (Contiguous United States). Standard shipping charges apply to Hawaii and Alaska.
Shipping is not available to a P.O. Box, APO/FPO/DPO addresses, US Territories, or Canada for this item.
Expedited is available on checkout to the United States, excluding Alaska, Hawaii.
Final shipping costs are available at checkout.



Created on:
Tools used
Open the door. Lower the window. Remove this trim. There are clips behind it. I'm going to use a plastic prying tool. You can buy these from 1AAuto.com. Once you remove those clips, there's another clip that is going vertically, so it's going to lift up and out, just like that.
Disconnect the electrical connector, push in the tab, pulling the connector out. Remove the 10 millimeter bolts, there are three of them, there's two here: one, two. And then the third one is outside, inside the rubber here. So if you're trying to get this free, and you can't figure out why the mirror is still free. Make sure you have released this one. I'm going to start with a 10 millimeter socket ratchet to get this top one loose. I'll leave it in there a little bit so the mirror doesn't fall. Then I'll remove this one. Once it's loose, I'll just use my fingers to take it out, put aside. This one, the trim is just in the way, it doesn't quite line up straight. You need to use a wobble extension if you have one.
I'm going to use an open-ended wrench, 10 millimeter. Just try to hold it on there so it doesn't pop off. Get that free. This wrench has a ratcheting end, so once it gets to a good point, try to use that. Remove that lower bolt. And then the top one should be loose. I'm also holding the outside of the mirror with my other hand so it doesn't fall. There are two plastic tabs on the white electrical connector. Use our plastic prying tool to push the top one in, then push the bottom one in. The mirror is free. That's why you want to make sure you hold on to it with your other hand, so it doesn't fall.
Installation is the reverse of removal. Take our mirror, line it up, and then push it through the opening of the electrical connector so it locks in. Now it's just seated there on the electrical connector. Going to take my hand and just push it up against the door frame. Take our upper bolt, thread that in, back to my 10 millimeter socket. Once I feel these get tight, I will stop. Install the bolt on the outside here. I feel it get tight, stop. Install the last bolt in the bottom. Since this one is hard to reach with my socket extension, I'm going to use the open ended 10 millimeter wrench. Once I feel it get tight, I will stop.
Reconnect the electrical connection. Re-install your trim panel. These tabs will go into the bottom slots here. And then these clips will clip into the body here. Actually there's a slot groove here that needs to fit into there. Get it slid into there. Trim cover is re-installed.
Thanks for watching. Visit us at 1AAuto.com for quality auto parts, fast and free shipping, and the best customer service in the industry.
The shipping was fast, and parts were perfect. Thank you for installation tutorial video.
Got the parts as promised. Followed the how-to videos. It was easy to do the repair and replacement. Highly recommended.
