Replaces


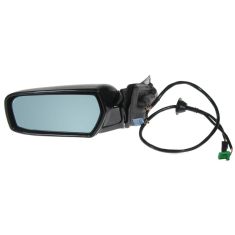
Part Details
About TRQ:
TRQ is a trusted brand dedicated to making every repair a success story by combining premium parts with easy installation. Each TRQ part is engineered by a team of automotive experts to meet or exceed OEM standards, delivering enhanced performance and maximum longevity. With rigorous in-house testing, the brand ensures superior fit and function across every product line. TRQ also provides customers with best-in-class, step-by-step installation videos—so you can complete repairs with confidence, whether you're a first-time DIYer or an industry professional.
Product Features
TRQ side mirrors and mirror components are designed to match the function, fixture, and performance of the original version for easy installation. TRQ mirrors are DOT certified, comply with all federal safety standards, and are independently lab tested to ensure our products comply with all government regulations. All products are fit and road-tested in our Massachusetts R&D facility to ensure we deliver on our promise of Trusted Reliable Quality.
Exact fit - To obtain proper fit and function confirm your vehicle has the exact mirror options listed.
Paint To Match Note:
"Paint-to-match finish" refers to a smooth, paintable surface. This item is not painted. Paint offers better coverage and adhesion, but it is not necessary for installation.
Attention California Customers:
 WARNING: This product can expose you to chemicals including Chromium (Hexavalent Compounds), which is known to the State of California to cause cancer, and birth defects or other reproductive harm. For more information, go to www.P65Warnings.ca.gov
Lifetime Warranty
This item is backed by our limited lifetime warranty. In the event that this item should fail due to manufacturing defects during intended use, we will replace the part free of charge. This warranty covers the cost of the part only.
FREE Shipping is standard on orders shipped to the lower 48 States (Contiguous United States). Standard shipping charges apply to Hawaii and Alaska.
Shipping is not available to a P.O. Box, APO/FPO/DPO addresses, US Territories, or Canada for this item.
Expedited is available on checkout to the United States, excluding Alaska, Hawaii.
Final shipping costs are available at checkout.

Created on:
Tools used
Brought to you by 1AAuto.com, your source for quality replacement parts and the best service on the Internet.
Hi, I'm Mike Green. I'm one of the owners of 1A Auto. I want to help you save time and money repairing and maintaining your vehicle. I'm going to use my 20 plus years experience restoring and repairing cars and trucks like this to show you the correct way to install parts from 1AAuto.com. The right parts installed correctly. That's going to save you time and money. Thank you and enjoy the video.
In this video, we're going to show you how to replace the side or rear view mirror on the door on this Cadillac CTS. This is a 2006, same for any '03 to '07. Tools you'll need are pretty basic, a putty knife or a similar flat-bladed tool, Phillip screwdriver, a 10mm socket with a ratchet and extension.
I use my old household putty knife, take a paper towel and just wrap it. Then you're going to put it up in underneath and pry up and pull out on this handle and up in here, pry up, pull out, that comes out. Behind here is a little tab, pull up on that tab, and pull the lock connector, make sure you leave it unlocked. Pull that off, and then this bezel comes right off.
See the very corner, right here on your lock button, pry out very lightly and this whole thing comes right up and off. Again, just carefully, there's a little plug right in behind your door pull here. Inside that plug, two Phillip screws. We'll speed up here, as we're just removing those two Phillip screws. Once those screws are out, start here at the top and pull, work your fingers in behind and just little sharp pulls, tugs.
Out and off, obviously your mirror mounts on here with three bolts. You have a little clip on your wire harness. Use your putty knife again, go from the side, release the clips a little bit. Then the mirror comes right down here, it's this green one, press and pull that out from the box and then there's another one right here, press and pull. Now using a 10mm socket with a ratchet and extension, you could also use a wrench. Remove these three nuts. We'll just fast forward a little bit as I'm removing those. Once you have those removed, force your harness through, and pull the mirror right off and grab the harness through. Here's our original mirror, new mirror from 1A Auto. You can see it's all the same. It's going to bolt in the same. Very important, it has the same, and your mirror has the same connections, so it's going to plug in all correctly. One thing about it is, it's molded in black. You can obviously install it as is, and it will work and function for you. If you wanted to paint it to match, I'd suggest going to an automotive parts store that has a good paint department. They can help you match the color of your paint, put some in an air charge can and you can tape off the mirror and spray it yourself to match.
For this vehicle, obviously my original is in fine shape. I'll show you re-installation just using that, and re-installation, pretty easily, is just a reverse in procedure. Put the harnesses through, feed them down in. You probably want to push your plug through here. Just put the bottom in first, push the top down in. Put the mirror in place. Fast forward as I put the three 10mm nuts in place and tighten them. You want to tighten them firm, but don't want to over-tighten them. It has larger line up pins here and down here, they go in to holes. This is going to peek through, line that one up there. Line that one up there, push the top on.
Make sure you can look down, you can see the connector going together. Now put in our two Phillip screws. Again we'll fast forward, just to speed through putting those screws in. You want to get them tight, they don't have to be extremely tight, but you want it nice and firm so they hold the door panel in place well. This trip plate, just hold it back in and pushes into place. Put this panel back on your door handle, reconnect your lock switch. I'm just going to put it back into place, it locks in. Last but not least, the lock button. Put it down until it touches there, and push in the lock.
We hope this helps you out. Brought to you by www.1AAuto.com, your source for quality replacement parts and the best service on the Internet. Please feel free to call us toll free 888-844-3393. We're the company that's here for you on the Internet and in person.
Tools used
Brought to you by 1AAuto.com, your source for quality replacement parts and the best service on the Internet.
Hi, I'm Mike from 1A Auto. I hope this how-to video helps you out, and next time you need parts for your vehicle, think of 1AAuto.com. Thanks.
In this video, we're going to show you how to remove the driver’s side view mirror on this 2005 Cadillac CTS. This information is going to be very similar for the passenger's side. Here are the items you'll need for this repair.
Using a flat blade screwdriver, we wrap it in some tape here to keep it from scoring the interior. We want to pry out on this trim panel around the door handle. Release this little tab on the connector at the top. Remove that connector from the door lock switch. Using that same screwdriver, I'm going to pop out this cover underneath the interior door handle here so we can access these two Phillips-head screws. Remove these two Phillips-head screws with a number 3 screwdriver. Using a small flat blade screwdriver, pop out this tab on the door lock and remove it from the door lock rod. Simply pull out on the panel now and release it from the door.
Disconnect these two connectors from the front door module. Feed them back through the harness here to get them out of the way. Using the flat blade screwdriver, pop this harness retainer out of the door. Remove these three 10mm nuts from the inside of the door. Be sure to support the mirror when you remove the last nut. Carefully work the mirror out of the door, feed the harness through the hole, and your mirror is out.
Feed the wiring harness through the center hole, line up your bolt, and pull the harness through to seat the rubber boot. Start your three 10mm nuts and tighten them down with a socket and ratchet. Snap the harness retainer into place, run the wires behind this harness to the left of the speaker. Reconnect the connector to the front door module.
Be sure to align the connector here in the door panel and line it up. Make sure that the door lock rod is pulled up. Snap all the retainers back into place. Install the door lock pull, pop it back in. Reinstall the two Phillips-head screws behind the door handle. Snap the plastic cover back into place. Reinstall the connector for the door lock switch. Pull out on the door handle, set the trim on, and snap it in.
Thanks for tuning in. We hope this video helps you out. Brought to you by www.1AAuto.com, your source for quality replacement parts and the best service on the Internet. Please feel free to call us toll-free, 888-844-3393. We're the company that's here for you on the Internet and in person.

MRA05823