Brought to you by 1AAuto.com, your source for quality replacement parts and the best service on the internet.
Hi. I'm Mike Green from 1A Auto. I hope this helps, the video helps you out. The next time you need parts for your vehicle, think of 1AAuto.com. Thanks.
In this video, we show you how to replace a mirror on this 2003 Honda CRV. We show you the driver side, passenger side is a very similar process. Tools you'll need are a small flat blade screwdriver, a Phillips screwdriver and an 8mm wrench or socket with ratchet.
You want to remove this trim piece. There's a little clip right here. Push in at the center. Okay. That allows that to be pulled out. Small screwdriver, the trim panel back in here. You want to kind of put the screwdriver in, and pry that out. Two Phillips screws to remove there. Carefully with a flat blade screwdriver, pry up on your switch panel here.
Then you will see me remove two Phillips screws way underneath the arm rest. With this up, hit the button on the back side of your mirror switch, press the button, work this connector out. Pull it up some, there's a green button on your window switch. You may want to use a little screwdriver, push that green button in firmly and work that panel right up and out. Now, unscrew up our four screws.
I'll fast forward here as I remove the two screws that are in behind that trim panel on the door handle and then the two screws that are hidden up under the arm rest or the door pole area. You'll need to pull your door handle out here. There's a little button for the connection for your power lock. Press that button and disconnect your power locks. There's a little clip back here. Flip that clip off and pull this rod up, and your door panel comes out. Your door handle comes out. Once that's all set, you can start the top corner, pull firmly and try to work your fingers down and then there's a series of clips that hold the door panel to the door. Once you have it released lift up.
As you pull the panel away, this is your trunk or your hatch release. You're just going to push on the brown tab to the side, that disconnects. There are two connectors here. This one already came out. If you insert your screwdriver, basically right in here under. The tabs are lined up with this, so you just got right in here, insert your screwdriver on this side, pull up, that comes out, and your door panel is free. Carefully pull your water shield down so you come to where the mirror is connected. Right here, press on the little tab, disconnect the mirror. Use a screwdriver on tabs up there. Insert your screwdriver from the bottom. That comes off. Okay, 8mm socket with a ratchet, an 8mm wrench would work fine too here. Once you have those three nuts off, just work the mirror out. There's your old mirror off.
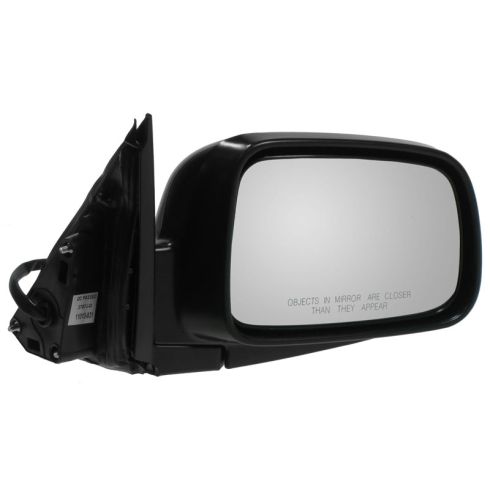
New mirror from 1A Auto. This is the black textured version, makes a good replacement for any vehicle. You can put on as is and it'll make a nice replacement. We do sell a smooth black one that can be repainted to match this vehicle, this trim. The mirror was blue. To do that, you could do something as crude as just going to your hardware store, finding a spray can that closely matches your vehicle and doing it that way. The better way if you want a better match is to go to an auto part store that has paint department. They can use your VIN and your color code, put some paint that matches and they in an air charged can and you can refinish it yourself.
Regardless, the 1A Auto replacement, goes right in, just feed that in. It comes with the mirror gasket and everything. Put it in, start one of the nuts. I'm just going to speed it up here and start all three of the nuts on by hand first and then tighten them up nice and firm with your wrench or socket and ratchet. Route your harness down through here. Put your insulation back on. To reinstall the door panel, push the window harness up and through, and then put these clips back in. Also my mirror harness, you could add something through, plug in my rear hatch switch down here. I know you can't see that but and then make sure that your lock goes through. Push the panel against the window so and down. Engage the clips around the outside which is look more than just using the back of your hand. I'm just going to fast forward here as I now put the two Phillips screws that go up under the door pull. Just kind of a matter of just putting up in there and getting him started and going and tighten them up nice and firm.
Kind of hold on to the window harness, put the panel down in and connect it. Connect your mirror harness. Kind of work this down and in, it'll lock it into place. Your door handle, connect your car door lock switch first. Pull this clip back a little bit, pull your rod out and kind of get it into the hole. Push it down in and flip that on. Put that in. A little bit of fast motion here again as I just use a Phillips screwdriver and put in those two screws that hold that door handle in place. Take your little trap door. It's got two, kind of clips at the bottom, at the bottom side. Put that in, push it right in. In this panel, put the kind of the bottom down in. Okay. Take this clip, push the center back through, put it in and just push the center flush to lock it.
We hope this helps you out, brought to you by www.1AAuto.com, your source for quality replacement parts and the best service on the internet. Please feel free to call us toll-free, 888-844-3393. We're the company that's here for you on the internet and in person.







 WARNING: This product can expose you to chemicals including Chromium (Hexavalent Compounds), which is known to the State of California to cause cancer, and birth defects or other reproductive harm. For more information, go to www.P65Warnings.ca.gov

