About TRQ: TRQ is a trusted brand dedicated to making every repair a success story by combining premium parts with easy installation. Each TRQ part is engineered by a team of automotive experts to meet or exceed OEM standards, delivering enhanced performance and maximum longevity. With rigorous in-house testing, the brand ensures superior fit and function across every product line. TRQ also provides customers with best-in-class, step-by-step installation videos—so you can complete repairs with confidence, whether you're a first-time DIYer or an industry professional.
Attention California Customers:
WARNING: This product can expose you to chemicals including Carbon black(airborne, unbound particles of respirable size), which is known to the State of California to cause cancer. For more information, go to www.P65Warnings.ca.gov.
This part fits
1 vehicle spanning 2001-2005.
Fits these Makes
Select vehicle
Year
Make
Model
Description
2001-2005
Honda
Civic
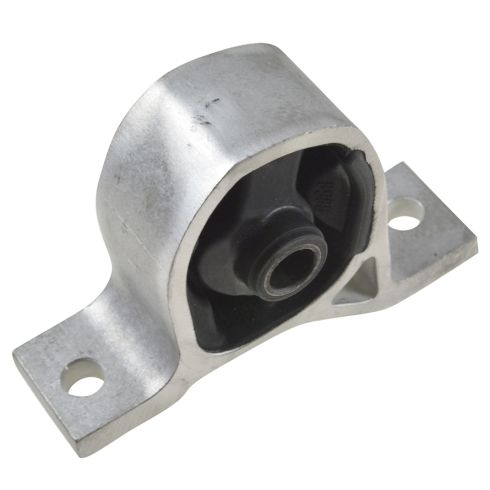
Honda Civic L4 1.7L Automatic Transmission Front Engine Mount TRQ MTA34314
Part Interchange
Brand Label
Part Number
Marmon Ride Control
A6595
DEA Products
A6595
DIY Solutions
EMT00332
Anchor
8988
Westar
EM-8988
Honda
50840S5A990
Honda
50840-S5A-990
Honda
50840S5AA81
DAI
7043
Honda
50840-S5A-A81
This item may be interchangeable with parts from other brands with the above part numbers.
This information is provided only for reference and does not guarantee that the item you are
purchasing is identical to parts with part numbers from the brands listed above.
To confirm that this item fits your vehicle, use the above "Check Vehicle Fit" option.
Lifetime Warranty
This item is backed by our limited lifetime warranty. In the event that this item should fail due to manufacturing defects during intended use, we will replace the part free of charge. This warranty covers the cost of the part only.
FREE Shipping is standard on Orders shipped to the lower 48 States (Contiguous United States). Standard shipping charges apply to Hawaii, Alaska and US Territories. Shipping is not available to Canada.
Expedited is available on checkout to the United States, excluding Alaska, Hawaii and US Territories as well as P.O. Boxes and APO/FPO/DPO addresses. Final shipping costs are available at checkout.
1A Product Review 2001-05 Honda Civic Front Engine Mount
How to Replace Front Lower Engine Mount 2001-05 Honda Civic
Created on:
Tools used
Tools used
Socket Extensions
Torque Wrench
Rust Penetrant
17mm Socket
Jack Stands
Ratchet
Floor Jack
1. Removing the Front Lower Engine Mount
Remove the 17mm bolt from the top of the motor mount
Lift and support the vehicle with jack stands
Support the engine with a jack
Remove the front 17mm motor mount bolt
Remove the 17mm bolt at the bottom of the motor mount
Lift the lower engine motor mount down and out
2. Installing the Front Lower Engine Mount
Insert the lower engine motor mount into place
Attach the bottom bolt finger tight
Hold the rear nut while lining up the front 17mm motor mount bolt
Tighten the bottom 17mm bolt
Torque the bottom bolt to 47 foot/lbs
Tighten the top 17mm bolt
Torque the motor mount bolts to 47 foot-pounds
Lower the jack
Brought to you by 1AAuto.com, your source for quality replacement parts and the best service on the Internet.
Hi, I'm Mike from 1A Auto. I hope this how-to video helps you out, and next time you need parts for your vehicle, think of 1AAuto.com. Thanks.
In this video, we're going to show you replacement of the front lower engine mount. This is a 2003 Honda Civic with the 1.7-liter VTEC motor as well as an automatic transmission. Pretty much the same for any Civic with the 1.7-liter and an automatic transmission. Items you'll need include a new lower engine mount from 1AAuto.com, 17mm socket with a ratchet and extension, jack and jack stands, torque wrench, penetrating oil.
Remove the 17mm bolt from the top of the motor mount. We're using a lift and bottle jack. You can also have your vehicle on jack stands and use a floor jack to support the engine during the repair.
Remove the front motor mount bolt with a 17mm socket. Remove the 17mm bolt at the bottom of the motor mount. You can remove the motor mount from the top of the vehicle, but since we're underneath, we're going to lift up out of the mount, bring it to the side, remove it from the car.
Here we have our old part from the vehicle and our new part from 1AAuto.com. As you can see, we have the same mounting locations both for engine into the frame. Our old motor mount is torn. Years of engine vibration, starting and stopping, can cause this type of failure. You can see our new part, nice and firm. It's going to bolt right in, direct fit.
Now we're going to put our motor mount back in, attach the bottom bolt, just finger tight until we've lined up the bolt through the rubber mount. Hold the rear nut in place while you wind up the front motor mount bolt. With the motor mount bolt in place, we can finish attaching our mount to the engine. Finish tightening the front motor mount bolt and torque to 47 foot-pounds. Install the top motor mount bolt. Torque the motor mount bolts to 47 foot-pounds. Lower the jack.
Thanks for tuning in. We hope this video helped you out. Next time you need parts for your car, please visit 1AAuto.com. Also check out our other helpful how-to and diagnosis videos.
Product Reviews
5.0/ 5
★★★★★★★★★★
1 review
5★
100%
4★
0%
3★
0%
2★
0%
1★
0%
★★★★★November 27, 2020
Cheap and Quality
looked around for other mounts but had mixed reviews from price and quality. have had zero problems with this one from 1aauto. would recommend
Showing 1–1 of 1 review
MTA34314
In Stock
Customer Q&A
Got a question about this part? Post it and get answers from our team.
No questions have been answered for this product yet.
Customer service
877-844-3393
Monday - Friday 8:00am - 9:30pm ET Saturday - Sunday 8:00am - 4:30pm ET
Ask a Question
Check Your Email
We sent a verification email to .
Click the Verify Email button in the email to submit your question.
This extra step helps prevent spam.
Select Your Vehicle
Specify your vehicle's year, make and model to guarantee fit.










 WARNING: This product can expose you to chemicals including Carbon black(airborne, unbound particles of respirable size), which is known to the State of California to cause cancer. For more information, go to www.P65Warnings.ca.gov.