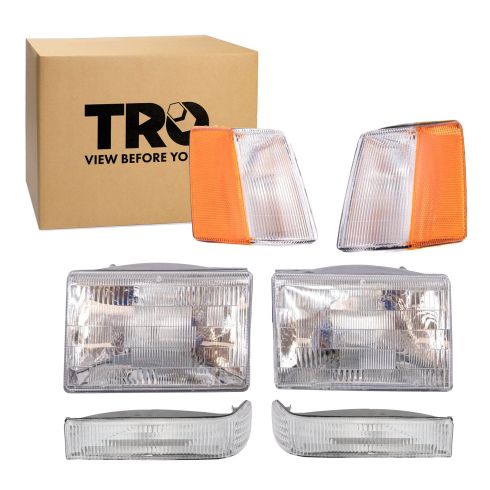
Replaces
Part Details
About TRQ:
TRQ is a trusted brand dedicated to making every repair a success story by combining premium parts with easy installation. Each TRQ part is engineered by a team of automotive experts to meet or exceed OEM standards, delivering enhanced performance and maximum longevity. With rigorous in-house testing, the brand ensures superior fit and function across every product line. TRQ also provides customers with best-in-class, step-by-step installation videos—so you can complete repairs with confidence, whether you're a first-time DIYer or an industry professional.
Assemblies may include halogen or incandescent test bulbs that should be replaced before installation.
Attention California Customers:
 WARNING: This product can expose you to chemicals including Chromium (Hexavalent Compounds), which is known to the State of California to cause cancer, and birth defects or other reproductive harm. For more information, go to www.P65Warnings.ca.gov
This part fits 1 vehicle spanning 1997-1998.
| Year | Make | Model | Description |
|---|---|---|---|
| 1997-1998 | Jeep | Grand Cherokee | Jeep Grand Cherokee 6 Piece Lighting Kit TRQ LKA55984 |
| Brand Label | Part Number |
|---|---|
| Hollander | 114-475R |
| Maxzone | 333-1508L-US |
| Hollander | 116-1098R |
| Partslink Numbering System | CH2520121 |
| Hollander | 114-00475L |
| Jeep | 55155126 |
| Eagle Eye Lights | CS026-U200L |
| Jeep | 55055118AB |
| Jeep | 56005104 |
| Hollander | 114-00475R |
| TYC | 20-3071-00-1 |
| Eagle Eye Lights | CS025-U000L |
| Jeep | 56005105 |
| Hollander | 116-01074R |
| Partslink Numbering System | CH2502104 |
| Eagle Eye Lights | CS024-B001L |
| Maxzone | 312-1638L-AF |
| TYC | 18-3117-01 |
| TYC | 20-3071-00 |
| Maxzone | 333-1109L-AS |
| Hollander | 114-475L |
| Partslink Numbering System | CH2520128 |
| Maxzone | 333-1109R-AS |
| TYC | 20-3070-00-1 |
| Hollander | 116-01098L |
| Jeep | 55155127 |
| Hollander | 116-01098R |
| Maxzone | 333-1508R-US |
| Jeep | 56005099AB |
| TYC | 12-1521-91 |
| TYC | 20-3070-00 |
| Partslink Numbering System | CH2521128 |
| Jeep | 55055119AB |
| TYC | 12-1522-91 |
| Hollander | 116-1098L |
| Jeep | 56005098AB |
| Hollander | 114-59472R |
| Partslink Numbering System | CH2521121 |
| Eagle Eye Lights | CS024-B001R |
| Partslink Numbering System | CH2503104 |
| Eagle Eye Lights | CS026-U200R |
| Hollander | 116-01074L |
| TYC | 18-3118-01 |
| Maxzone | 332-1526R-US |
| DIY Solutions | LHT03028 |
| DIY Solutions | LHT04503 |
| Hollander | 116-59410L |
| DIY Solutions | LHT04504 |
| Maxzone | 312-1186R-AF |
| Hollander | 116-00935R |
| Eagle Eye Lights | CS025-U000R |
| Mopar | 55055118AB |
| Mopar | 55055119AB |
This item may be interchangeable with parts from other brands with the above part numbers. This information is provided only for reference and does not guarantee that the item you are purchasing is identical to parts with part numbers from the brands listed above. To confirm that this item fits your vehicle, use the above "Check Vehicle Fit" option.
Lifetime Warranty
This item is backed by our limited lifetime warranty. In the event that this item should fail due to manufacturing defects during intended use, we will replace the part free of charge. This warranty covers the cost of the part only.
FREE Shipping is standard on orders shipped to the lower 48 States (Contiguous United States). Standard shipping charges apply to Hawaii and Alaska.
Shipping is not available to a P.O. Box, APO/FPO/DPO addresses, US Territories, or Canada for this item.
Expedited is available on checkout to the United States, excluding Alaska, Hawaii.
Final shipping costs are available at checkout.

Created on:
Tools used
This video is brought to you by www.1AAuto.com, your source for quality replacement parts and the best service on the internet.
Hi. My name is Mike Green. I want to help you save time and money repairing your vehicle. I have 20-plus years experience restoring and repairing cars and trucks. My company, 1A Auto, sells high quality replacement parts over the internet. In this video I'll be showing you how to install these parts. By the end of this video, you'll know how to install them and where to get them. That's going to save you time and money. Thank you and enjoy the video.
In this video, we'll be replacing these side marker lights on this 1998 Jeep Grand Cherokee. It's a very easy replacement. It only requires a number 2 Torx screwdriver. The side marker light is held in by two Torx screws and here is a close up of the first one. It's a little hard to find. It's between the side marker and the lower parking light. Here now you can see, I'm inserting my Torx driver into there and loosening up that screw. I'll loosen it in up some and then I'll actually take the top one off. The top one is just located right inside the fender right there. You'll notice I have the headlight out. You do not have to have the headlight out. Again, you don't have to have the headlight out. I was just doing another project and filming this at the same time. You can remove this marker easily without taking the headlight out. I remove that top screw, and now I am going to finish removing. The reason I did it that way is because when I pull the light out, I want to pull the screw out, too. I don't want to try and reach in there and remove that screw.
You can service the bulb at this point or replace it. Note that you do have to have the orange bulbs. To put it back in, put the screwdriver in there. Keep the screw in its location and then find that area and then start it in. I'll just start it in place and then I'll put the top one in. You always want to do it this way so you can kind of move it around loose. Get that top one started in and then I'll tighten up the bottom one and I'll tighten up the top one. That's pretty much it. Side marker lights on these are pretty easy fix.
We hope this helped you out. I wish you good luck on your Jeep Grand Cherokee project. Your source for quality replacement parts and the best service on the Internet. You call us toll-free, 888-844-3393. We're the company that's here for you on the Internet and in person.
Tools used
This video is brought to you by www.1AAuto.com your source for quality replacement parts and the best service on the internet.
Hi, I'm Mike Green. I'm one of the owners at 1A Auto. I want to help you save time and money repairing and maintaining your vehicle. I'm going to use my 20 plus years' experience, restoring and repairing cars and trucks like this to show you the correct way to install parts from 1AAuto.com. The right parts installed correctly, that's going to save you time and money. Thank you and enjoy the video.
In this video, we're going to replace the headlights on this 1998 Jeep Grand Cherokee, basically the same as all '93 to '98 Cherokees. Pretty easy, only requires a number two torques screw driver. We're going to help you switch your truck from this to that, and again pretty easy, probably about an hours' worth of time and just a number two torques screwdriver. We'll start out, going to kind of speed this up a little bit.
We're going to remove the side marker light, there's a screw there and you're going to see me use my number two torque screwdriver, remove that screw. Don't pay attention to the fact that the lights are already out, kind of shot this out of sequence. You do have to remove this side marker light first, two screws, one down there and then one up on the top. Also you'll notice that I switch from side to side because I found that the marker light on this car was broken on the other side, so I'm showing you how to remove the side marker on the left side, but how to remove the headlight on the right side.
You got your side marker, all right, and then you just basically pull the light right out and you pull pretty hard and you give it a good tug, all right. Then you can pull the other side, okay and then it comes out and then there's a little locking tab on the headlight and you pull that locking tab off and your headlight is out. Then what you want to do is you want to clean up the studs that the headlight snaps on to. You can see it's a little bit rusty, I'm going to take a wire brush and I'm going to clean that rust and any dirt and gunk off of them. You clean the surface of them and kind of in behind too.
I apologize the lighting is not the best on here. Like I said, it's a nice stiff wire brush, clean those up. Then once they're clean you're going to want to spray them with a little bit of white grease or oil or anything, just to make it easy to kind of push the headlights on there. Then you'll see up here, the clip stayed with the car, okay the new headlights come with that clip installed. For this, I'm going to actually pull that clip out of the headlight because this is how they did it at the factory.
The car came down the line, that clip helped line it up and then they pushed it on. You can always just push it on regularly if that clip comes off with your truck. First, plug in the light and then you kind of have to look down into the holes in the radiator support and line it up. Make sure both the ball and sockets are on and then you'll see me give it a good fist bump basically. You want to use a good striking blow, not just try and push it, you'll end up breaking the plastic. I'm just making sure it's lined up, I'm going to give it a good whack there and it's in place.
Now you can use the torque screw driver also to aim it if it's a little bit off. Then we're going to switch back to the other side, just show you and I'll speed this up replacing that other parking light. You get this parking light in and again don't pay attention to the fact that the headlights aren't in, kind of like I said, shot this out of sequence and putting it together for you the best I can. Basically you remove the parking light, remove the headlight, put the headlight back in and put the side marker light back in.
If all goes right, hopefully your truck will go from this to more like this. Now we hope this helped you out and we appreciate you looking, thank you very much.