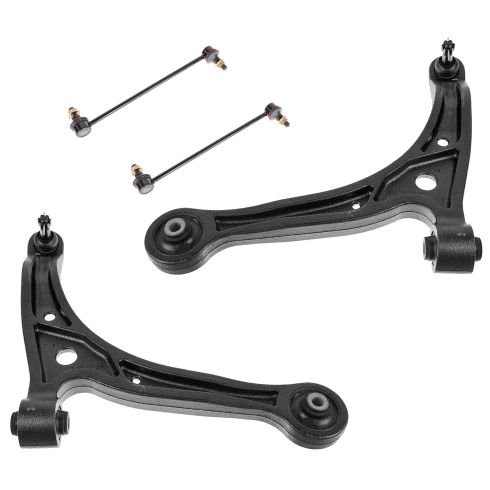
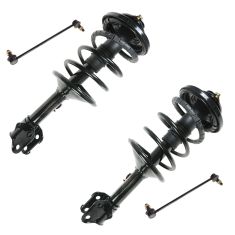
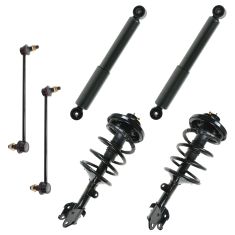
Kit Includes: (2) Front Lower Control Arms with Ball Joints (2) Front Sway Bar Links
Quantity: 4 Piece
Specification
Location
Front
TRQ suspension kits are manufactured using premium raw materials and coatings for extended service life. Each TRQ suspension component is designed to be a direct, maintenance-free replacement to the stock unit. To extend the life of your steering and suspension components, TRQ recommends replacing components in pairs, sets, or kits. All products are fit and road-tested in our Massachusetts R&D facility to ensure we deliver on our promise of Trusted Reliable Quality.
Product Features
Application Specific Design: No modifications necessary
Anti-Corrosion Coated: Enhanced surface life
Pre-greased: No additional maintenance required
Kitted for Restored Performance: Improved road-feel and handling
Our steering and suspension components are pre-greased and sealed for long life and do not require the extra maintenance typically required by greaseable versions.
Item Condition:New
Attention California Customers:
WARNING: This product can expose you to chemicals including Lead and Lead Compounds, which are known to the State of California to cause cancer, and birth defects or other reproductive harm. For more information, go to www.P65Warnings.ca.gov.
Lifetime Warranty
This item is backed by our limited lifetime warranty. In the event that this item should fail due to manufacturing defects during intended use, we will replace the part free of charge. This warranty covers the cost of the part only.
FREE Shipping is standard on orders shipped to the lower 48 States (Contiguous United States). Standard shipping charges apply to Hawaii and Alaska.
Shipping is not available to a P.O. Box, APO/FPO/DPO addresses, US Territories, or Canada for this item.
Expedited is available on checkout to the United States, excluding Alaska, Hawaii.
Final shipping costs are available at checkout.
How to Replace Front Sway Bar Link 2003-05 Honda Pilot
How to Replace Sway Bar Link 1999-2004 Honda Odyssey
How to Replace Control Arm with Ball Joint 1999-2004 Honda Odyssey
Created on:
Tools used
A Piece of Pipe (for leverage)
Torque Wrench
17mm Wrench
Rust Penetrant
17mm Socket
Jack Stands
19mm Wrench
19mm Socket
Ratchet
Wire Brush
Floor Jack
1. Removing the Wheel
Loosen the 19mm lug nuts with the vehicle on the ground
Raise the vehicle with a floor jack
Secure the vehicle on jack stands
Remove the lug nuts
Pull off the wheel
2. Removing the Stabilizer Link
Hold the upper stabilizer link stud with a 19mm wrench
Remove the upper nut from the stabilizer link with a 17mm socket and ratchet
Hold the lower stabilizer link stud with a 19mm wrench
Remove the lower nut from the stabilizer link with a 17mm socket and ratchet
Pull off the stabilizer link
3. Reinstalling the Stabilizer Link
Push the stabilizer link into place
Start the 17mm nuts by hand
Hold the upper stabilizer link stud with a 19mm wrench
Fasten the upper nut onto the stabilizer link with a 17mm wrench
Hold the lower stabilizer link stud with a 19mm wrench
Fasten the lower nut onto the stabilizer link with a 17mm wrench
4. Reattaching the Wheel
Slide the wheel into place
Start the lug nuts by hand
Tighten the lug nuts preliminarily
Lower the vehicle to the ground
Tighten the lug nuts to 100 foot-pounds in a crossing or star pattern
Brought to you by 1AAuto.com, your source for quality replacement parts and the best service on the Internet.
Hi, I'm Mike from 1A Auto. I hope this how-to video helps you out, and next time you need parts for your vehicle, think of 1AAuto.com. Thanks.
In this video, we're going to show you how to replace the front stabilizer bar links on this 2003 Honda Pilot. It's pretty much the same for any 2003 to 2008 Pilot as well as the Acura MDX. We're going to show you on one side, but both sides are the same procedure.
For this repair you'll need new stabilizer links from 1AAuto.com, jack and jack stands, 17mm to 19mm sockets and a ratchet, a pipe breaker bar or pipe for some extra leverage, 19mm wrench, wire brush, penetrating oil, and if you want to do it the way the pros do it, they usually just either torch and cut them off or use a reciprocating saw and cut them off to save themselves a little bit of time. But you can easily get them off with regular hands tools.
A tell-tale sign of bad stabilizer links is a rattling sound that actually will go away when you're going around small, slight curves. You can reach in with your wheel turned, grab a hold of the stabilizer link, and try and shake and pull on it. If you can get it to make noise or feel play in it, then you know you need to replace them. Lug nuts are 19mm so use a 19mm socket and ratchet, or you can always use your lug wrench as well. Loosen up the lug nuts with the vehicle on the ground, then raise and secure the vehicle, remove the lug nuts the rest of the way as well as the wheel and tire.
The top, the stabilizer link connects to the strut. Wire brush, clean off any of the dirt and stuff from the stud part of the stabilizer links. Just helps. Then you'll probably want to spray it down with some penetrating oil. These are 17mm bolts on the originals. I'm sorry, they're 17mm nuts. Put a 17mm socket on there, make sure it goes on well. Then I'm going to use a ratchet and I'm going to use a piece of pipe as well to give me some extra leverage to loosen up the nut.
Now I'll put a 19mm wrench on the backside. There's a nut that you can hold onto. You can see that wrench is going to start moving, so I'll get it up and get the strut to hold it for me, and then loosen up that nut. The nuts have nylon locks on them, so they tend to come out a little bit, and then the locks will engage and it will stop turning, so you actually tighten it back up and spray it down with some rust penetrant. After a few rounds of doing that, they usually come right off. This is usually what the professionals avoid with the use of a torch or reciprocating saw. Do the same thing for the lower part and remove the stabilizer link.
Installation is a pretty simple reverse of the procedure. Put the link back in place, put the nuts on, use a wrench to hold the backside and tighten them up. When you tighten them up, you want to just tighten them up nice and tight. They don't really need to be torqued or anything, they just need to be good and tight. If your links are greaseable, be sure to give them a few shots of grease.
Once you have the links replaced, then reinstall your tire. Lug nuts on by hand first. Make sure you don't cross thread them. Tighten them up preliminarily with the vehicle in the air. Then let the vehicle down and make sure you torque those lug nuts to 100 foot pounds each.
Thanks for tuning in. We hope this video helped you out. Next time you need parts for your car, please visit 1AAuto.com. Also check out our other helpful how-to and diagnosis videos.
Tools used
Torque Wrench
Rust Penetrant
18mm Wrench
Jack Stands
18mm Socket
Ratchet
Floor Jack
1/2 Inch Breaker Bar
1. Removing the Wheel
Loosen the lug nuts with the vehicle on the ground
Raise the vehicle with a floor jack
Secure the vehicle on jack stands
Remove the lug nuts
Pull off the wheel
If the wheel is frozen in place, kick the tire to loosen it
2. Removing the Stabilizer Link
Apply penetrating oil to the stabilizer link bolts
Attach an 18mm wrench to the back of the top stabilizer link bolt
Remove the top 18mm nut with a socket and ratchet
Pull out the top stabilizer link stud
Attach an 18mm wrench to the back of the bottom stabilizer link bolt
Remove the bottom 18mm nut with a second 18mm wrench
Pull out the stabilizer link
3. Installing the New Stabilizer Link
Push the lower stabilizer link stud into place
Push the upper stabilizer link stud into place
Start the two 18mm nuts
Tighten the nuts to between 55 - 60 foot-pounds of torque
4. Reattaching the Wheel
Slide the wheel into place
Start the lug nuts by hand
Tighten the lug nuts preliminarily
Lower the vehicle to the ground
Tighten the lug nuts to between 95 - 100 foot-pounds in a crossing or star pattern
Brought to you by 1AAuto.com, your source for quality replacement parts and the best service on the Internet.
Hi, I'm Mike from 1A Auto. I hope this how-to video helps you out, and next time you need parts for your vehicle, think of 1AAuto.com. Thanks.
In this video we're going to show you how to replace the front stabilizer link or one of the front stabilizer links. We show you the passenger's side and the driver's side is the same procedure. With stabilizer links, you'll hear a rattling and sometimes you'll know that it's a stabilizer link if you enter a slight curve and then the rattling stops. That's usually a good sign that the stabilizer link is bad. What you'll need is a new stabilizer link from 1A Auto. If you're going to replace one, it's probably a good idea just to replace just them both. Usually if one is getting worn out, the other one is getting ready to go. Jack and jack stands, I did put a star. You can do this without jacking the vehicle up but it does make it quite a bit more difficult just to get in there in the angles and stuff. You'll need two 18mm wrenches and you'll need an 18mm socket and ratchet and some penetrating oil.
As you can see here, I've got the vehicle raised up and I'm removing the lug nuts with my impact wrench. If you don't have an impact wrench, you want to start with the vehicle on the ground. Loosen the lug nuts with a 19mm socket and breaker bar or your tire iron. Then raise and support the vehicle and remove the lug nuts and wheel the rest of the way. You can see here I'm kicking the tire. That's basically just a way . if your tire or your wheel is a little bit frozen on because of the aluminum, just give it some good kicks and break it loose and then you can remove the tire.
We're going to start by putting some lubricant on the ends of the bolts so that the nuts actually come off from the front and the back side. We have an 18mm wrench and an 18mm socket to the top of the end link. The 18-mm wrench goes on the back; the socket goes on the front and then you've just got to use your muscles to tear it apart. I'm just going to speed up here as we remove that nut the rest of the way. Now, we can just pull the end link out. Once we remove the end link from the strut, you can go down to the bottom and you can start working on the bottom bolt. On the bottom of the end link there's not enough room to get a big ratchet like this in, so you have to use a wrench on both sides. Ideally a ratcheting wrench would be great but when in a pinch, you can just use two regular wrenches. Put an 18mm on one side and an 18mm on the other just like the top and you just break it loose. Unfortunately there is really no easier way. You just go 1/16 to 1/8 of a turn at a time, and eventually you get that nut off.
We'll put the bottom one in first. I'm just going to speed it up here as I tighten up those two nuts. They should be tightened up to around 55 to 60 foot-pounds but you don't have to torque them. This is not an integral component. Just as long as you get them nice and tight with the wrenches or the socket and ratchet. Put your wheel back on and start all your lug nuts just by hand first, and then, while the vehicle is still in the air, just preliminarily tighten them with your socket and ratchet or as I'm doing, with my impact wrench. Now, again, use your torque wrench and you want to tighten your lug nuts between 95 and 100 foot-pounds and use a star pattern as you tighten.
We hope this video helps you out. Brought to you by www.1AAuto.com, your source for quality replacement parts and the best service on the Internet. Please feel free to call us toll-free, 888-844-3393. We're the company that's here for you on the Internet and in person.
Tools used
Pickle Fork
A Piece of Pipe (for leverage)
Hammer
17mm Wrench
Rust Penetrant
Pry Bar
18mm Wrench
Jack Stands
19mm Socket
Ratchet
1/2 Inch Breaker Bar
Pick
1. Separating the Control Arm from the Knuckle
Loosen the lug nuts.
Lift the car, and remove the lug nuts the rest of the way.
Using pliers and a pick remove the ball joint pin.
Spray penetrating oil on the ball joint nut.
Using a wrench remove the ball joint nut.
Put the nut back on partially.
Use a ball joint fork and separate the ball joint from the lower control arm.
Remove the nut.
Pry the lower control arm out of the knuckle.
2. Removing the Control Arm
Spray the bolts on the control arm with penetrating oil.
Remove the two bolts from the control arm.
Pull the control arm down and out.
3. Replacing the Control Arm
Replace the rear bolt partially.
Rotate the control arm into place and push the ball joint into the knuckle.
Pry the control arm up to align the holes and replace the bolt.
Replace the ball joint nut.
Replace the pin.
Jack up the ball joint end of the control arm until all the support is on the suspension.
Torque the control arm bolts to 90 – 95ft/lbs.
Lower the control arm jack.
Put the wheel in place and replace the lug nuts.
Lower the vehicle and torque the lug nuts to 95 – 100ft/lbs. in a crossing pattern.
Brought to you by 1AAuto.com, your source for quality auto replacement parts and the bets service on the internet.
Hi, this is Mike from 1A Auto. I hope this how to video helps you out. Next time you need parts for your vehicle, think of 1AAuto.com. In this video, we'll show you how to repair or replace the front control arms. We're going to show you the passenger side. The driver side is the same procedure. Usually these, you really won't know if they were out. A lot of times it will come up in the yearly inspection but some symptoms of bad control arms are just kind of spongy steering or hearing kind of a knocking or clanking sound when you steer back and forth, right to left. We're doing this on a 2003 Odyssey, same as a '99 to '04 Odyssey.
You'll need new control arm or control arms from 1AAuto.com, jack and jack stands, 19mm socket and ratchet. You'll need a breaker bar or a pipe for some extra leverage, 17mm and 18mm wrenches, a ball joint or sometimes called pickle fork, a hammer and some penetrating oil. Okay, as you can see here, I've got the vehicle raised up and the lug nuts with my impact wrench. If you don't have an impact wrench, you want to start the vehicle on the ground, loosen the lug nuts with a 19mm socket and breaker bar or your tire iron then raise and support the vehicle and remove the lug nuts and wheel the rest of the way. You can see here I'm kicking the tire. That's basically just the way if your tire or your wheel is a little bit frozen on because of the aluminum. Just give it some good kicks and break it loose and then you can remove the tire.
Using pliers and a small pick or a screwdriver, I'll remove the pin that holds the ball joint nut. We're going to attach two wrenches together to get a little extra force on this and you can see, it works. I'm going to speed up here as Jeremy just takes that nut all the way off. That nut is generally a 17mm, it can be an 18mm though as well. Once the nut is off, I actually like to put it back on again, a few threads just because we're going to be breaking these two separate from each other and I don't like anything to happen to suddenly. If you have the nut on there, it keeps anything from getting crazy over here. This is an air activated pickle fork. They sell them to be used with a hammer as well. The hammer ones you just put right here then you hit on the end with a hammer. This one like I said is air activated so it's powered by air. Just put it right in here. As you can see, it separates the ball point.
Now, we'll grab a pry bar, put through in the lower control arm and pry it down. Take the nut off of the lower ball joint. Hopefully when it try it out enough, pull it out of the knuckle. Spray the bolts the best you can with some penetrating oil. There's two bolts that hold the control arm to the frame of the vehicle. Now, both of the control arm bolts are 19mm. You'll want to use a ratchet with a pipe on it because it's going to be pretty tight. Or maybe not. I'm going to speed it up here as we just remove that bolt the rest of the way. As it comes out, you'll probably have to keep spinning it with your wrench and kind of pull on it to get it out the whole way. Same thing with this one, just speed it up as the bolt is removed.
As you can see, the new one versus the old one. They look identical for all intents and purposes. New one have a nice coating on it. New ball joint, new bushings and it obviously fits the same way. Put the rear of the control arm in first. Then place the bolt in. Just install a couple of threads there while we rotate the arm into place. You can get the ball joint in too. Then your front bolts. You're going to need some messing with a pry bar. You can put the nut on the ball joint now. Using the original nut, it has the grove in it so the clip will fit a lot better. We'll tighten this down. Make sure that the pin will slide through the castle nut. I think we're pretty close. Now, you just push down and wiggle it, make sure it's tight. Now, just tighten those two main bolts until they start to sit. Now, before tightening these bolts, I'm putting a jack underneath the ball joint end of the control arm and basically jacking it up until the van starts raising off the lift a little bit. That means I have full support on the suspension and you want to tighten up those bolts with all the support on the suspension.
This should be torqued to around 90 to 95 foot pounds. This one should be the same. Okay, now you can let the suspension down off the jack and put your wheel and tire back on, start the lug nuts by hand first and just kind of tighten them up preliminarily before you put the vehicle down on the ground. Now again, use your torque wrench and you want to tighten up your lug nuts between 95 and 100 foot pounds and use a start pattern as you tighten.
We hope this helps you out. Brought to you by www.1AAuto.com, your source for quality auto replacement parts and the bets service on the internet. Please feel free to call us toll-free, 888-844-3393. We're the company that's here for you on the internet and in person.
PSA56460
In Stock
Product Reviews
Loading reviews
4.50/ 5.06
6 reviews
5 Stars
4 Stars
3 Stars
2 Stars
1 Star
5
0
0
1
0
Suspension parts
Fernando
November 27, 2017
I would recommend this. Product . The price is very low an quality is good.
This was a perfect match. After reviewing the video it was very easy to replace.
Thank you so much. Now my vehecle will pass inspection
Excellent suplier ++++++++
Zbigniew
November 28, 2017
Parts was install by professional, certify mechanic. Alighment was set and so far I have no problems with it. I will highly recommend Your bussines. Robert from Staten Island NY
Worst packaging ever!!
jeff
July 23, 2019
Heavy control arms with sway bar links put in a big box with some light air filled bags and wrapped with single layer low duty tape. Box arrived with gaping holes and bandaid tape job from ups which didnt have a chance with such heavy non secure items. Control arms had ball joints. Hard to tell if they were compromised or not banging around in the loose packaging.
Good quality parts
J
September 10, 2019
I was impressed that they packed it well. Heavy parts and nothing broke out of the box. Came with new pins and nuts for the End Links. Only one complaint is that the nuts for the end links were larger than the stock nuts. But everything fit perfectly. I hope I dont have to buy these parts for a long time. But I will differently being more parts from 1aauto.com
Thank you
susan
November 14, 2021
Excellent product fits perfectly on my honda odyssey 03 thank you
Ching
October 17, 2023
Very good
Customer Q&A
No questions have been asked about this item.
Customer service
877-844-3393
Monday - Friday 8:00am - 9:30pm ET Saturday - Sunday 8:00am - 4:30pm ET
Honda is a registered trademark of Honda Motor Co., Ltd. 1A Auto is not affiliated with or sponsored by Honda or Honda Motor Co., Ltd.See all trademarks.
Enter Vehicle Year Make Model
Specify your vehicle's year, make and model to guarantee fit.
Year
Make
Model
Options
Drivetrain
This part doesn’t fit a . Select from parts that fit.