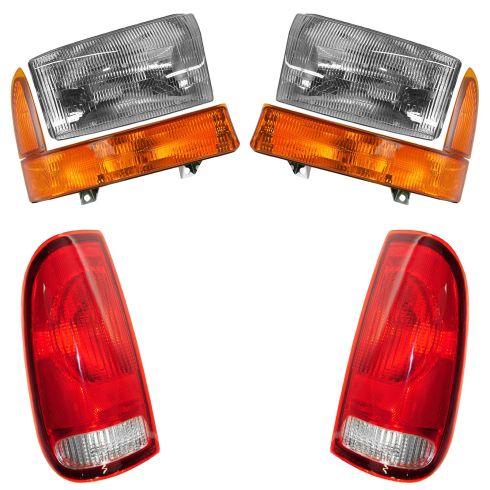
Complete Repair in One Purchase - Stop searching for parts individually and complete your repair with a customized kit or set from DIY Solutions.
High-Quality Parts from Trusted Brands - DIY Solutions' kits and sets are selected from the best automotive brands and include hard-to-find and even obsolete parts you may need for your vehicle.
Guaranteed Fit - DIY Solutions ensures its selected parts are quality-tested to guarantee fit and function.
Assemblies may include halogen or incandescent test bulbs that should be replaced before installation.
Features and Benefits
Direct Fit - No vehicle or wiring modification necessary
DOT, SAE, and FMVSS Compliant - Meets on-road use regulations
Matching set for a restored look
Item Condition:New
Attention California Customers:
WARNING: This product can expose you to chemicals including Chromium (Hexavalent Compounds), which is known to the State of California to cause cancer, and birth defects or other reproductive harm. For more information, go to www.P65Warnings.ca.gov
Lifetime Warranty
This item is backed by our limited lifetime warranty. In the event that this item should fail due to manufacturing defects during intended use, we will replace the part free of charge. This warranty covers the cost of the part only.
FREE Shipping is standard on orders shipped to the lower 48 States (Contiguous United States). Standard shipping charges apply to Hawaii and Alaska.
Shipping is not available to a P.O. Box, APO/FPO/DPO addresses, US Territories, or Canada for this item.
Expedited is available on checkout to the United States, excluding Alaska, Hawaii.
Final shipping costs are available at checkout.
How to Replace Tail Lights 1999-2007 Ford F250 Super Duty
How to Replace Headlights 1999-2004 Ford F250 Super Duty
Created on:
Tools used
8mm Socket
Ratchet
1. Removing the Taillight Assembly
Remove the two 8mm bolts on the side of the taillight.
Pull the taillight down and out.
Twist the sockets out.
2. Replacing the Bulbs
Pull the bulb out.
Push the new bulb into place.
3. Replacing the Taillight Assembly
Twist the sockets into the new taillight assembly.
Line up the taillight and push it into place.
Replace the two 8mm bolts on the side of the taillight.
Brought to you by 1AAuto.com, your source for quality replacement parts and the best service on the internet.
In this video we're going to show you how to remove and reinstall the taillight, whether you need to replace a broken taillight or you're just looking to replace a bulb. We're working here on a 2003 F250, same as any super duty truck of this era. The only tool you'll need is an 8mm wrench or socket with ratchet.
Okay, pretty straight forward. On the backside here there's two bolts that you need to remove. These bolts are 8mm. Speed it up here as I use an 8mm socket with a ratchet to remove those two bolts. Okay, once you have those bolts out pull down. The bulbs twist counterclockwise to disconnect. To service the bulb just pull it out, push it back in. The same up here. The new taillight from 1A Auto, if your taillight loses a battle with a 2x4 or fire wood, which happens on my truck a lot get a nice new light from 1A Auto. It goes right in. Everything goes right together. There are a couple line-up tabs. You just kind of want to get the bulbs in. Watch those line-up tabs. Get them in place.
Okay, we'll speed it up here as I put those two 8mm bolts back in. When you tighten them up you don't want to over tighten them, because you are just tightening speed screws into plastic, so make them firm but not too tight.
We hope this helps you out. Brought to you by www.1AAuto.com, your source for quality replacement parts and the best service on the internet. Please feel free to call us toll free, 888-844-3393. We're the company that's here for you on the internet and in person.
Tools used
Phillips Head Screwdriver
Bent Tipped Awl
Flashlight
1. Changing the Headlight Bulbs
Reach in to the back of the light and twist the ring counter clockwise
Pull it off to pull the bulb out
Hold the collar back and pull the bulb free
Push a new bulb in and snap it back into the ring
Push the bulb back into the assembly and twist clockwise
2. Removing the Headlight Assembly
Use an awl to pull the arms out and up on the side of the tabs holding in the headlight
Hook the awl into the top of the clip and force it up and out. Repeat on the other side of the light
Remove the clip down past the headlight wiring harness. Remove the clip by pressing in the wings on either side
Pull the headlight out
Disconnect the harnesses to free the light
3. Installing the New Headlights
Adjust the lower clip to match the clip on the old headlight
Measure the top adjustors to make sure they are the same distance from the light
Reconnect the light harnesses
Line up the light and push it in to connect it
Push the clips on the back, back into place
4. Adjusting the Headlight
Set the light to your states standards
The right Phillips screw adjusts the light left to right
The left Phillips screw adjusts the light up and down
Brought to 1AAuto.com. Your source for quality replacement parts and the best service on the internet. Hi, I am Mike Green. I am one of the owners of 1A Auto. I want to help you save time and money repairing and maintaining your vehicle. I am going to use my 20-plus years experience restoring and repairing cars and trucks like this to show you the correct way to install parts from 1A Auto. The right parts installed correctly, that is going to save you time and money. Thank you and enjoy the video.
In this video we are going to show you how to replace the headlight on this Ford F-250. The first couple minutes we'll just deal with if you're just replacing the bulb. Then after that we go into how to change the whole headlight assembly. The headlights on these trucks get faded, cloudy, and yellow quite a bit. So they're a pretty popular reinstallation item. The only tools you'll need a bent-tipped awl and a Phillips screwdriver.
Okay. To change your light bulb, you want to come in behind and you can see the back of the light bulb with that ring around it. Reach in, turn that ring counterclockwise. Okay here you can see close-up better angle, this is what you are reaching for. You turn this counter clockwise, pull it off. Then you kind of have to use it to kind of shake your headlight up and down and then bring it out.
Right up here pull the collar back. Just use a screwdriver, kind of force that off. There is your bulb disconnected. Reconnect, just put the bulb in, push the harness together, Then pull that back to just make sure that is connected correctly. When putting the bulb back in you want to look right here you can see there is kind of a slot right on top of the housing. That lines up with the slot on the bulb and push together and lock your ring on.
Okay. To remove all these headlights you're first going to have to pull two tabs up. One here and one here. Okay, so here is the back of the headlight. So the clips go right down on here. So you can see that they hold on a couple different ways. You can see that these arms curl in to lock into these slots. So that's why you put this down in there, lock this in. Then pull on it up to try to get those right out of those slots. Okay, and it's also shaped, it has a little. It's got almost a little ridge right here. That's why you have to kind of pry back and then up and out to get these off.
So now I am going to go back to these clips here. Take my bent tipped awl and put it in, pull out, and up. Then go down to the other side pull out, then twist out, and up. Okay. Now notice I have a glove on. What I am going to do is hook my awl into that slot at top. I'm going to pry this way which forces the clip out away from the truck, and I am going to put my glove on top of the clip as well just to kind of hold it in place. So that when I pull it out it stays on my awl. Do the same thing for this side. Use a flashlight. Pull up on one side. Hook it into the other side. Pull up on that side, put my awl down in there, get your fingernail down in there. Push out and pull up, and there is my other clip out.
Okay the next part of this is a bit difficult to film, but right down in here is the headlight. Down a little further, my hand gets in the way, down a little further you could see another little clip poking through the fender. Okay looking at my new light, it has this right here and it has a couple little wings on it. These squeeze actually pretty easy. So what you want to do is reach down in there, kind of give these and squeeze while you pull out.
Okay so I reach down in. You'll probably squeeze them one at a time. Squeeze the top or the bottom with your fingernail or take a small screwdriver with you. Then it releases and then you can pull the headlight out. Take that off then pull the bulb right out. Then disconnect the harness. Here's the light that was in the truck, new light from 1A Auto. Lights from 1A Auto, they are just like the original. They are going to shine. They're DOT approved. One thing you want to do before you go to put them in, is you see here, this is an adjuster and you can see the length between there and there. On my one - one that was in the truck the length is much shorter here. So I am going to adjust this to match that. I am also going to do the same thing at the top here and with this one here. So I am just going to make the adjusters the new light match the old light. With the one exception being, you can see that the design of this mount is a little different than the original. So that adjuster, I am going to actually measure the distance between the light and the adjuster and make them the same.
Here's my new light. I am going to plug in my bulb and make sure this adjuster goes back into the slot where its supposed to be. See that's going right into that hole and that's going to go right into that hole. Push the bottom in to lock it and the tops are in. Now I am going to put my clip down in carefully. Push back on the light some. Get it started. So this one I am going to use my bent tipped awl just so I don't drop it. Put it down in, get it started, push the light in. Just use my Phillips screwdriver here to try to push these clips all the way down on. Then the lights all set.
Okay to adjust your headlight, this screw here adjusts your light left to right. If you look at the line down here, as I go counter clockwise light goes in, clockwise light goes out. Then the other screw is way down in here, right in here. Counter clockwise light goes down, clockwise light comes up.
We hope this video helps you out. Brought to you by www.1AAuto.com Your source for quality replacement parts and best service on the internet. Please feel free to call us toll free at 888-844-3393. We're the company that is here for you on the internet and in person.
Product Reviews
Loading reviews
4.89/ 5.09
9 reviews
5 Stars
4 Stars
3 Stars
2 Stars
1 Star
8
1
0
0
0
Great parts
Lucas
September 16, 2018
Came with light bulbs! Pleasant surprise. Installed easily, good fit.
B
March 8, 2019
Great parts and fast service!
Awesome buying Avenue
C
March 17, 2019
I was looking for a complete lens kit for my 99 F250 Sd. Comparable sets were as high as $599, mine was less than half of those and shipped in a few days
Looks great, fits great, packed well
J
November 23, 2020
I've wrenched quite a bit, and these headlights were humbling to remove. Getting the clips loose was quite challenging, the trick there is to lift from far bottom, not the tab. The tabs are very brittle and break.
There is no space to get your hand in there to pinch the tabs, and sockets, pipe, or whatever doesn't pinch down well enough to remove, and the shape of the headlights is difficult to grab.
Once you realize that "Hey!, I've got new ones" a long skinny chisel was able to clip them and get busy installing the new ones.
The thing I have to say about installation is that the plastic adjusters are positioned all the way out. Do yourself a favor and look at the original headlight, and match the length BEFORE you install them. There is no way to grab anything as the adjuster screw is buried inside the plastic nut. You must run the screw out-In my case the headlight was positioned about an inch past the fender and I had to take the headlight out again and run the screw out
Brent
July 25, 2021
Good quality set up . The fit of the turn lights assembly in the passengers side was not quite flush withe the head light, but it is ok. Lights are a BIG improvement over the yellowed oem on the truck. Install was simple after watching the video.
Lights
Greg
September 21, 2021
They fit just like oem mans look great!
david
November 19, 2021
Very good Im pleased
Scott
February 9, 2023
Fit just right.
Very good match with OEM.
C
June 17, 2024
Only installed the taillights so far. They look great! Starting on the headlights today.
Customer Q&A
Do they come with bulbs?April 8, 2022
John D
10
New light bulbs are not included with this assembly. Occasionally, manufacturers leave test bulbs in the lights. If you receive test bulbs, you'll want to replace them with your original bulbs or with new bulbs.
April 8, 2022
Cristina P
10
Yes they came with bulbs.
April 9, 2022
R O
Customer service
877-844-3393
Monday - Friday 8:00am - 9:30pm ET Saturday - Sunday 8:00am - 4:30pm ET
Ford is a registered trademark of Ford Motor Company. 1A Auto is not affiliated with or sponsored by Ford or Ford Motor Company.See all trademarks.
Enter Vehicle Year Make Model
Specify your vehicle's year, make and model to guarantee fit.
Year
Make
Model
Options
Drivetrain
This part doesn’t fit a . Select from parts that fit.